Creative Woodworks & crafts 2003-04, страница 53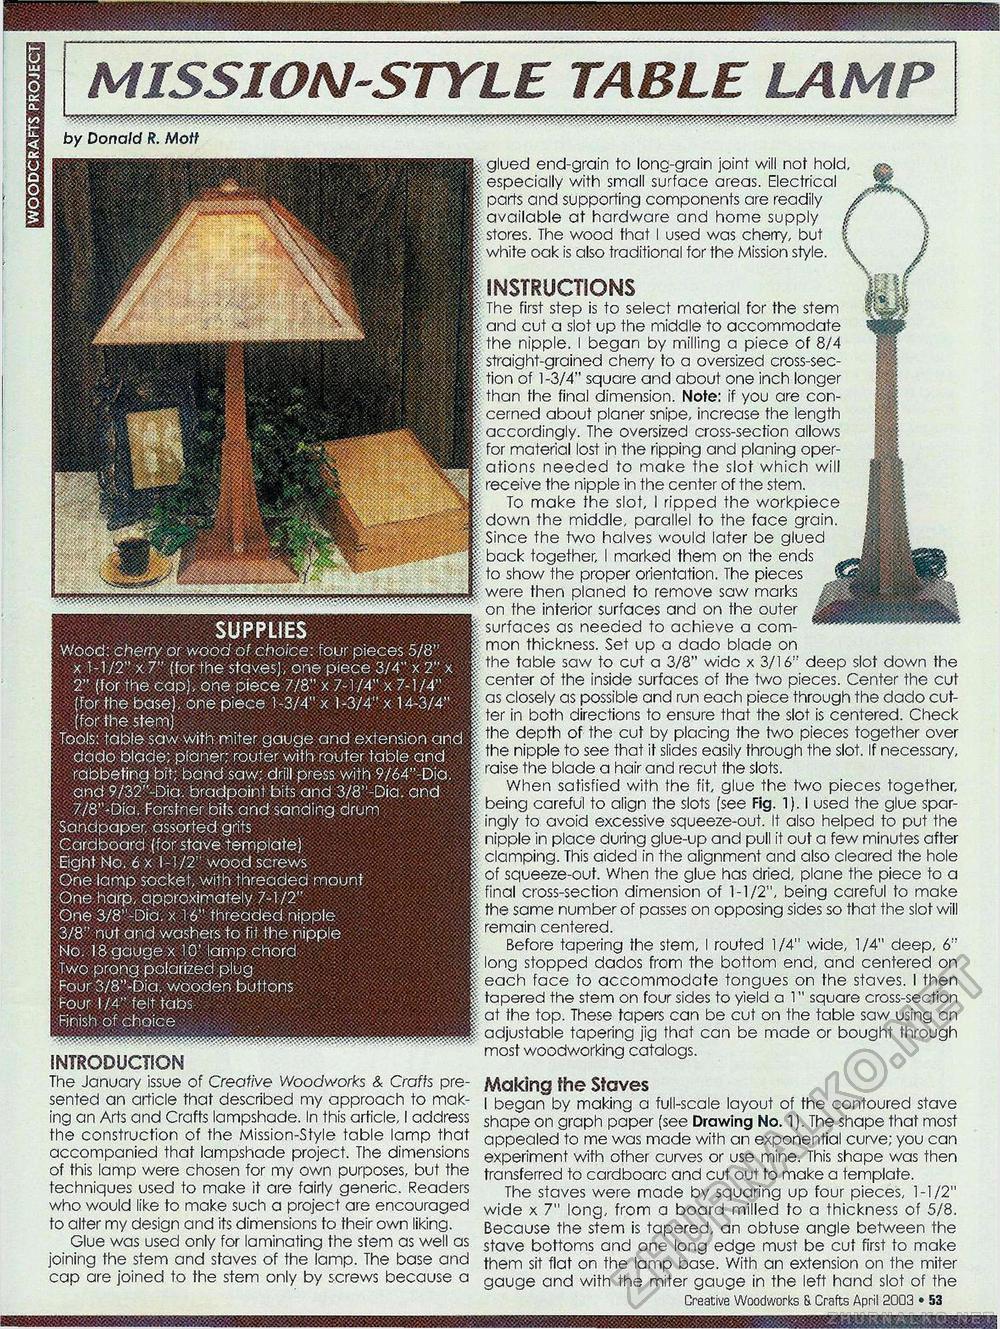
MISSION-STYLE TABLE LAMP by Donald R. Mott SUPPLIES Wood: cherry or wood of choice: four pieces 5/8" x 1-1/2" x 7" (for the staves), one piece 3/4" x 2" x 2" (for the cap), one piece 7/8" x 7-1 /4" x 7-1 /4" (for the base), one piece 1-3/4" x 1-3/4" x 14-3/4" . (for the stem) Tools: table saw with miter gauge and extension and dado blade; planer; router with router table and rabbeting bit; band saw; drill press with 9/64"-Dia. and 9/32"-Dia. bradpoint bits and 3/8"-Dia. and 7/8"-Dia. Forstner bits and sanding drum Sandpaper, assorted grits Cardboard (for stave template) Eight No. 6 x 1-1/2" wood screws One lamp socket, wilh threaded mount. One harp, approximately 7-1/2" One 3/8"-Dia. x 16" threaded nipple 3/8" nut and washers to fit the nipple No. 18 gauge x 10' lamp chord Two prong polarized plug Four 3/8"-Dia. wooden buttons Four 1/4" felt tabs Finish of choice INTRODUCTION The January issue of Creative Woodworks & Crafts presented an article that described my approach to making an Arts and Crafts lampshade. In this article, 1 address the construction of the Mission-Style table lamp that accompanied that lampshade project. The dimensions of this lamp were chosen for my own purposes, but the techniques used to make it are fairly generic. Readers who would like to make such a project are encouraged to alter my design and its dimensions to their own liking. Glue was used only for laminating the stem as well as joining the stem and staves of the lamp. The base and cap are joined to the stem only by screws because a glued end-grain to long-grain joint will not hold especially with small surface areas. Electrical parts and supporting components are readily available at hardware and home supply stores. The wood that I used was cherry, but t I white oak is also traditional for the Mission style. INSTRUCTIONS The first step is to select material for the stem and cut a slot up the middle to accommodate the nipple. I began by milling a piece of 8/4 straight-grained cherry to a oversized cross-sec-tion of 1-3/4" square and about one inch longer than the final dimension. Note: if you are concerned about planer snipe, increase the length accordingly. The oversized cross-section allows for material lost in the ripping and planing operations needed to make the slot which will receive the nipple in the center of the stem. To make the slot, I ripped the workpiece down the middle, parallel to the face grain. Since the two halves would later be glued back together, I marked them on the ends to show the proper orientation. The pieces were then planed to remove saw marks on the interior surfaces and on the outer surfaces as needed to achieve a common thickness. Set up a dado blade on the table saw to cut a 3/8" wide x 3/16" deep slot down the center of the inside surfaces of the two pieces. Center the cut as closely as possible and run each piece through the dado cutter in both directions to ensure that the slot is centered. Check the depth of the cut by placing the two pieces together over the nipple to see that it slides easily through the slot. If necessary, raise the blade a hair and recut the slots. When satisfied with the fit, glue the two pieces together, being careful to align the slots (see Fig. 1). I used the glue sparingly to avoid excessive squeeze-out. It also helped to put the nipple in place during glue-up and pull it out a few minutes after clamping. This aided in the alignment and also cleared the hole of squeeze-out. When the glue has dried, plane the piece to a final cross-section dimension of 1-1/2", being careful to make the same number of passes on opposing sides so that the slot will remain centered. Before tapering the stem, I routed 1/4" wide, 1/4" deep, 6" long stopped dados from the bottom end, and centered on each face to accommodate tongues on the staves. 1 then tapered the stem on four sides to yield a 1" square cross-section at the top. These tapers can be cut on the table saw using an adjustable tapering jig that can be made or bought through most woodworking catalogs. Making the Staves I began by making a full-scale layout of the contoured stave shape on graph paper (see Drawing No. 1). The shape that most appealed to me was made with an exponential curve; you can experiment with other curves or use mine. This shape was then transferred to cardboarc and cut out to make a template. The staves were made by squaring up four pieces, 1-1/2" wide x 7" long, from a board milled to a thickness of 5/8. Because the stem is tapered, an obtuse angle between the stave bottoms and one long edge must be cut first to make them sit flat on the lamp base. With an extension on the miter gauge and with the miter gauge in the left hand slot of the Creative Woodworks & Crafts April 2003 • 53 |


