Creative Woodworks & crafts 2004-01, страница 43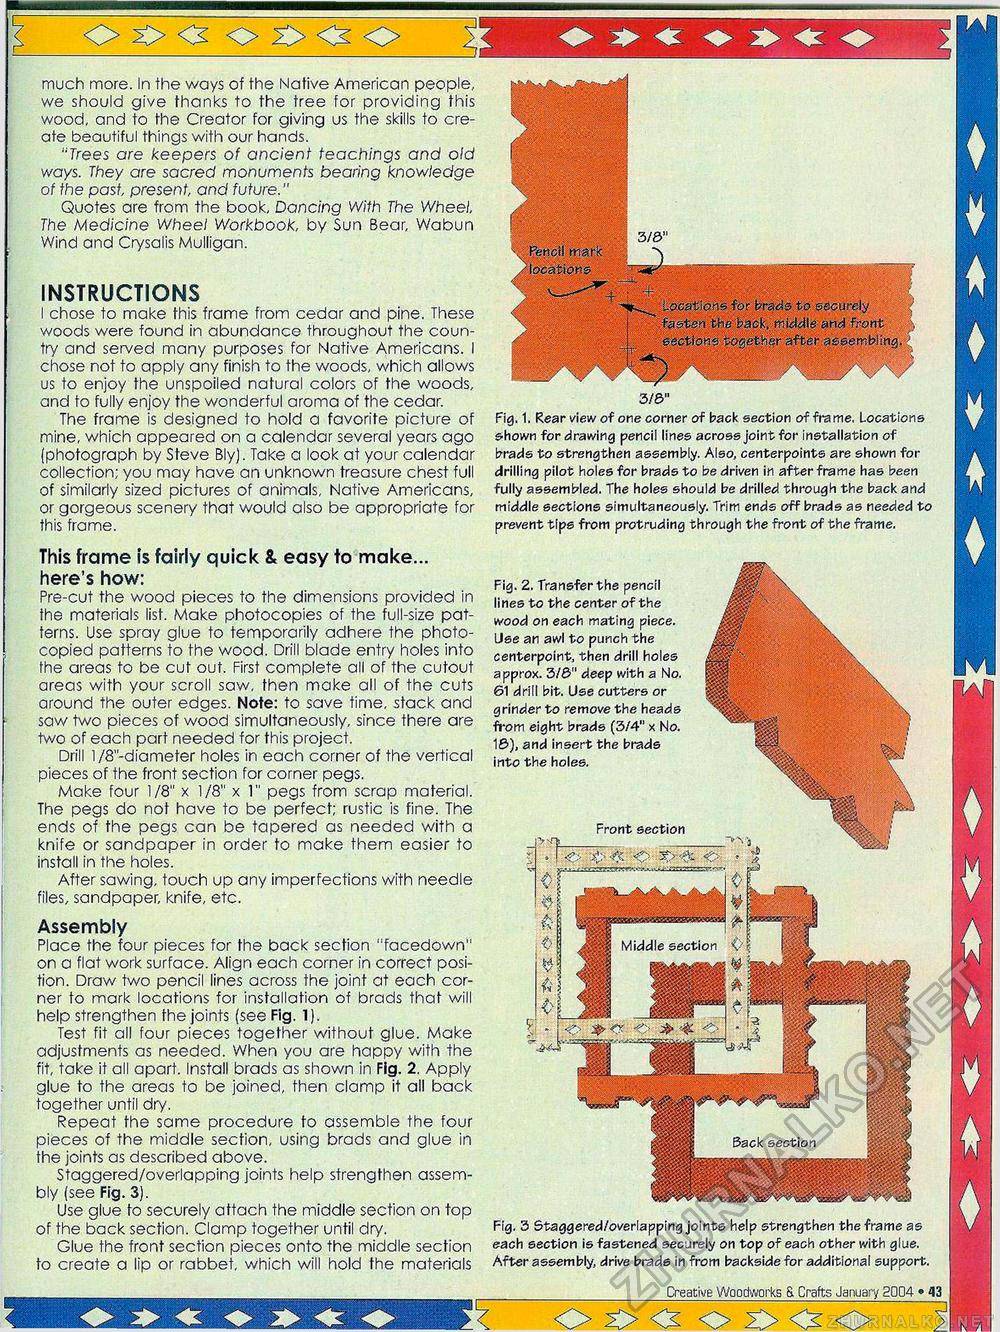
$ otx^oxxxo \ Ffencil irat< locations Creative Woodworks S. Crafts January 2004 • 13 C>5><2 o 2><SO much more. In the ways of the Native American people, we should give thanks to the tree for providing this wood, and to the Creator for giving us the skills to create beautiful things with our hands. "Trees are keepers of ancient teachings and old ways. They are sacred monuments bearing knowledge of the past present, and future." Quotes are from the book, Dancing With The Wheel, The Medicine Wheel Workbook, by Sun Bear, Wabun Wind and Crysalis Mulligan. INSTRUCTIONS I chose to make this frame from cedar and pine. These woods were found in abundance throughout the country and sen/ed many purposes for Native Americans. I chose not to apply any finish to the woods, which allows us to enjoy the unspoiled natural colors of the woods, and to fully enjoy the wonderful aroma of the cedar. The frame is designed to hold a favorite picture of mine, which appeared on a calendar several years ago (photograph by Steve Bly). Take a look at your calendar collection; you may have an unknown treasure chest full of similarly sized pictures of animals, Native Americans, or gorgeous scenery that would also be appropriate for this frame. This frame is fairly quick & easy fo make... here's how: Pre-cut the wood pieces to the dimensions provided in the materials list. Make photocopies of the full-size patterns. Use spray glue to temporarily adhere the photocopied patterns to the wood. Drill blade entry holes into the areas to be cut out. First complete all of the cutout areas with your scroll saw, then make all of the cuts around the outer edges. Note: to save time, stack and saw two pieces of wood simultaneously, since there are two of each part needed for this project. Drill 1 /8"-diameter holes in each corner of the vertical pieces of the front section for corner pegs. Make four 1/8" x 1/8" x 1" pegs from scrap material. The pegs do not have to be perfect; rustic is fine. The ends of the pegs can be tapered as needed with a knife or sandpaper in order to make them easier to install in the holes. After sawing, touch up any imperfections with needle files, sandpaper, knife, etc. Assembly Place the four pieces for the back section "facedown" on a flat work surface. Align each corner in correct position. Draw two pencil lines across the joint at each corner to mark locations for installation of brads that will help strengthen the joints (see Fig. 1). Test fit all four pieces together without glue. Make adjustments as needed. When you are happy with the fit, take it all apart. Install brads as shown in Fig. 2. Apply glue to the areas to be joined, then clamp it all back together until dry. Repeat the same procedure to assemble the four pieces of the middle section, using brads and glue in the joints as described above. Staggered/overlapping joints help strengthen assembly (see Fig. 3). Use glue fo securely attach the middle section on top of the back section. Clamp together until dry. Glue the front section pieces onto the middle section to create a lip or rabbet, which will hold the materials Fig. 3 Staggered/overlapping joints help strengthen the frame as each section is fastened securely on top of each other with glue. After assembly, drive brads in from backside for additional support. Fig. 2. Transfer the pencil lines to the center of the wood on each mating piece. Use an awl to punch the centerpoint, then drill holes approx. 3/3" deep with a No. 61 drill bit. Use cutters or grinder to remove the heads from eight brads (3/4" x No. 16), and insert the brads into the holes. Front section Locations for brads to securely fasten the back, riddle and front secticme Together after assembling.' Fig. 1. Rear view of one corner of back section of frame. Locations shown for drawing pencil lines across jointfor installation of brads to strengthen assembly. Also, centerpoints are shown for drilling pilot holes for brads to be driven in after frame has been fully assembled. The holes should be drilled through the back and middle sections simultaneously. Trim ends off brads as needed to prevent tips from protruding through the front of the frame. |


