Creative Woodworks & crafts 2004-01, страница 40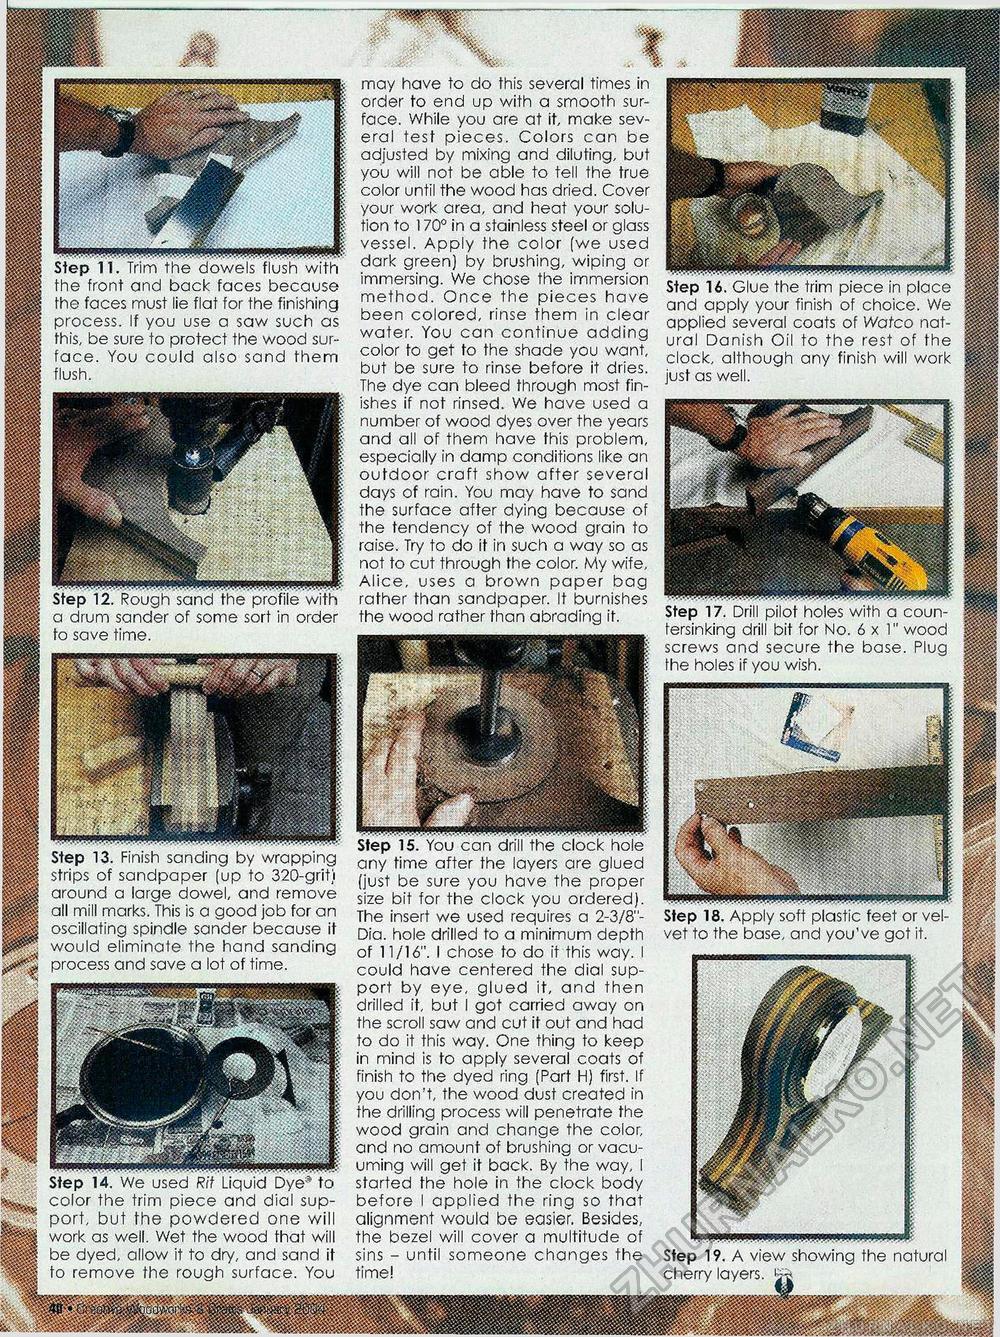
may have to do this several times in order to end up with a smooth sur- ||i| face. While you are at it, make sev- |p|" eral test pieces. Colors can be ||| adjusted by mixing and diluting, but Hfi| you will not be able to tell the true HS color until the wood has dried. Cover H your work area, and heat your solution to 170° in a stainless steel or glass vessel. Apply the color (we used dark green) by brushing, wiping or immersing. We chose the immersion method. Once the pieces have been colored, rinse them in clear water. You can continue adding color to get to the shade you want, but be sure to rinse before it dries. The dye can bleed through most finishes if not rinsed. We have used a number of wood dyes over the years and all of them have this problem, especially in damp conditions like an outdoor craft show after several ............| days of rain. You may have to sand the surface after dying because of the tendency of the wood grain to raise. Try to do it in such a way so as | ' • not to cut through the color. My wife, Alice, uses a brown paper bag ■ **' rather than sandpaper. It burnishes the wood rather than abrading if. Step 17. Drill pilot holes with a coun- fersinking drill bit for No. 6x1" wood v iPPsiiflHKK screws and secure the base. Plug the holes if you wish. Step IT. Trim the dowels flush with the front and back faces because the faces must lie flat for the finishing process. If you use a saw such as this, be sure to protect the wood surface. You could also sand them flush. Step 16. Glue the trim piece in place and apply your finish of choice. We applied several coats of Watco natural Danish Oil to the rest of the clock, although any finish will work just as well. Step 12. Rough sand the profile with a drum sander of some sort in order to save time. Step 15. You can drill the clock hole -si ^ any time after the layers are glued (just be sure you have the proper ' size bit for the clock you ordered). ui.i.,i The insert we used requires a 2-3/8"- Step 18. Apply soft plastic feet or vel- Dia. hole drilled to a minimum depth vet to the base, and you've got it. of 11/16". I chose to do it this way. I ■r...... —^^^ could have centered the dial sup-port by eye, glued it, and then drilled it, but I got carried away on jjjjr the scroll saw and cut it out and had lHW/ iff^ I to do it this way. One thing to keep ipF I in mind is to apply several coats of KwnSfip ^ finish to the dyed ring (Part H) first. If W^fffi / you don't, the wood dust created in the drilling process will penetrate the S^^m^^m wood grain and change the color, and no amount of brushing or vacu- J|||gP|§p uming will get it back. By the way, I started the hole in the clock body m&JBmP"' before I applied the ring so that alignment would be easier. Besides, the bezel will cover a multitude of m.u:i.'.>in.n,hh-ih.m.u,.ii,iiiw»rww.» sins - until someone changes the Step 19. A view showing the natural time! cherry layers. Step 13. Finish sanding by wrapping strips of sandpaper (up to 320-griti around a large dowel, and remove all mill marks. This is a good job for an oscillating spindle sander because it would eliminate the hand sanding process and save a lot of time. Step 14. We used Rit Liquid Dye® to color the trim piece and dial support, but the powdered one will work as well. Wet the wood that will be dyed, allow it to dry, and sand it to remove the rough surface. You |


