Creative Woodworks & crafts 2004-08, страница 68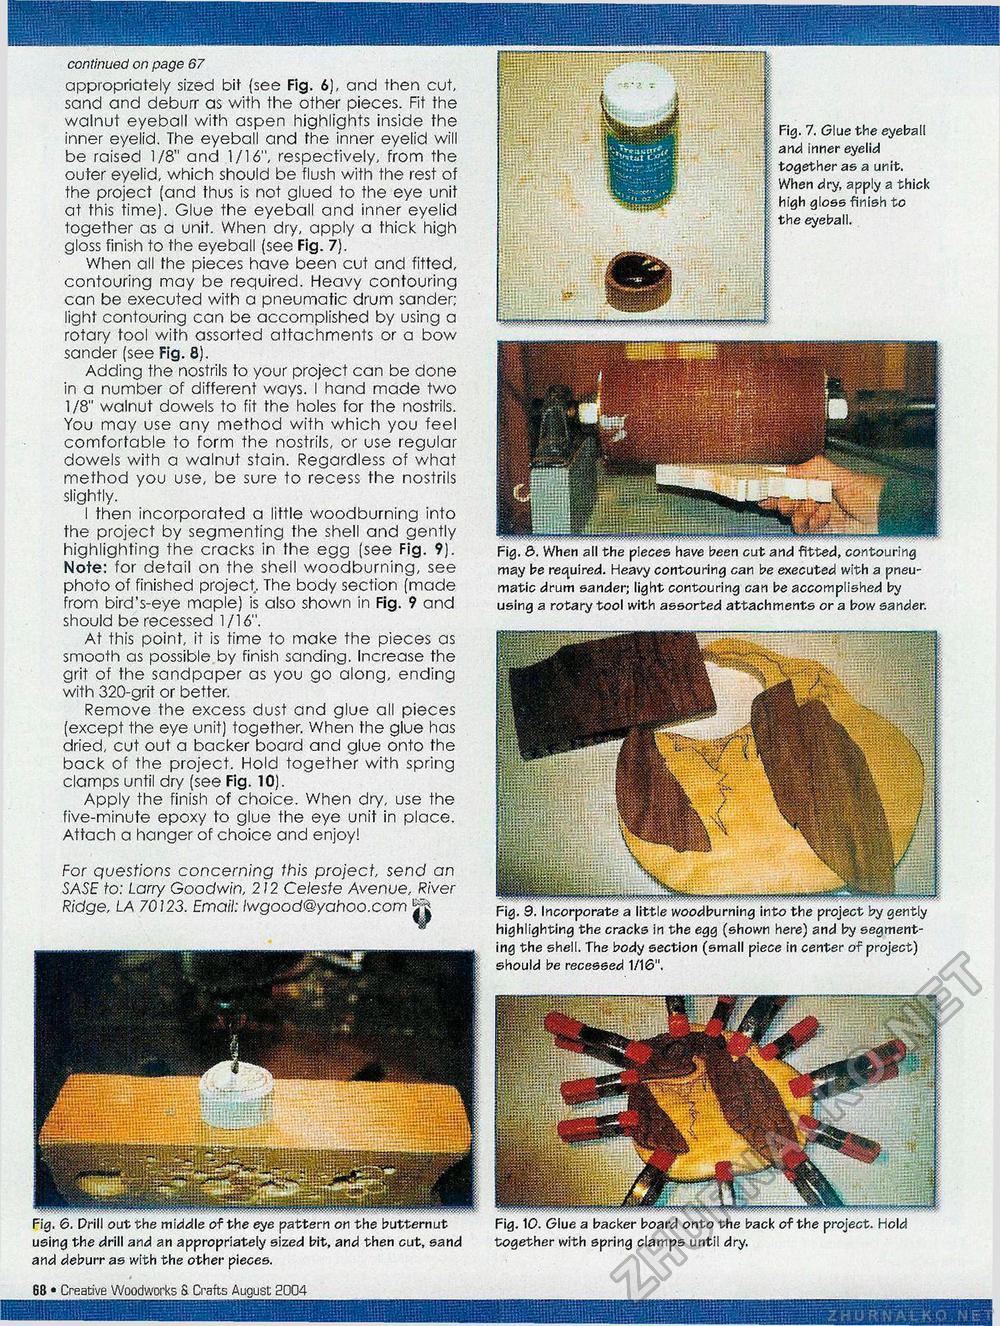
continued on page 67 appropriately sized bit (see Fig. 6), and then cut, sand and deburr as with the other pieces. Fit the walnut eyeball with aspen highlights inside the inner eyelid. The eyeball and the inner eyelid will be raised 1/8" and 1/16", respectively, from the outer eyelid, which should be flush with the rest of the project (and thus is not glued to the eye unit at this time). Glue the eyeball and inner eyelid together as a unit. When dry, apply a thick high gloss finish to the eyeball (see Fig. 7). When all the pieces have been cut and fitted, contouring may be required. Heavy contouring can be executed with a pneumatic drum sander; light contouring can be accomplished by using a rotary tool with assorted attachments or a bow sander (see Fig. 8). Adding the nostrils to your project can be done in a number of different ways. I hand made two 1/8" walnut dowels to fit the holes for the nostrils. You may use any method with which you feel comfortable to form the nostrils, or use regular dowels with a walnut stain. Regardless of what method you use, be sure to recess the nostrils slightly. I then incorporated a little woodburning into the project by segmenting the shell and gently highlighting the cracks in the egg (see Fig. 9). Note: for detail on the shell woodburning, see photo of finished project, The body section (made from bird's-eye maple) is also shown in Fig. 9 and should be recessed 1/16". At this point, it is time to make the pieces as smooth as possible by finish sanding. Increase the grit of the sandpaper as you go along, ending with 320-grit or better. Remove the excess dust and glue all pieces (except the eye unit) together. When the glue has dried, cut out a backer board and glue onto the back of the project. Hold together with spring clamps until dry (see Fig. 10). Apply the finish of choice. When dry, use the five-minute epoxy to glue the eye unit in place. Attach a hanger of choice and enjoy! For questions concerning this project, send an SASE to: Larry Goodwin, 212 Celeste Avenue, River Ridge, LA 70123. Email: lwgood@yahoo.com jf^ Fig. 6. Drill out the middle of the eye pattern or the butternut using the drill and an appropriately sized bit, and then cut, sand and deburr as with the other pieces. 11 Fig. 7. Glue the eyeball and inner eyelid together as a unit. When dry, apply a thick high gloss finish to the eyeball. Fig. &. When all the pieces have been cut and fitted, contouring may be required. Heavy contouring can be executed with a pneumatic drum sander, light contouring can be accomplished by using a rotary tool with assorted attachments or a bow sander. Fig. 9. Incorporate a little woodburning into the project by gently highlighting the cracks in the egg (shown here) and by segmenting the shell. The body section (small piece in center of project) should be recessed 1/16", Fig. 10. Glue a backer board onto the back of the project. Hold together with spring clamps until dry. Creative Woodworks 3. Crafts August 2004 • 18 |


