Creative Woodworks & crafts 2005-01, страница 47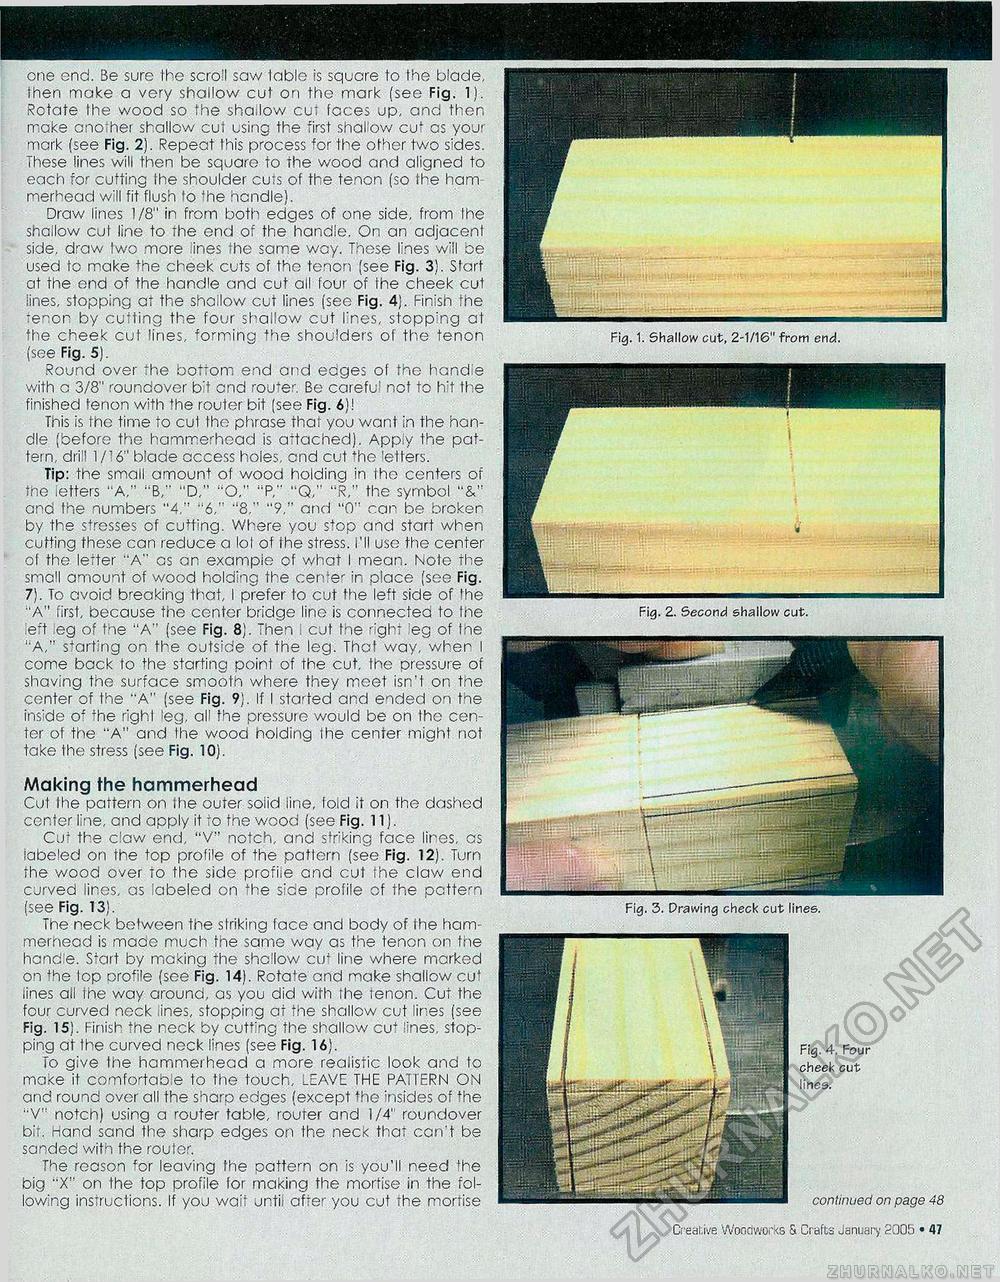
one end. Be sure the scro'l saw table is square to the blade, then moke a very shallow cut on the mark (see Fig. 1). Rotate the wood so the shallow cut feces up, and then make another shallow cut using the first shallow cut as your mark (see Fig. 2). Repeat this process for the other two sides. These lines will then be square to the wood and aligned to each for cutting the shoulder cuts of the tenon (so the ham merhead will fit flush to 'he handle). Draw lines 1/8" in from both edges of one side, from Ihe shallow cut line to the end of the handle. On an adjacent side, draw two more ines ihe same way. These lines will be used lo make fhe cheek cuts of tho tenon (see Fig. 3). Start at the end of the handle and cut all four of the cheek cut lines, stopping at the shoilow cut lines (see Fig. 4). Finish the -enon by cutting the four shallow cut lines, stopping at the cheek cut lines, forming the shoulders of the tenon (see Fig. 5). Round over the bottom end and edges of the hand e with c 3/8" roundover bit c.nd router. Be careful not to h;t the finished tenon with the router bit (see Fig. 6)1 This is the time to cul the phrase that you want in the handle (before the hammerhead is attached). Apply the pattern, drill 1/16" blade access holes, and cut +he tetters. Tip: the small amount of wood holding in tho centers of the letters "A," "B," "D," "O," "P." "Q," "R," the symbol "&" and the numbers "4." "6," ''8," "9," and "0" car be broken by the stresses of cutting. Where you stop and start when cutting these can reduce a lol of the stress. I'll use the center of the letter "A" as an example of what I mean. Note the smoll amount of wood holding the center in place [see Fig. 7). To avoid breaking that, I prefer to cut the left side of the "A" first, because the center bridge lino is connected to Ine left eg of the "A" (see Fig. 8;. Then i cut the right eg of the "A," starting on the outside of the leg. That way, when I come back to the starting point of the cut, the pressure of shaving the surface smooth where they meet isn't on tne center of the "A" (see Fig. 9). If I started and ended on the inside of the righl leg, all the pressure would be on the center of the "A" and Ihe wood holding the center might not take Ihe stress (see Fig. 10). Making the hammerhead Cut the pattern on ihe outer soiid line, fold it on the dashed center tne, and apply it to the wood (see Fig. 11). Cut the claw end, "V" notch, and striking face lines, as labeled on the top profile of the pattern (see Fig. 12). Turn the wood over to the side profile and cut the claw end curved lines, as labeled on the side profile of the pattern (see Fig. 13). The neck between the striking face and body of the ham-mernead is made much the same way as the tenon on the handle. S+art by making the shallow cir line where marked on the 1op orofile (see Fig. 141. Rotate and make shallow cut iines all the way around, as you did with the tenon. Cut the four curved neck lines, stopping at the shallow cut lines (see Fig. 15). Finish the neck by cutting the shallow cu+ lines, stopping at Ihe curved neck lines (see Fig. 16). To give the hammerhead a more realistic look and to make it comfortable to the touch, LEAVE THE PATTERN ON and round over all the sharp edges (except the insides of the ''V'1 notch) using a router table, router and 1/4" roundover bit. Hand sand the sharp edges on the necK thai can't be sanded with the router. The reason for leaving the oattern on is you'll need the big "X" on the top profile for making the mortise in the following instructions. If you wait until after you cut the mortise Fig. 2. Second shallow cut. Fig. 4. Four cheek cut lines. continued on page 48 48 • Creative Woodworks S. Crafts January 2005 Fig. 1. Shallow cut, 2-1/16" from end. |


