Creative Woodworks & crafts 2005-03, страница 50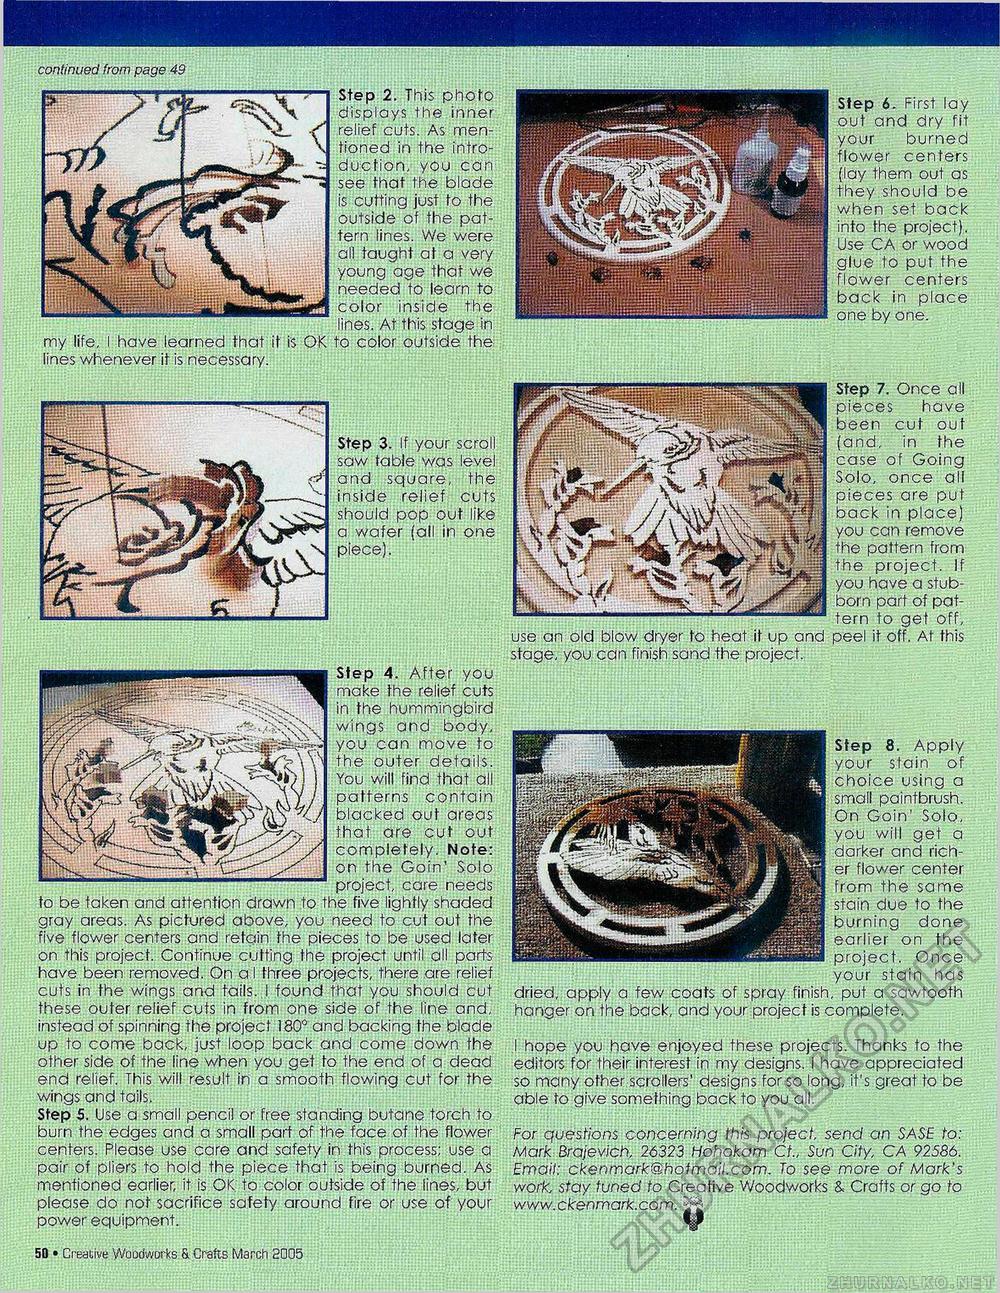
continued from page 49 \ I , ^ L—r-i Step 2. This photo s si displays the inner jLf* ■/ relief cuts. As men- ,^ tioned in the intro- . see that the blade 's cuttin9 Just to the 1 iSi-- iC&k outside of the pat- Nf M i tern lines. We were lines. At this stage in my life. I have learned that it is OK to color outside the lines whenever it is necessary. __Step 7. Once all Step 3. If your scroll ?/ 7 ♦ <ond- in the TfcsK'a. saw table was level ' 'jh'^L case of Going ZZ- jfr^'^jJSJim € and square, the f ; 'jf*. Jji Solo, once all inside relief cuts llijiNpf^ V* pieces are put I vv^ should pop out like \ r " back in place) / \ ICj^"5 a wafer (all in one ^il^Wr < ,/\ \T\\V;- you can remove L ^ piece). the pattern from ■■■Wt the project. If . Vo// youhaveastub- M A t? I \ v k V .JJ? born part of pat- L-J-=-JQ-1--'fa • ^ i -yJEJ fem fo get off< use an old blow dryer to heat it up and peel it off. At this to be taken and attention drawn to the five lightly shaded five flower centers and retain the pieces to be used later on this project. Continue cutting the project until all parts Byilslllli^HB^ttHBW have been removed. On a I three projects, there are relief cuts in the wings and tails..! found that you should cut these outer relief cuts in from one side of the line and, instead of spinning the project 180° and backing the blade up to come back, just loop back and come down the J hope you have enjoyed these projects. Thanks to the other side of the line when you get to the end of a dead editors for their interest in my designs. I have appreciated end relief. This will result in a smooth flowing cut for the so many other scrollers' designs for so long, it's great to be wings and tails. able to give something back to you all. Step 5. Use a small pencil or free standing butane torch to burn the edges and a small part o.f the face of the flower For questions concerning this project, send an SASE to: centers. Please use care and safety in this process; use a Mark Brajevich, 26323 Hohokom Cf„ Sun City, CA 92586. pair of pliers to hold the piece that is being burned. As Email: ckenmark@hotmail.com. To see more of Mark's mentioned earlier, it is OK. to color outside of the lines, but work, stay tuned to Creative Woodworks & Crafts or go to please do not sacrifice safety around fire or use of your www.ckenmark.com. power equipment. t§ Step 6. First lay out and dry fit your burned flower centers (lay them out as they should be when set back into the project). Use CA or wood glue to put the flower centers back in place one by one. Step 8. Apply your stain of choice using a small paintbrush. On Goin' Solo, you will get a darker and richer flower center from the same stain due to the burning done earlier on the project. Once your stain has dried, apply a few coats of spray finish, put a sawtooth hanger on the back, and your project is complete. 50 • Creative Woodworks & Crafts March 2005 |


