Creative Woodworks & crafts 2005-08, страница 32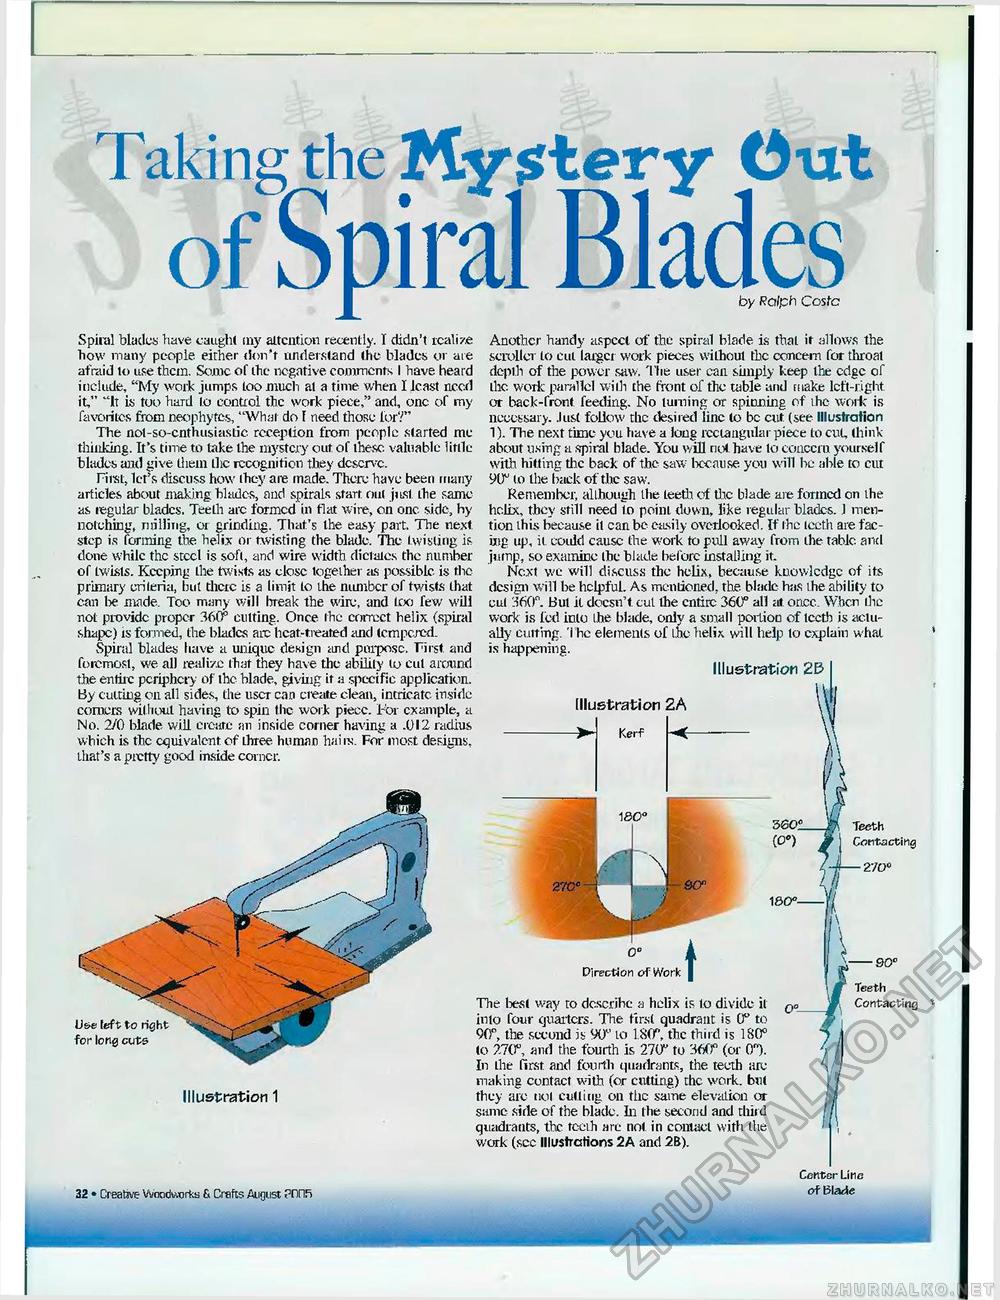
Taking the My$tery Cut of Spiral Bladestoy Ralph Costa Spiral blacks have caught my attention recently. I didn't realize how many people either don't understand the blades or are afraid to use them. Same of the negative comments I have heard include, "My work jumps too much at a time when I least nec.d it," "It is too hard lo control the work piece," and, one of my favorites from neophytes, "What do f need those lor?" The not-so-cnthusiastic reception from people started me thinking. It's time to take the mystery out of these valuable little blades and give them the recognition they deserve. First, let's discuss how they are made. There have been many articles about making bkidcs, and spirals start oti( just the same as tegular blades. Teeth are formed in flat wire, on one side, hy notching, nrilling, or grinding. That's the easy part, The next step is forming the helix or twisting the blade. The twisting is done while the steel is soft, and wire width dictates the number of twists. Keeping the twists as close together as possible is the primary criteria, but there is a limit to the number of twists that can be made. Too many will break the wire, and loo few will riot provide proper 3<Sff cutting. Once ihe correct helix (spiral shape) is formed, the blades arc heat-treated and tempered. Spiral blades have a unique design and purpose. First and foremost, we all realize that they have the ability to cut around the entite periphery of ihe blade, giving it a specific application. By cutting on all sides, the user can create clean, intricate inside comers without having to spin the work piece. Tor example, a No. 2/0 blade will cream an inside corner having a .012 radius which is the equivalent of three human haiix. For most designs, that's a pretty good inside corner. Another handy aspccl of the spiral blade is that it allows the scroller lo cut larger work pieces without the concern for throat depth of the power saw. The user can simply keep the edge of the work parallel with the front of the table and make left-right, or back-front, feeding. No turning or spinning of ihe work is necessary, .lust follow the desired line lo be cut (see Illustration 1). The next time you have a long rectangular piece to cut, think about using a spiral blade. You will not have lo conccru yourself with hitting the back of the saw because you will be able to cut 90" to the back of tlic saw. Remember, allhuugh Ihe teeth of the blade are formed on the helix, they still need to point down, like regular blades. 1 mention ihis because il can be easily overlooked. If ihe leet.h are facing up, it coidd cause the work to pull away from the table and jump, so examine Ihe blade before installing it. Next we will discuss the helix, because kuovviedge of its design will be helpful. As mentioned, the. blade has the ability to cut 360". But il doesn't cut the entire 360° all at oncc. When the work is fed into Ihe blade, only a small portion of lectb is actually cutting. The elements of ihe helix will help lo explain what is happening. Illustration 23 Illustration ZA 180°- U&e left to right for long cute Illustration 1 o° Direction of Work The best way to describe a helix is to divide it into four quarters. The First quadrant is 0° to Off, the second is 90° lo 180", the third is 180° to 270", and the fourth is 270" to 360" (or 0"). In the first and fourth quadrants, the teeth are making contact with (or cutting) the work, bul they are not cutting on the same elevation or same side of the blade. In the second and third quadrants, the teeih are not in contact with the work (see Illustrations 2A and 2B). Teeth w Contacting (4-27O" f -90° Teeth Contacting 32 • Creative Woodwrte fi Crafts August ?nnh Center Line of Blade |


