Creative Woodworks & crafts 2005-08, страница 6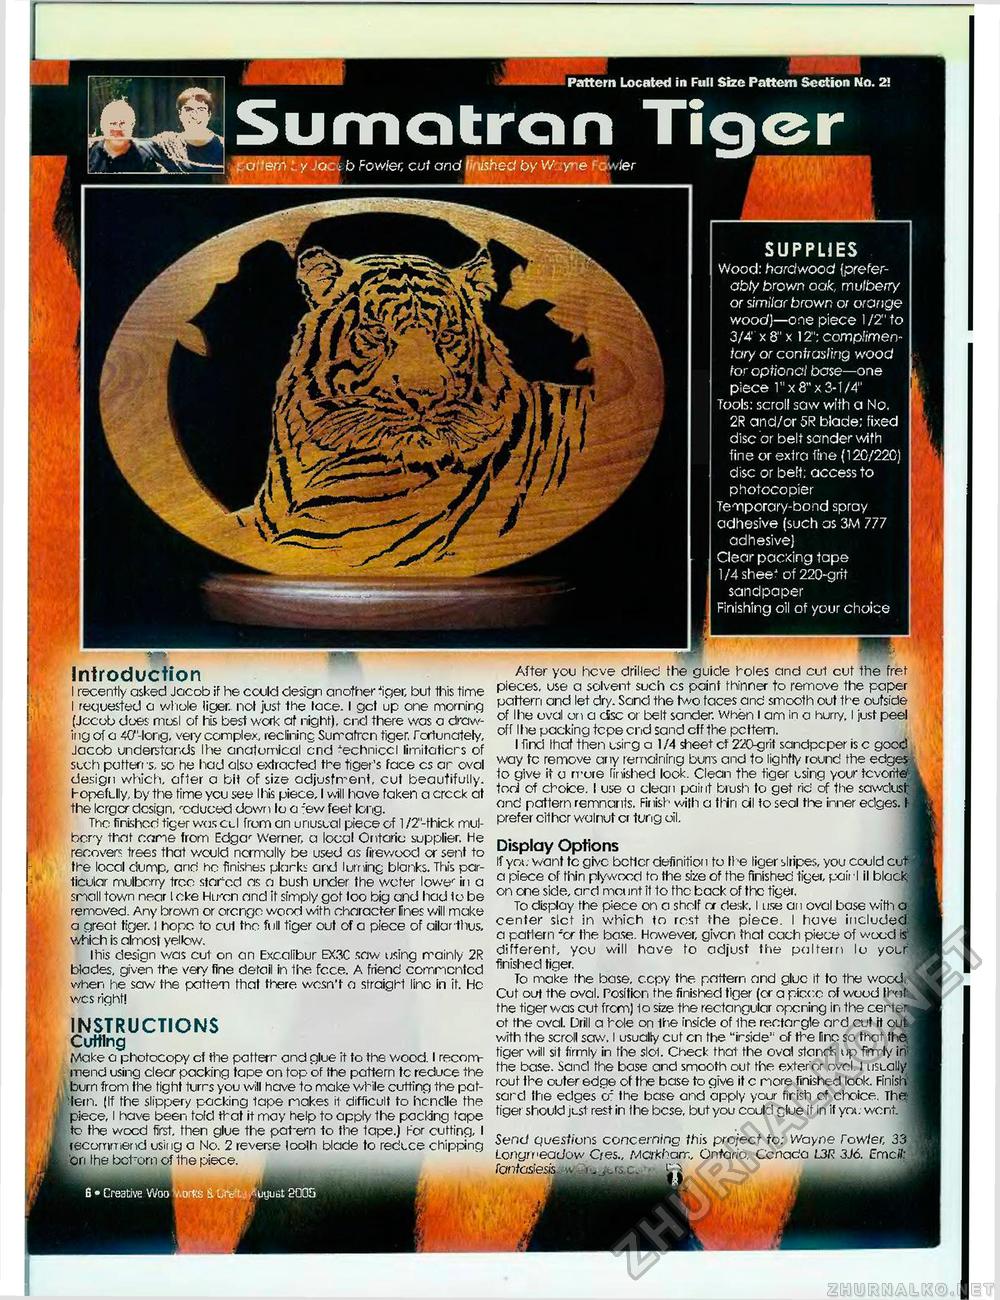
Pattern Located in Full Size Pattern Section No. 2! Sumatron Tiger : a,"em L y Joes b Fowler, cut and finished by W yne Fowler SUPPLIES Wood: hardwood (prefer-abty brown oak, mulberry or similar brown or orange wood)—one piece 1/2" to 3/4' x 8" x 12": compffmen-iary or contrasting wood tor optional base—one piece i"x8"x3-l/4" Tools: scroll saw with a No. 2R and/or 5R blade; fixed disc or belt sander with fine or extra fine (120/22C] disc or belt; access to photocopier Temporary-bond spray adhesive (such as 3M 777 adhesive) Clear packing tape 1/4 sheeJ of 220-grit sandpaper Finishing oil of your choice ! inTroauCTion I recently asked Jacob if he could design another Jiger, but this time I requested a whole iiger. nol just the lace. I get up one morning (Jacob does mosl of his best work at night), end there was o drawing of o -W-lorig, veiy complex, reclining Suiratrcn tiger, fatunately, Jacob understands I tie anatomical end "-echniccl Smitaticrs of such patterns, so he had also extracted the tiger's face cs ar oval design which, after a bit of size adjustment, cut beautifully. Hopefully, by the time ycu see Ihis piece. I will have taken a crcck at the Icrgcr design, ■cduced down lo o -'ewfeet long. The finished tiger waxed from an unusual piece of l/2"-thick mul-bery that cane from Edgcr Werner, a local Ontario supplier. He recover? trees that wajld ncrmally be used os firewood or sent to the local dump, and he finishes plarks and lurning blanks. This particular mulberry tree staged as a bush under the wefer lower in a small town near I eke Hu'on and it simply got loo big and had io be removed. Any brown or orcnge wood with character lines will make a great tiger. 1 hope to cu1 the full tiger out of a piece of ailarthus, which is almost yellow. Ihis design was cut on on Excalibur EX3C saw using mainly 2R blades, given the very fine detail in the fcce. A friend commented when he saw the patten that there wasn't a straight line in it. He wes right! INSTRUCTIONS Cutting Make o photocopy cf the pattern and glue it to the wood. I recommend using clear packing tape on top of ttie pattern tc reduce the burn from the tight turrs you will have to make while cutting the pattern. (If the slippery packing tape makes it difficult to hcndle the J piece, I have been told that it may help to apply the packing tape I to the wood first, then glue the potrem to the tape.) For cutting, I recommend using a No, 2 reverse looih blade to reduce chipping on Ihe bc-horn of the piece. pieces, use a solvent such cs paint thinner to remove the paper pattern and let dry. Sand the two faces and smooth out the outside of Ihe oval on a disc or belt sender, when i am in a hurry, I just peel off Ihe packing fepe end sand off the pcftem. I find lhaf then usirg o 1/4 sheet cf 220-grit sandpeper is c good way fc remove any remaining burrs and to lightly round the edge to give it g more finished look. Clean the tiger using your tcvorite tod of choice. I use a clean paint blush to get rid of the sawdusjj ond pattern remnants. Finish with a thiri oil to seal the inner edges, f i prefer either wolnuf cr tung oil. Display Options If you want tc give better definite i to Ihe Iiger sliipes, you could cuf a piece of thin plywood to ttie size of the finished tiger, pair l il black; ] on one side, ard mot int il lo the back of the tiger. To display the piece on a shelf or desk, I use ai i oval base with a center slot in which to rest the piece. I hove included a pattern ~or the base. However, given that cach piece of wood is' different, you will have to adjust the paltem lo your' finished tiger. To make the base, ccpy the pattern and glue it to the wood,, Cut out the oval. Position the finished tiger (or a piece of wood lhaf the tiger was cut frcm) to size the rectangular opening in the center j ot the oval. Drill a hole on the inside of ihe reetargle ard cut it out J with the scroll saw. I usually cut cn the "irside" of the line so that the tiger will sit firmly in the slot. Check thai- the oval stands up firmly iri; the base. Sand the base and smooth out the exterior ovel. I usually J rout the outer edge of the base to give it c more finished look. Finish': I sard ttie edges o~ the base and apply your firish of choice. The tiger should just rest in the bese, but you could glue it in il you went. Sand questions concerning this project to: Wayne Tow/er, 33 Lonymeadow Cies., Mcrkharr,. Ontario, Ccnada L3R 3J6. Emcil: fanfasesis. w-ia ■ ■ > |


