Creative Woodworks & crafts 2005-09, страница 6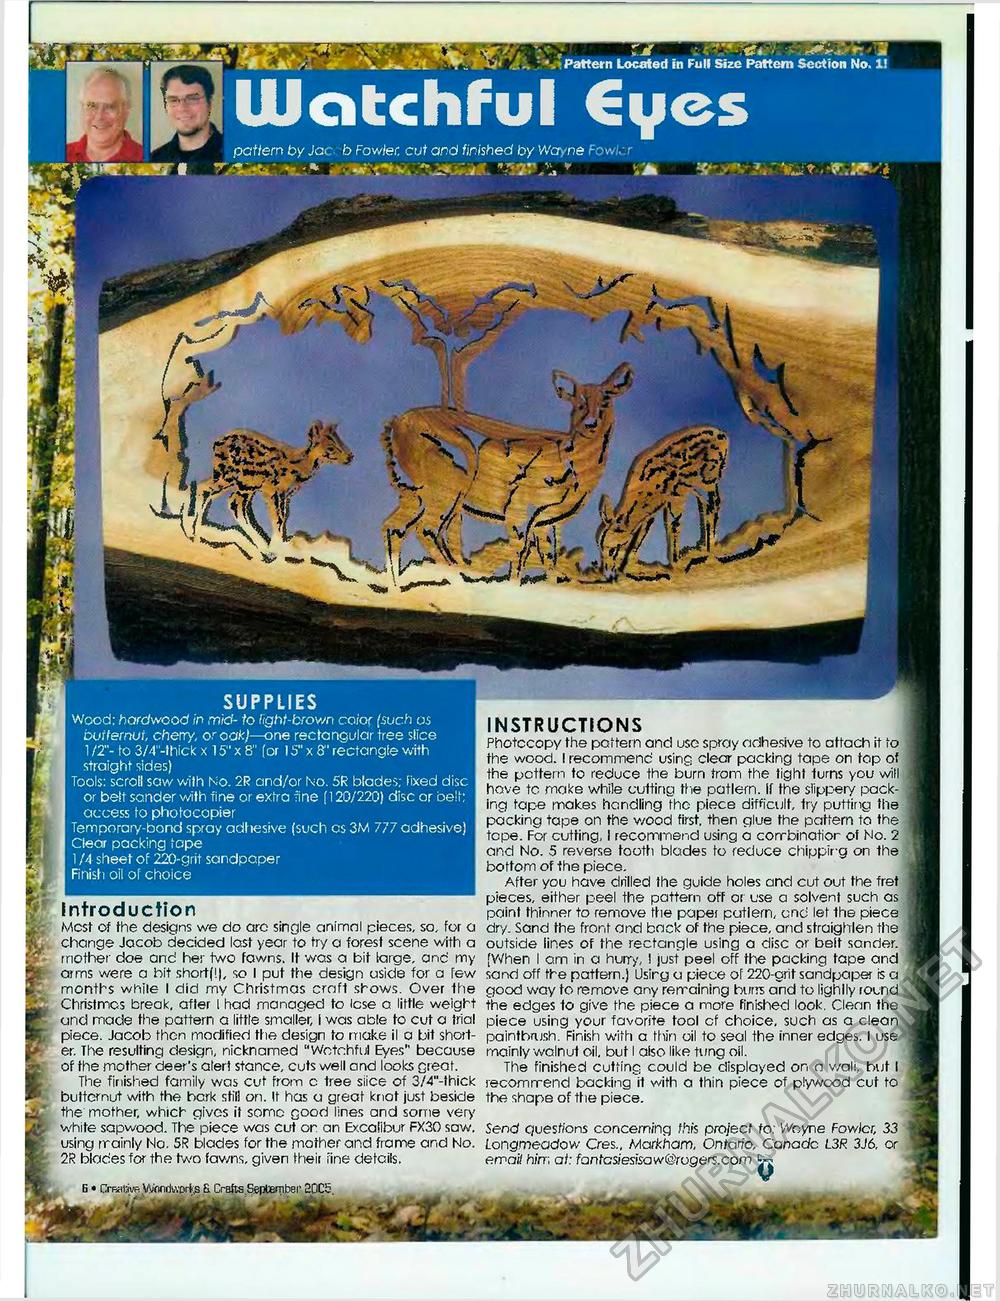
■tf. •• ' 5 IM r m • 'Sx ' - Pattern Located in Full Size (Pattern Section No. 1! | Watchful €yes nriiiern bv lac h Fnvsler c~rJt and finished hv Wcrvne Fnw.v r pattern by Jac. b Fovsler. cut and finished by Wayne Fow;. r ft • * i SUPPLIES Wood: hardwood in mid- to light-brov/n coior (such as butternut cherry, or oak)—one rectangular tree slice 1 IT- to 3/4"-thick x 15" x 8" (or 15" x 8" rectangle with straight sides) Tools: scroll saw wilh No. 2R and/or No. 5R blades; Fixed disc or belt sander with Tine or extra fine [120/220) disc or belt: access to photocopier Temporary-bond spray adhesive (such cs3M 777 adhesive) Clear packing tape 1 /4 sheet of 220-grit sandpaper Finish oil of choice Introduction Mcst of the designs we do arc single animnl pieces, so, for a change Jacob decided last year to try a forest scene with a mother doe and her two fawns. It was a bit large, and my arms were a bit short(l), so I put the design aside for a Few months while I did my Christmas craft shows. Over the Christmas break, after I had managed to lose a little weight and made the pattern a little smaller, I was able to cut a trial piece. Jacob then modified the design to make il a bit shorter. The resulting design, nicknamed "Watchful Eyes" because of the mother deer's alert stance, cuts well and looks great. The finished family was cut from c tree slice of 3/4"-thick butternut with the hcrk stil! on. It has a great knot just beside the mother, which gives it some good lines and some very white sapwood. The piece was cut or an Excalibur FX30 saw, using rrainly Mo. 5R blades for the mother and frame and No. 2R blades for the two fawns, given their fine details. INSTRUCTIONS Photocopy the pattern and use spray adhesive to attach it to the wood. I recommend using clear packing tape on tap of the pattern to reduce the burn trorn the tighl turns you will hove to make while cutting the pattern. If the slippery packing tape makes handling the piece difficult, try putting the packing tape on the wood first, then glue the pattern to the tope. For cutting, I recommend using a combination of No. 2 and No. 5 reverse tooth blades to reduce chippir-g on the bottom of the piece. After you have drilled the guide holes and cut out the fret pieces, either peel the pattern off or use a solvent such as paint thinner to remove the paper pattern, and let the piece dry. Sand the front and back of the piece, and straighten the outside lines of the rectangle using a disc or belt sander. [When I am in a hurry, I just peel off the packing tape and sand off the pattern.) Usirg a piece of 220-grit sandpaper is a good way to remove any remaining burrs and to lighlly round the edges 1o give the piece a more finished look. Clean the piece using your favorite tool of choice, such as a clean paintbrush. Finish with a thin oil to seal the inner edges.! use mainly walnut oil, but I also like tung oil. The finished cutting could be displayed on n v/ali, but I recommend backing it with a thin piece of plywood cut to the shape of tfie piece. Send questions concerning f.his project to: Woyne Fowler, 33 Longmeadow Cres., Mark'ham, Ontario, Canadc L3R 3J6, or email hirr, at: fanfcsiesisaw@rogere.com K B • CreativeWflfidivfirte & Crafts September 2PC5. Q |


