Creative Woodworks & Crafts-059-1998-Fall, страница 18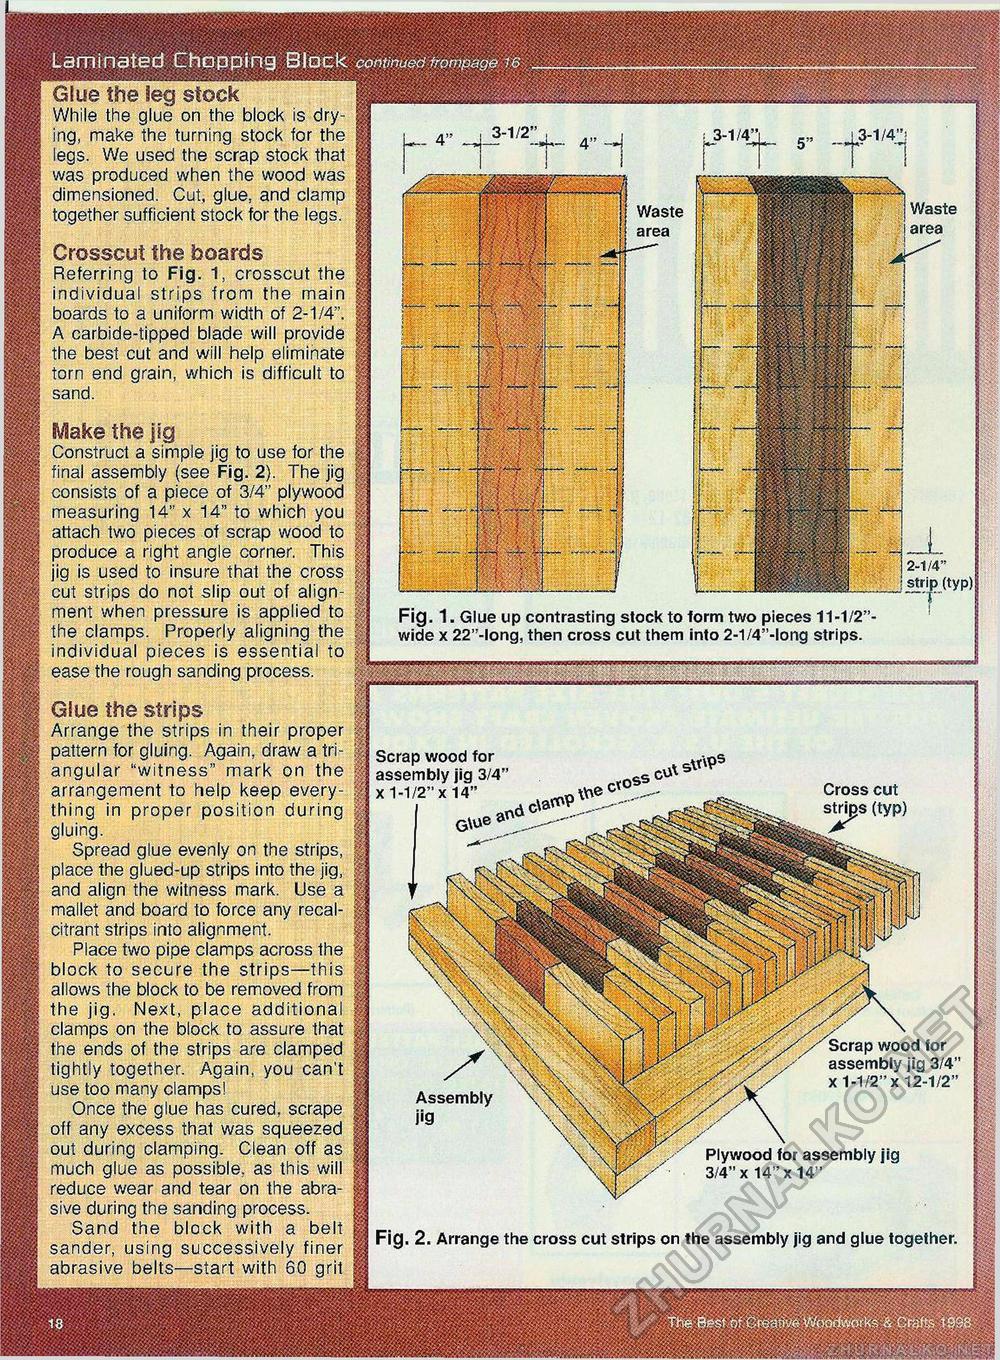
Laminated Chopping Block continued trompage re Glue the leg stock While the glue on the block is drying, make the turning stock for the legs. We used the scrap stock that was produced when the wood was dimensioned. Cut, glue, and clamp together sufficient stock for the legs. Crosscut the boards Referring to Fig. 1, crosscut the individual strips from the main boards to a uniform width of 2-1/4". A carbide-tipped blade will provide the best cut and will help eliminate torn end grain, which is difficult to sand. Waste area Waste area Make the jig Construct a simple jig to use for the final assembly (see Fig. 2}. The jig consists of a piece of 3/4" plywood measuring 14" x 14" to which you attach two pieces of scrap wood to produce a right angle corner, This jig is used to insure that the cross cut strips do not slip out of alignment when pressure is applied to the clamps. Properly aligning the individual pieces is essential to ease the rough sanding process. Glue the strips Arrange the strips in their proper pattern for gluing. Again, draw a triangular "witness" mark on the arrangement to help keep everything in proper position during gluing. Spread glue evenly on the strips, place the glued-up strips into the jig, and align the witness mark. Use a mallet and board to force any recalcitrant strips into alignment. Place two pipe clamps across the block to secure the strips—this allows the block to be removed from the jig. Next, place additional clamps on the block to assure that the ends of the strips are clamped tightly together. Again, you can't use too many clamps! Once the glue has cured, scrape off any excess that was squeezed out during clamping. Clean off as much glue as possible, as this will reduce wear and tear on the abrasive during the sanding process. Sand the block with a belt sander, using successively finer abrasive belts—start with 60 grit Fig. 1. Glue up contrasting stock to torm two pieces 11-1/2 wide x 22"-long, then cross cut them into 2-1/4"-long strips. Scrap wood for assembly jig 3/4 x 1-1/2" x 14" Scrap wood for assembly jig 3/4 x 1-1/2" x 12-1/2' Assembly jig Plywood for assembly jig 3/4" x 14" x 14" Fig. 2. Arrange the cross cut strips on the assembly jig and glue together. |


