Creative Woodworks & Crafts-059-1998-Fall, страница 40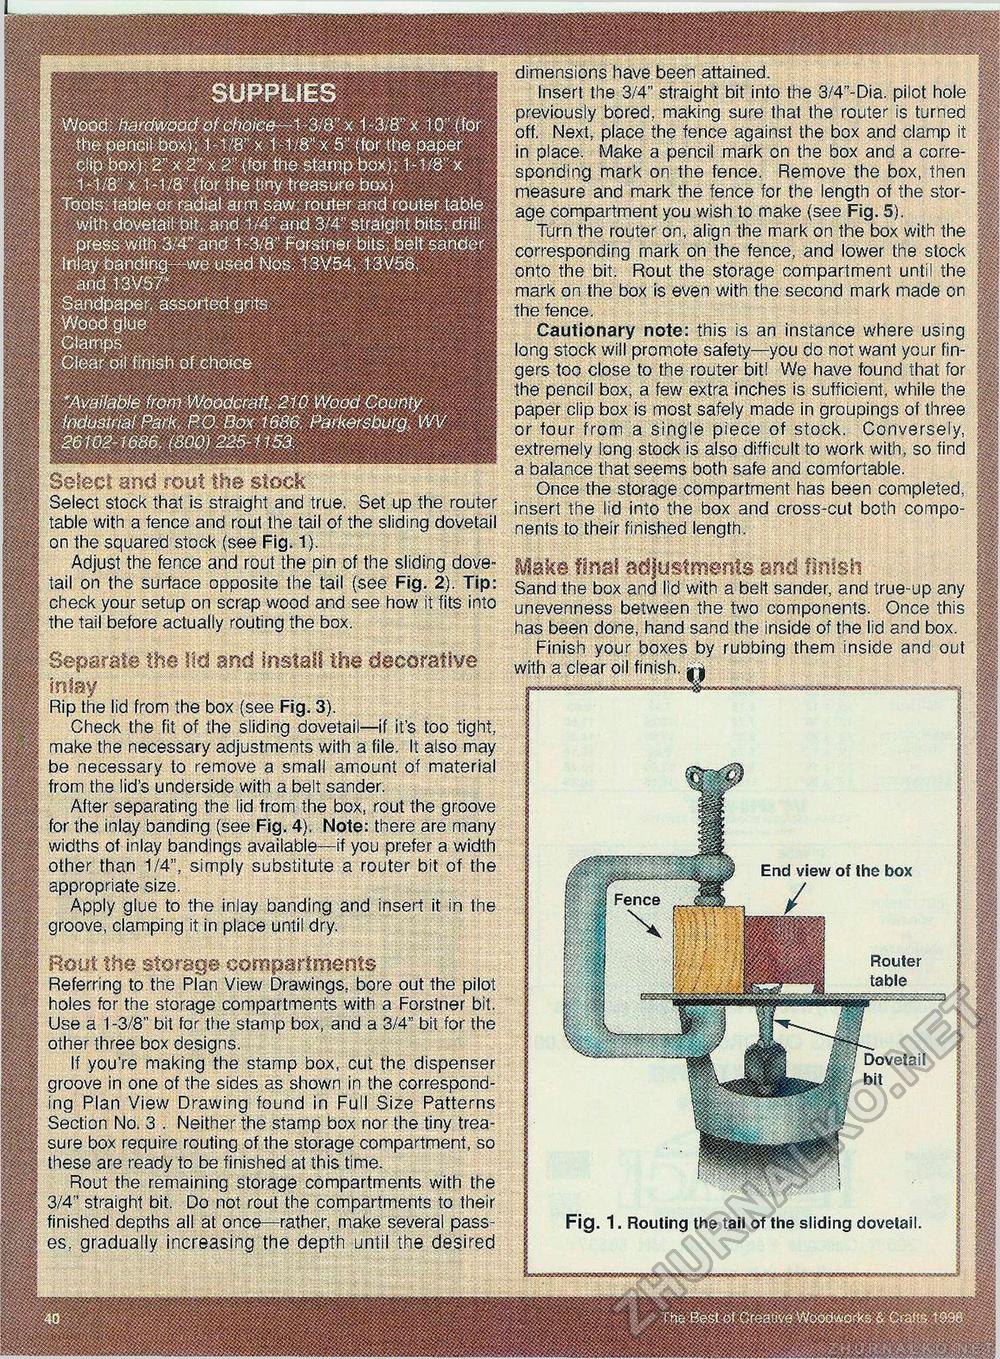
SUPPLIES 1 I I <. / i - > Wood hardwood of choice-1 3/8" x 1 -3/6 "x 10'(for .tftapetiGil: box); 1 -1/8" x 5!' (forlhe papbr : ■. clip box) 2" x 2" x 2" (for the stamp box), 1 -1 /8" x 1-1/a x 1-1/8" (for the tiny treasure box) ; Toots tabfe or radial arm saw router and router table with dovetail bit, and 1/4" and'3/4" straight bits; drill press with 3/4" and 1-3/0" Forstner bits; belt sandor inlay bandog - we used Nos. 13V54,13V56, | -and 13V57" m' fHg§ Sandpaper, assorted grits Wood glue, I |: * Clear oil finish of choice ' H - 1 v- % H t/ ■■ m 1 m z i ' i 'Available from Woodcraft 210 Wood County industrial Park, P.O. Box 1686, Parkersburg, WV 26102-1686. ($00) 225-11 S3. | I § | dimensions have been attained. Insert the 3/4" straight bit into the 3/4"-Dia. pilot hole previously bored, making sure that the router is turned off. Next, place the fence against the box and clamp it in place. Make a pencil mark on the box and a corresponding mark on the fence. Remove the box, then measure and mark the fence for the length of the storage compartment you wish to make (see Fig. 5). Turn the router on, align the mark on the box with the corresponding mark on the fence, and lower the stock onto the bit. Rout the storage compartment until the mark on the box is even with the second mark made on the fence. Cautionary note: this is an instance where using long stock will promote safety—you do not want your fingers too close to the router bitl We have found that for the pencil box, a few extra inches is sufficient, while the paper clip box is most safely made in groupings of three or four from a single piece of stock. Conversely, extremely long stock is also difficult to work with, so find a balance that seems both safe and comfortable. Once the storage compartment has been completed, insert the lid into the box and cross-cut both components to their finished length. Make final adjustments and finish Sand the box and lid with a belt sander, and true-up any unevenness between the two components. Once this has been done, hand sand the inside of the lid and box. Finish your boxes by rubbing them inside and out with a clear oil finish, Select and rout the stock Select stock that is straight and true. Set up the router table with a fence and rout the tail of the sliding dovetail on the squared stock (see Fig. 1). Adjust the fence and rout the pin of the sliding dovetail on the surface opposite the tail (see Fig. 2). Tip: check your setup on scrap wood and see how it fits into the tail before actually routing the box. Separate the lid and install the decorative inlay Rip the lid from the box (see Fig. 3). Check the fit of the sliding dovetail—if it's too tight, make the necessary adjustments with a file. It also may be necessary to remove a small amount of material from the lid's underside with a belt sander. After separating the lid from the box, rout the groove for the inlay banding (see Fig. 4). Note: there are many widths of inlay bandings available—if you prefer a width other than 1/4", simply substitute a router bit of the appropriate size. Apply glue to the inlay banding and insert it in the groove, clamping it in place until dry. Root the storage compartments Referring to the Plan View Drawings, bore out the pilot holes for the storage compartments with a Forstner bit. Use a 1 -3/8" bit for the stamp box, and a 3/4" bit for the other three box designs. If you're making the stamp box, cut the dispenser groove in one of the sides as shown in the corresponding Plan View Drawing found in Full Size Patterns Section No. 3 . Neither the stamp box nor the tiny treasure box require routing of the storage compartment, so these are ready to be finished at this time. Rout the remaining storage compartments with the 3/4" straight bit. Do not rout the compartments to their finished depths all at once—rather, make several passes, gradually increasing the depth until the desired Router table Ml Dovetail im. < . . Hi bit Fig. 1. Routing the tail of the sliding dovetail |


