Creative Woodworks & crafts-111-2005-Holiday, страница 6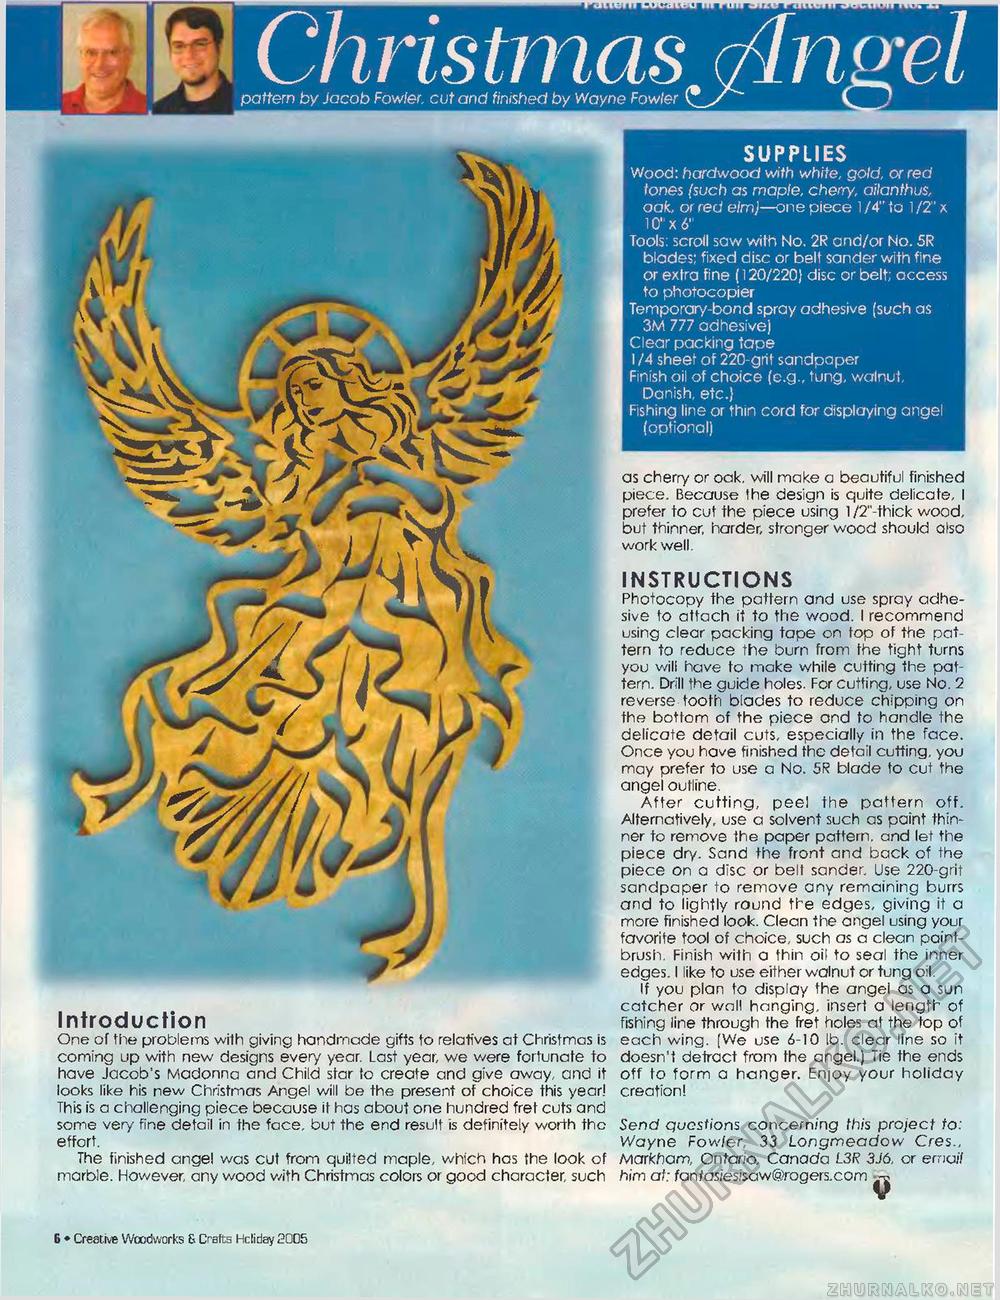
mm i jut i ii wuvaiDu i Christmas (Angelpattern by Jacob Fowler, cut and finished by Wayne Fowler C J Introduction One of the problems with giving handmade gifts to relatives at Christmas is coming up with new designs every year. Last year, we were fortunate to have Jacob's Madonna and Child star to create and give away, and it looks like his new Christmas Angel will be the present of choice this year! This is a challenging piece because it has about one hundred fret cuts and some very fine detail in the face, but the end result is definitely worth the effort. The finished angel was cut from quilted maple, which has the look of marble. However, any wood with Christmas colors or good character, such SUPPLIES Wood: hardwood with white, gold, or red tones (such as maple, cherry, ailanthus, oak, or red elm]—one piece 1 /4" to 1 IT x 10" x 6" Tools: scroll saw with No. 2R and/or No. 5R blades: fixed disc or belt sander with fine or extra fine (120/220) disc or belt; access to photocopier Temporary-bond spray adhesive (such as 3M 777 adhesive) Clear packing tape I /4 sheet of 220-grit sandpaper Finish oil of choice (e.g., tung, walnut, Danish, etc.} Fishing line or thin cord for displaying angel (optional) as cherry or oak. will make a beautiful finished piece. Because Ihe design is quite delicate, I prefer to cut the piece using 1 /2"-thick wood, but thinner, harder, stronger wood should also work well. INSTRUCTIONS Photocopy the pattern and use spray adhesive to attach it to the wood. I recommend using clear packing tape on top of the pattern to reduce the burn from the tight turns you will have to make while cutting the pattern. Drill the guide holes. For cutting, use No. 2 reverse tooth blades to reduce chipping on the bottom of the piece and to handle the delicate detail cuts, especially in the face. Once you have finished the detail cutting, you may prefer to use a No. 5R blade to cut the angel outline. After cutting, peel the pattern off. Alternatively, use a solvent such as paint thinner to remove the paper pattern, and let the piece dry. Sand the front and back of the piece on a disc or belt sander. Use 220-grit sandpaper to remove any remaining burrs and to lightly round the edges, giving it a more finished look. Clean the angel using your favorite tool of choice, such as a clean paintbrush. Finish with a thin oil to seal the inner edges. I like to use either walnut or tung oil. If you plan to display the angel as a sun catcher or wall hanging, insert a length of fishing line through the fret holes at the top of each wing. [We use 6-10 lb. clear line so it doesn't detract from the angel.) Tie the ends off to form a hanger. Enjoy your holiday creation! Send questions concerning this project to: Wayne Fowler, 33 Longmeadow Cres., Markham, Ontario, Canada L3R 3J6, or email him at: fantasiesisaw@rogers.com --j i flfl • Creative Woodworks & Crafts Holiday S005 |


