Popular Woodworking 2000-02 № 113, страница 47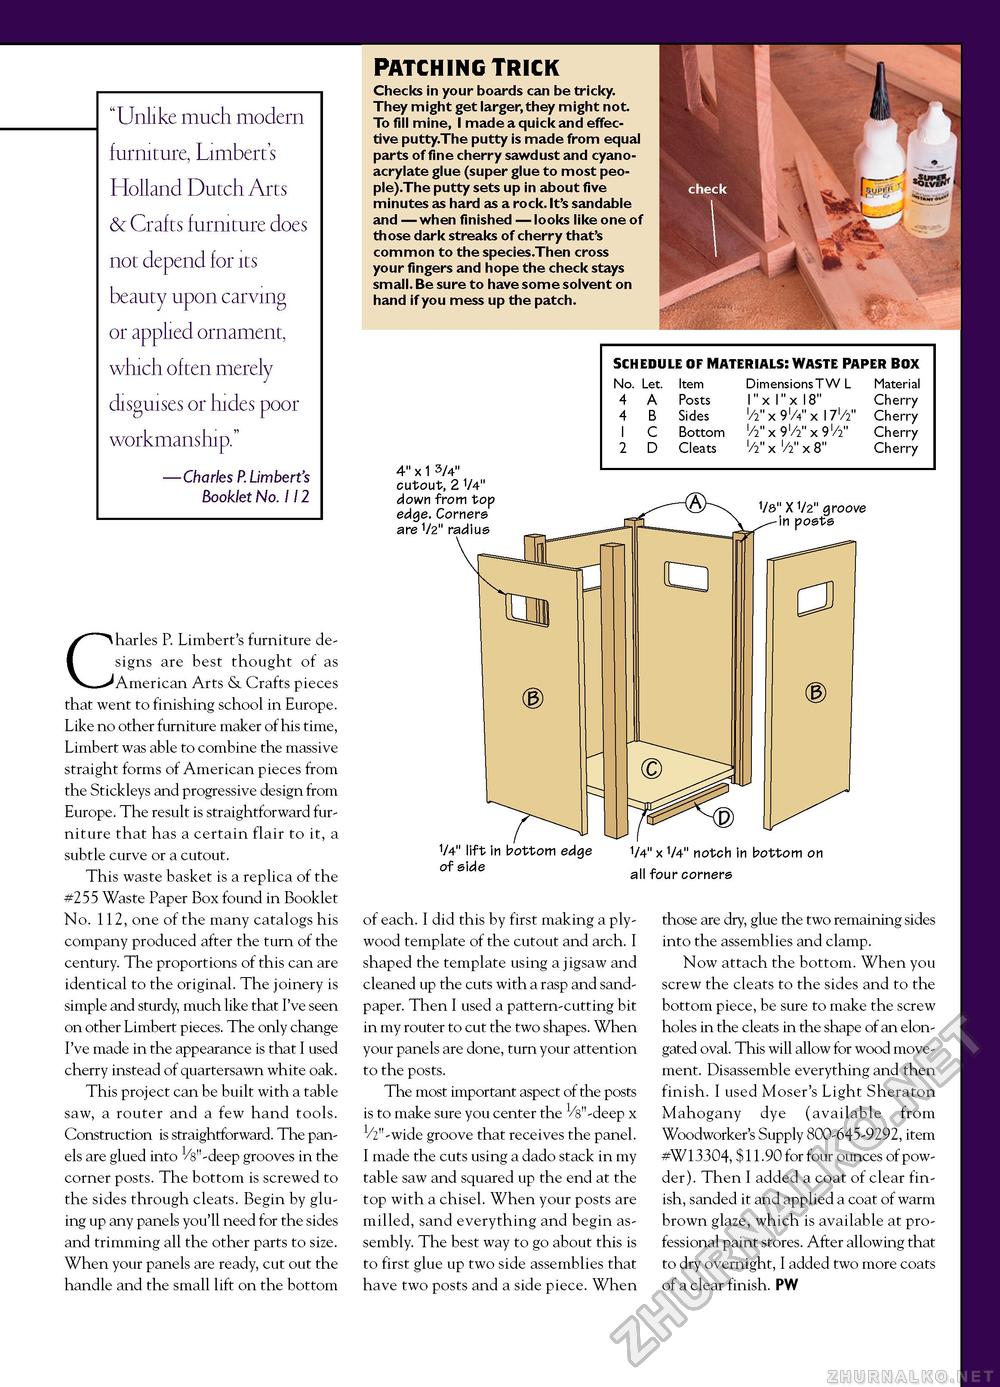
"Unlike much modern furniture, Limbert's Holland Dutch Arts & Crafts furniture does not depend for its beauty upon carving or applied ornament, which often merely disguises or hides poor workmanship." —Charles P. Limbert's Booklet No. 112 Charles P. Limbert's furniture designs are best thought of as American Arts & Crafts pieces that went to finishing school in Europe. Like no other furniture maker of his time, Limbert was able to combine the massive straight forms of American pieces from the Stickleys and progressive design from Europe. The result is straightforward furniture that has a certain flair to it, a subtle curve or a cutout. This waste basket is a replica of the #255 Waste Paper Box found in Booklet No. 112, one of the many catalogs his company produced after the turn of the century. The proportions of this can are identical to the original. The joinery is simple and sturdy, much like that I've seen on other Limbert pieces. The only change I've made in the appearance is that I used cherry instead of quartersawn white oak. This project can be built with a table saw, a router and a few hand tools. Construction is straightforward. The panels are glued into 1/s"-deep grooves in the corner posts. The bottom is screwed to the sides through cleats. Begin by gluing up any panels you'll need for the sides and trimming all the other parts to size. When your panels are ready, cut out the handle and the small lift on the bottom PATCHING TRICK Checks in your boards can be tricky. They might get larger,they might not. To fill mine, I made a quick and effective putty.The putty is made from equal parts of fine cherry sawdust and cyano-acrylate glue (super glue to most peo-ple).The putty sets up in about five minutes as hard as a rock. It's sandable and — when finished — looks like one of those dark streaks of cherry that's common to the species.Then cross your fingers and hope the check stays small. Be sure to have some solvent on hand if you mess up the patch. SCHEDULE OF MATERIALS: WASTE PAPER BOX
Dimensions T W L 1" x 1" x 1! '/2" x 9'/4" x l7'/2" Cherry Dimensions T W L 1" x 1" x 1! Material Cherry '/2" x 9'/4" x l7'/2" Cherry '/2" x 91/2" x 9l/2" l/i" x l/2" x 8" Cherry Cherry 4" X 1 3/4" cutout, 2 1/4" down from top edge. Corners are 1/2" radius 1/8" X 1/2" groove in posts 1/4" lift in bottom edge of side 1/4" x 1/4" notch in bottom on all four corners of each. I did this by first making a plywood template of the cutout and arch. I shaped the template using a jigsaw and cleaned up the cuts with a rasp and sandpaper. Then I used a pattern-cutting bit in my router to cut the two shapes. When your panels are done, turn your attention to the posts. The most important aspect of the posts is to make sure you center the 1/s"-deep x 1/2"-wide groove that receives the panel. I made the cuts using a dado stack in my table saw and squared up the end at the top with a chisel. When your posts are milled, sand everything and begin assembly. The best way to go about this is to first glue up two side assemblies that have two posts and a side piece. When those are dry, glue the two remaining sides into the assemblies and clamp. Now attach the bottom. When you screw the cleats to the sides and to the bottom piece, be sure to make the screw holes in the cleats in the shape of an elongated oval. This will allow for wood movement. Disassemble everything and then finish. I used Moser's Light Sheraton Mahogany dye (available from Woodworker's Supply 800-645-9292, item #W13304, $11.90 for four ounces of powder). Then I added a coat of clear finish, sanded it and applied a coat of warm brown glaze, which is available at professional paint stores. After allowing that to dry overnight, I added two more coats of a clear finish. pw |


