Popular Woodworking 2000-04 № 114, страница 58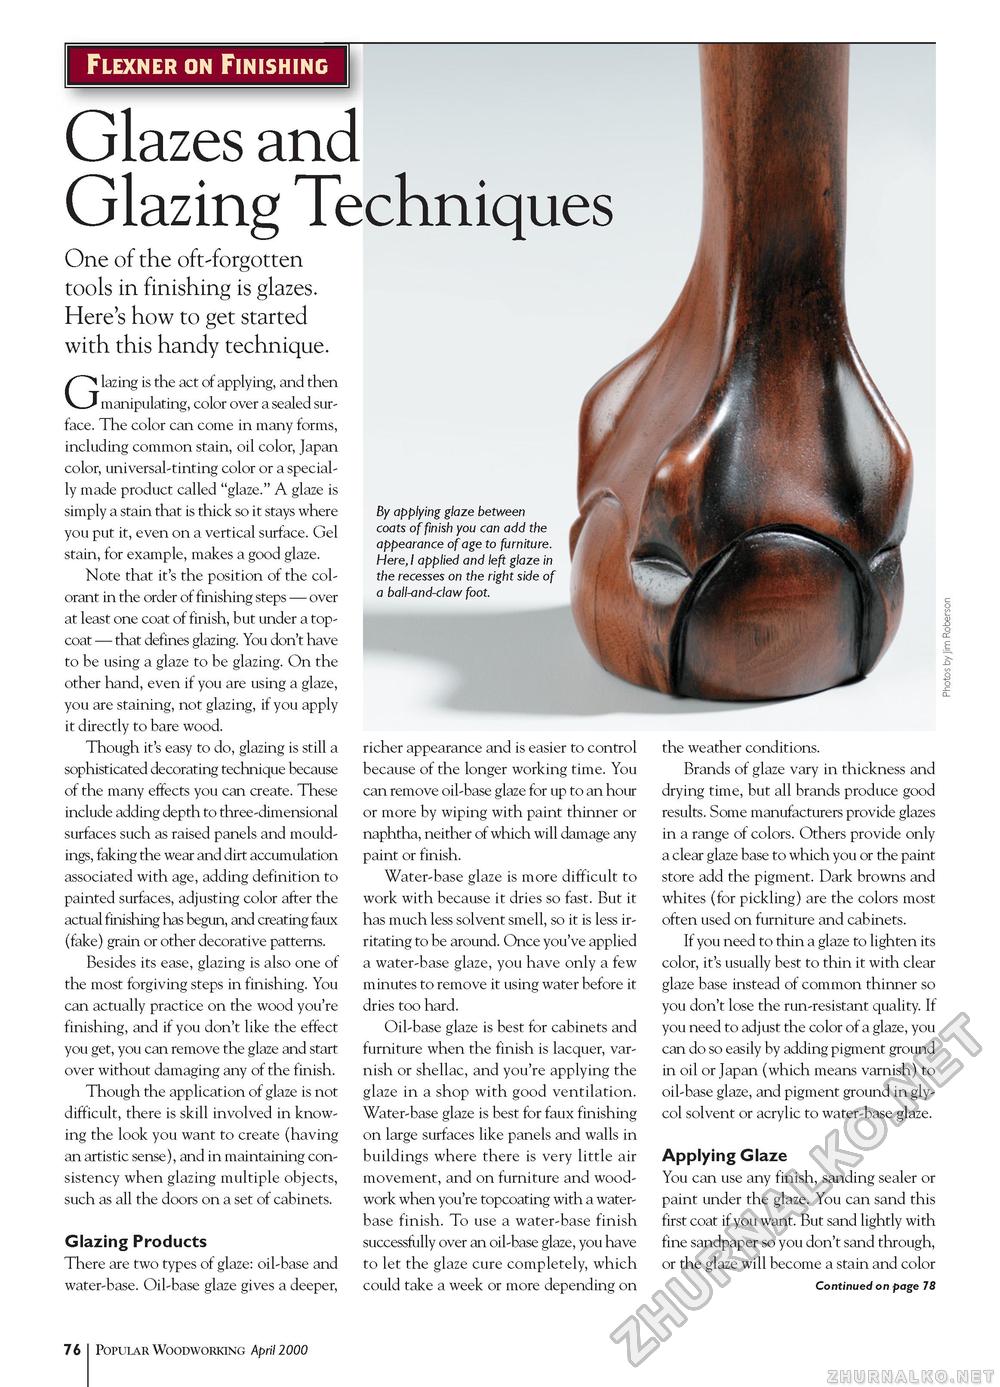
Flexner on Finishing Glazes and Glazing Techniques One of the oft-forgotten tools in finishing is glazes. Here's how to get started with this handy technique. Glazing is the act of applying, and then manipulating, color over a sealed surface. The color can come in many forms, including common stain, oil color, Japan color, universal-tinting color or a specially made product called "glaze." A glaze is simply a stain that is thick so it stays where you put it, even on a vertical surface. Gel stain, for example, makes a good glaze. Note that it's the position of the colorant in the order of finishing steps — over at least one coat of finish, but under a topcoat — that defines glazing. You don't have to be using a glaze to be glazing. On the other hand, even if you are using a glaze, you are staining, not glazing, if you apply it directly to bare wood. Though it's easy to do, glazing is still a sophisticated decorating technique because of the many effects you can create. These include adding depth to three-dimensional surfaces such as raised panels and mouldings, faking the wear and dirt accumulation associated with age, adding definition to painted surfaces, adjusting color after the actual finishing has begun, and creating faux (fake) grain or other decorative patterns. Besides its ease, glazing is also one of the most forgiving steps in finishing. You can actually practice on the wood you're finishing, and if you don't like the effect you get, you can remove the glaze and start over without damaging any of the finish. Though the application of glaze is not difficult, there is skill involved in knowing the look you want to create (having an artistic sense), and in maintaining consistency when glazing multiple objects, such as all the doors on a set of cabinets. Glazing Products There are two types of glaze: oil-base and water-base. Oil-base glaze gives a deeper, By applying glaze between coats of finish you can add the appearance of age to furniture. Here, I applied and left glaze in the recesses on the right side of a ball-and-claw foot. richer appearance and is easier to control because of the longer working time. You can remove oil-base glaze for up to an hour or more by wiping with paint thinner or naphtha, neither of which will damage any paint or finish. Water-base glaze is more difficult to work with because it dries so fast. But it has much less solvent smell, so it is less irritating to be around. Once you've applied a water-base glaze, you have only a few minutes to remove it using water before it dries too hard. Oil-base glaze is best for cabinets and furniture when the finish is lacquer, varnish or shellac, and you're applying the glaze in a shop with good ventilation. Water-base glaze is best for faux finishing on large surfaces like panels and walls in buildings where there is very little air movement, and on furniture and woodwork when you're topcoating with a water-base finish. To use a water-base finish successfully over an oil-base glaze, you have to let the glaze cure completely, which could take a week or more depending on the weather conditions. Brands of glaze vary in thickness and drying time, but all brands produce good results. Some manufacturers provide glazes in a range of colors. Others provide only a clear glaze base to which you or the paint store add the pigment. Dark browns and whites (for pickling) are the colors most often used on furniture and cabinets. If you need to thin a glaze to lighten its color, it's usually best to thin it with clear glaze base instead of common thinner so you don't lose the run-resistant quality. If you need to adjust the color of a glaze, you can do so easily by adding pigment ground in oil or Japan (which means varnish) to oil-base glaze, and pigment ground in gly-col solvent or acrylic to water-base glaze. Applying Glaze You can use any finish, sanding sealer or paint under the glaze. You can sand this first coat if you want. But sand lightly with fine sandpaper so you don't sand through, or the glaze will become a stain and color Continued on page 78 12 Popular Woodworking April 2000 |


