Popular Woodworking 2001-02 № 120, страница 37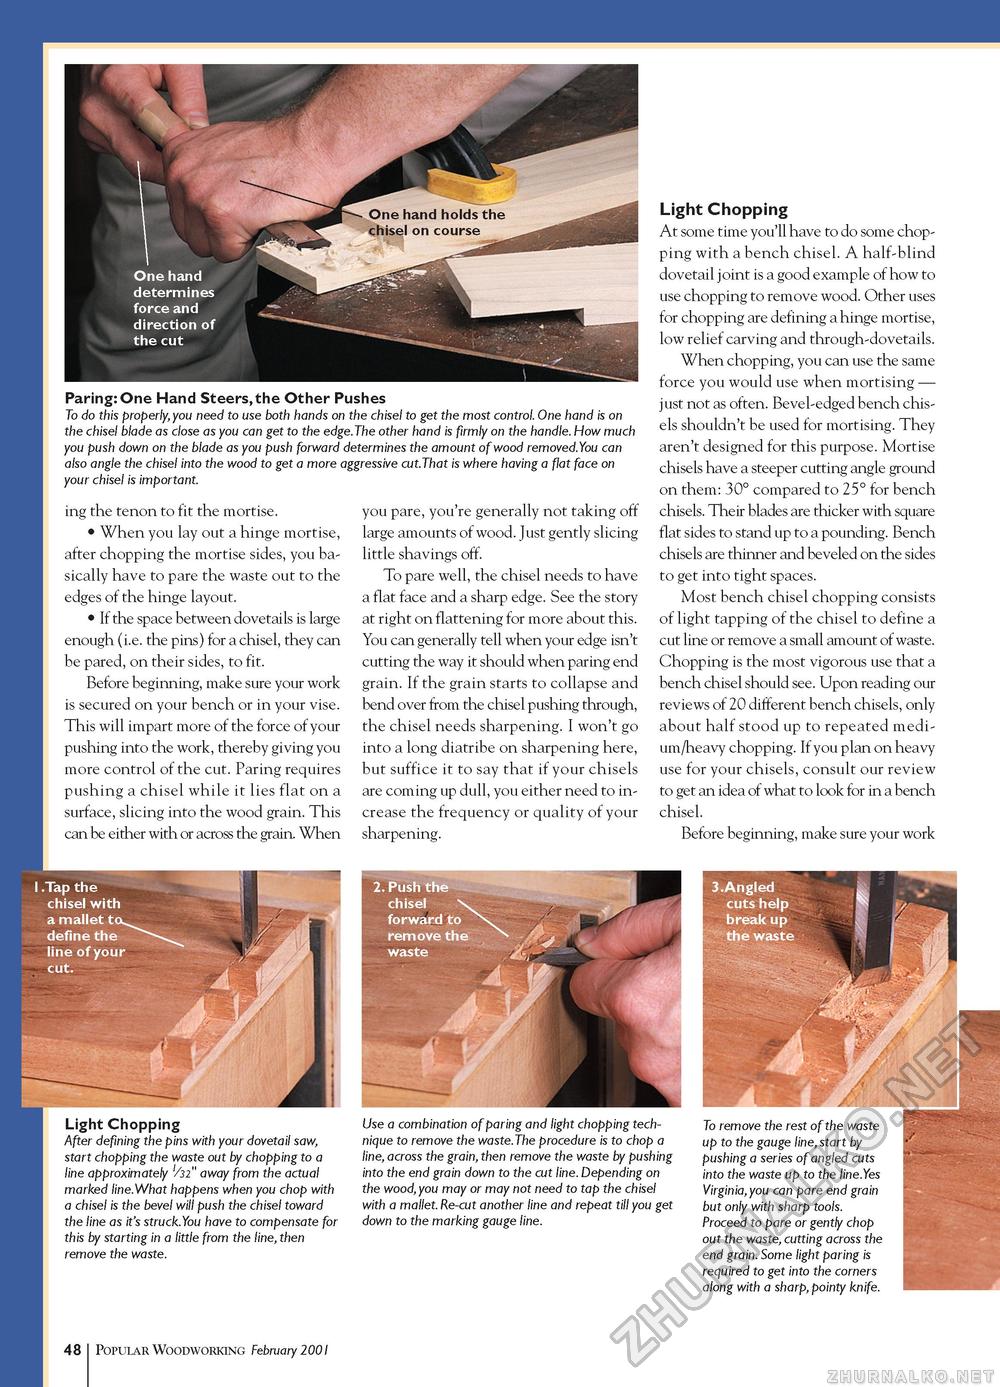
Paring: One Hand Steers, the Other Pushes To do this properly, you need to use both hands on the chisel to get the most control. One hand is on the chisel blade as close as you can get to the edge.The other hand is firmly on the handle. How much you push down on the blade as you push forward determines the amount of wood removed.You can also angle the chisel into the wood to get a more aggressive cut.That is where having a flat face on your chisel is important. ing the tenon to fit the mortise. • When you lay out a hinge mortise, after chopping the mortise sides, you basically have to pare the waste out to the edges of the hinge layout. • If the space between dovetails is large enough (i.e. the pins) for a chisel, they can be pared, on their sides, to fit. Before beginning, make sure your work is secured on your bench or in your vise. This will impart more of the force of your pushing into the work, thereby giving you more control of the cut. Paring requires pushing a chisel while it lies flat on a surface, slicing into the wood grain. This can be either with or across the grain. When you pare, you're generally not taking off large amounts of wood. Just gently slicing little shavings off. To pare well, the chisel needs to have a flat face and a sharp edge. See the story at right on flattening for more about this. You can generally tell when your edge isn't cutting the way it should when paring end grain. If the grain starts to collapse and bend over from the chisel pushing through, the chisel needs sharpening. I won't go into a long diatribe on sharpening here, but suffice it to say that if your chisels are coming up dull, you either need to increase the frequency or quality of your sharpening. Light Chopping At some time you'll have to do some chopping with a bench chisel. A half-blind dovetail joint is a good example of how to use chopping to remove wood. Other uses for chopping are defining a hinge mortise, low relief carving and through-dovetails. When chopping, you can use the same force you would use when mortising — just not as often. Bevel-edged bench chisels shouldn't be used for mortising. They aren't designed for this purpose. Mortise chisels have a steeper cutting angle ground on them: 30° compared to 25° for bench chisels. Their blades are thicker with square flat sides to stand up to a pounding. Bench chisels are thinner and beveled on the sides to get into tight spaces. Most bench chisel chopping consists of light tapping of the chisel to define a cut line or remove a small amount of waste. Chopping is the most vigorous use that a bench chisel should see. Upon reading our reviews of 20 different bench chisels, only about half stood up to repeated medium/heavy chopping. If you plan on heavy use for your chisels, consult our review to get an idea of what to look for in a bench chisel. Before beginning, make sure your work 1.Tap the chisel with a mallet to define the line of your cut. Light Chopping After defining the pins with your dovetail saw, start chopping the waste out by chopping to a line approximately '/32" away from the actual marked line.What happens when you chop with a chisel is the bevel will push the chisel toward the line as it's struck.You have to compensate for this by starting in a little from the line, then remove the waste. Use a combination of paring and light chopping technique to remove the waste.The procedure is to chop a line, across the grain, then remove the waste by pushing into the end grain down to the cut line. Depending on the wood,you may or may not need to tap the chisel with a mallet. Re-cut another line and repeat till you get down to the marking gauge line. To remove the rest of the waste up to the gauge line, start by pushing a series of angled cuts into the waste up to the line.Yes Virginia, you can pare end grain but only with sharp tools. Proceed to pare or gently chop out the waste, cutting across the end grain. Some light paring is required to get into the corners along with a sharp, pointy knife. 48 Popular Woodworking February 2001 |


