Popular Woodworking 2001-02 № 120, страница 59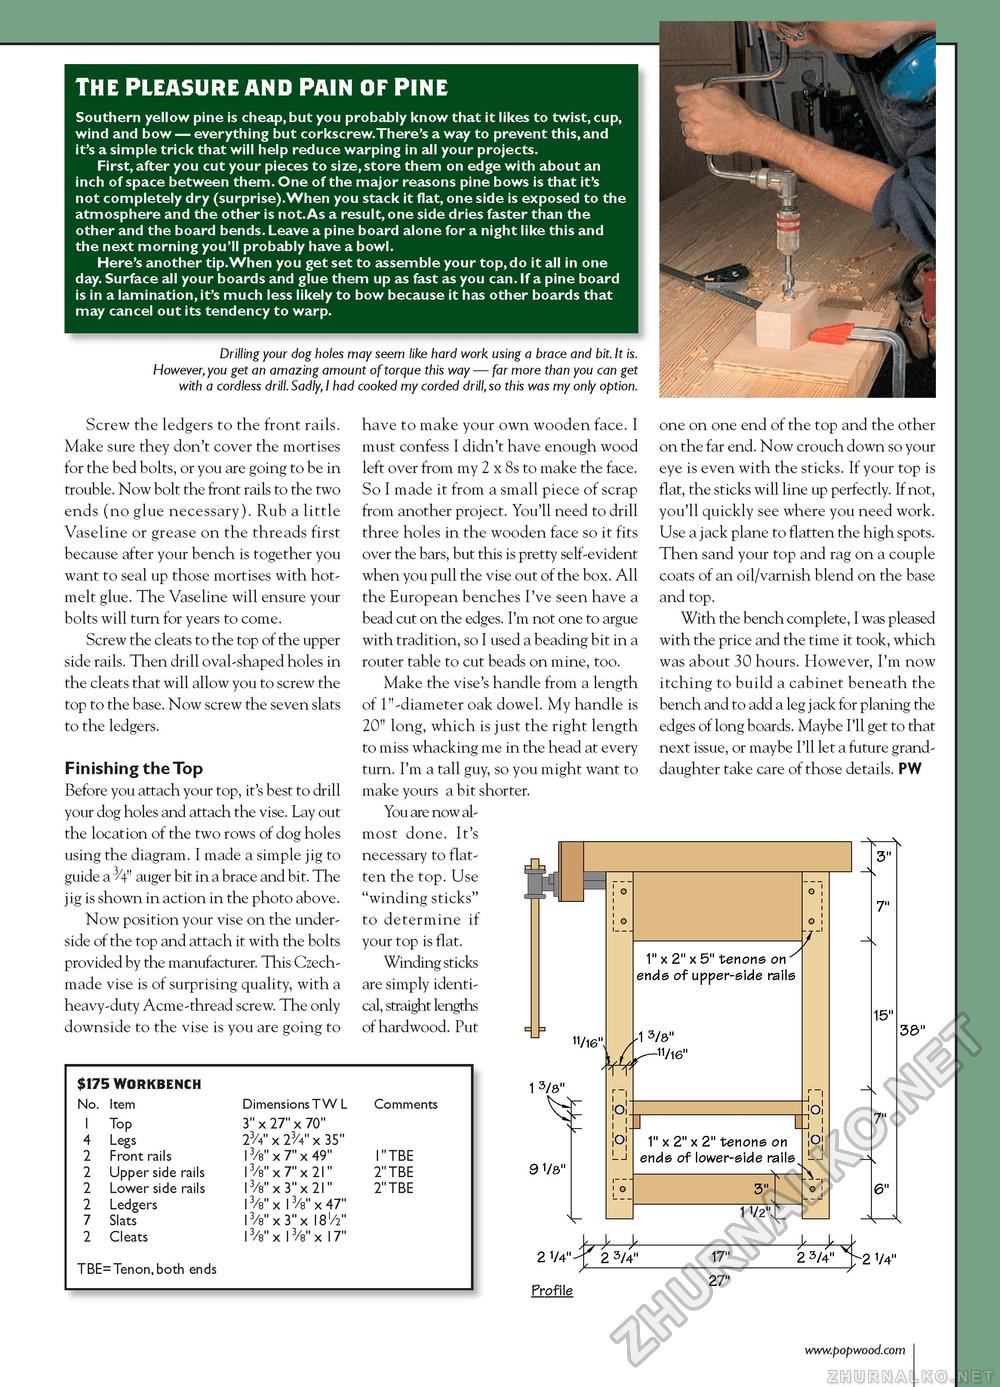
THE PLEASURE AND PAIN OF PINE Southern yellow pine is cheap, but you probably know that it likes to twist, cup, wind and bow — everything but corkscrew.There's a way to prevent this, and it's a simple trick that will help reduce warping in all your projects. First, after you cut your pieces to size, store them on edge with about an inch of space between them. One of the major reasons pine bows is that it's not completely dry (surprise).When you stack it flat, one side is exposed to the atmosphere and the other is not.As a result, one side dries faster than the other and the board bends. Leave a pine board alone for a night like this and the next morning you'll probably have a bowl. Here's another tip.When you get set to assemble your top,do it all in one day. Surface all your boards and glue them up as fast as you can. If a pine board is in a lamination, it's much less likely to bow because it has other boards that may cancel out its tendency to warp. Drilling your dog holes may seem like hard work using a brace and bit. It is. However, you get an amazing amount of torque this way — far more than you can get wth a cordless drill. Sadly, I had cooked my corded drill, so this was my only option. Screw the ledgers to the front rails. Make sure they don't cover the mortises for the bed bolts, or you are going to be in trouble. Now bolt the front rails to the two ends (no glue necessary). Rub a little Vaseline or grease on the threads first because after your bench is together you want to seal up those mortises with hot-melt glue. The Vaseline will ensure your bolts will turn for years to come. Screw the cleats to the top of the upper side rails. Then drill oval-shaped holes in the cleats that will allow you to screw the top to the base. Now screw the seven slats to the ledgers. Finishing the Top Before you attach your top, it's best to drill your dog holes and attach the vise. Lay out the location of the two rows of dog holes using the diagram. I made a simple jig to guide a ^V" auger bit in a brace and bit. The jig is shown in action in the photo above. Now position your vise on the underside of the top and attach it with the bolts provided by the manufacturer. This Czech-made vise is of surprising quality, with a heavy-duty Acme-thread screw. The only downside to the vise is you are going to 11/16",
1 3/8" 9 1/8" 2 1/4"- Profile have to make your own wooden face. I must confess I didn't have enough wood left over from my 2 x 8s to make the face. So I made it from a small piece of scrap from another project. You'll need to drill three holes in the wooden face so it fits over the bars, but this is pretty self-evident when you pull the vise out of the box. All the European benches I've seen have a bead cut on the edges. I'm not one to argue with tradition, so I used a beading bit in a router table to cut beads on mine, too. Make the vise's handle from a length of 1"-diameter oak dowel. My handle is 20" long, which is just the right length to miss whacking me in the head at every turn. I'm a tall guy, so you might want to make yours a bit shorter. You are now almost done. It's necessary to flatten the top. Use "winding sticks" to determine if your top is flat. Winding sticks are simply identical, straight lengths of hardwood. Put one on one end of the top and the other on the far end. Now crouch down so your eye is even with the sticks. If your top is flat, the sticks will line up perfectly. If not, you'll quickly see where you need work. Use a jack plane to flatten the high spots. Then sand your top and rag on a couple coats of an oil/varnish blend on the base and top. With the bench complete, I was pleased with the price and the time it took, which was about 30 hours. However, I'm now itching to build a cabinet beneath the bench and to add a leg jack for planing the edges of long boards. Maybe I'll get to that next issue, or maybe I'll let a future granddaughter take care of those details. PW 1" x 2" x 5" tenons on 7" ends of upper-side rails -1 3/8" ■11/16" :r 1" x 2" x 2" tenons on ends of lower-side rails 3" 1 1/2" T] O! 3" 7" 15" 7" 6" 38" 2 3/4" 17" 27" 2 3/4" 2 1/4" |


