Popular Woodworking 2001-08 № 123, страница 31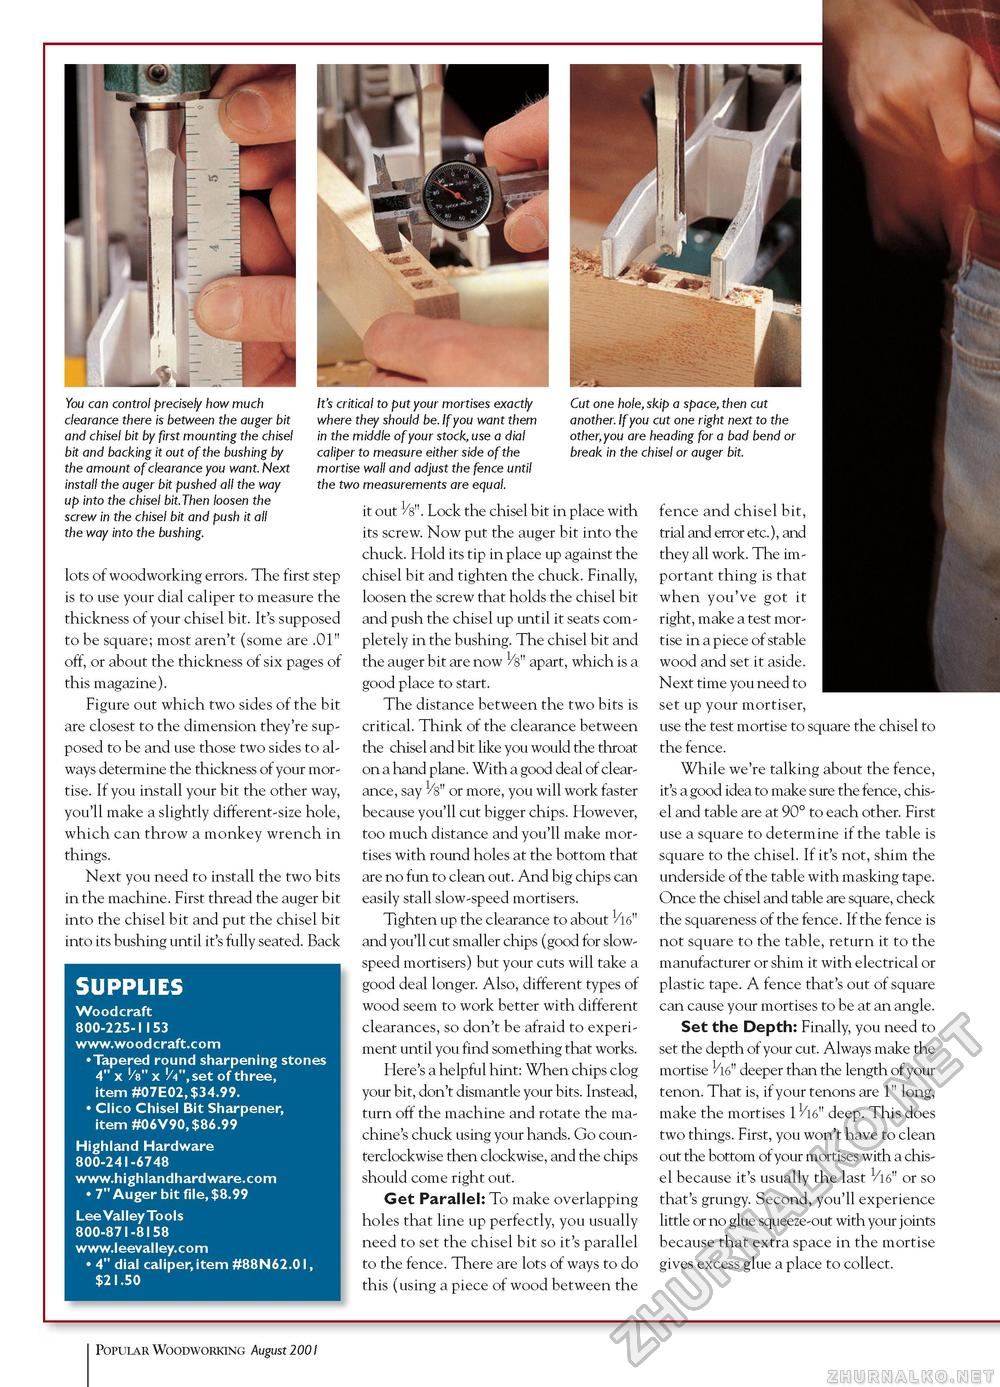
You can control precisely how much clearance there is between the auger bit and chisel bit by first mounting the chisel bit and backing it out of the bushing by the amount of clearance you want. Next install the auger bit pushed all the way up into the chisel bit.Then loosen the screw in the chisel bit and push it all the way into the bushing. It's critical to put your mortises exactly where they should be. If you want them in the middle of your stock, use a dial caliper to measure either side of the mortise wall and adjust the fence until the two measurements are equal. it out 1/8' Cut one hole, skip a space, then cut another. If you cut one right next to the other,you are heading for a bad bend or break in the chisel or auger bit. lots of woodworking errors. The first step is to use your dial caliper to measure the thickness of your chisel bit. It's supposed to be square; most aren't (some are .01" off, or about the thickness of six pages of this magazine). Figure out which two sides of the bit are closest to the dimension they're supposed to be and use those two sides to always determine the thickness of your mortise. If you install your bit the other way, you'll make a slightly different-size hole, which can throw a monkey wrench in things. Next you need to install the two bits in the machine. First thread the auger bit into the chisel bit and put the chisel bit into its bushing until it's fully seated. Back Lock the chisel bit in place with its screw. Now put the auger bit into the chuck. Hold its tip in place up against the chisel bit and tighten the chuck. Finally, loosen the screw that holds the chisel bit and push the chisel up until it seats completely in the bushing. The chisel bit and the auger bit are now V8" apart, which is a good place to start. The distance between the two bits is critical. Think of the clearance between the chisel and bit like you would the throat on a hand plane. With a good deal of clearance, say 1/8" or more, you will work faster because you'll cut bigger chips. However, too much distance and you'll make mortises with round holes at the bottom that are no fun to clean out. And big chips can easily stall slow-speed mortisers. Tighten up the clearance to about 1/l6" and you'll cut smaller chips (good for slow-speed mortisers) but your cuts will take a good deal longer. Also, different types of wood seem to work better with different clearances, so don't be afraid to experiment until you find something that works. Here's a helpful hint: When chips clog your bit, don't dismantle your bits. Instead, turn off the machine and rotate the machine's chuck using your hands. Go counterclockwise then clockwise, and the chips should come right out. Get Parallel: To make overlapping holes that line up perfectly, you usually need to set the chisel bit so it's parallel to the fence. There are lots of ways to do this (using a piece of wood between the fence and chisel bit, trial and error etc.), and they all work. The important thing is that when you've got it right, make a test mortise in a piece of stable wood and set it aside. Next time you need to set up your mortiser, use the test mortise to square the chisel to the fence. While we're talking about the fence, it's a good idea to make sure the fence, chisel and table are at 90° to each other. First use a square to determine if the table is square to the chisel. If it's not, shim the underside of the table with masking tape. Once the chisel and table are square, check the squareness of the fence. If the fence is not square to the table, return it to the manufacturer or shim it with electrical or plastic tape. A fence that's out of square can cause your mortises to be at an angle. Set the Depth: Finally, you need to set the depth of your cut. Always make the mortise deeper than the length of your tenon. That is, if your tenons are 1" long, make the mortises 11/16" deep. This does two things. First, you won't have to clean out the bottom of your mortises with a chisel because it's usually the last 1/16" or so that's grungy. Second, you'll experience little or no glue squeeze-out with your joints because that extra space in the mortise gives excess glue a place to collect. SUPPLIES Woodcraft 800-225-1153 • Tapered round sharpening stones 4" x !/8" x !/4",set of three, item #07E02,$34.99. • Clico Chisel Bit Sharpener, item #06V90,$86.99 Highland Hardware 800-241-6748 • 7" Auger bit file,$8.99 Lee Valley Tools 800-871-8158 • 4" dial caliper, item #88N62.0I, $21.50 31 Popular Woodworking August 2001 |


