Popular Woodworking 2002-02 № 126, страница 55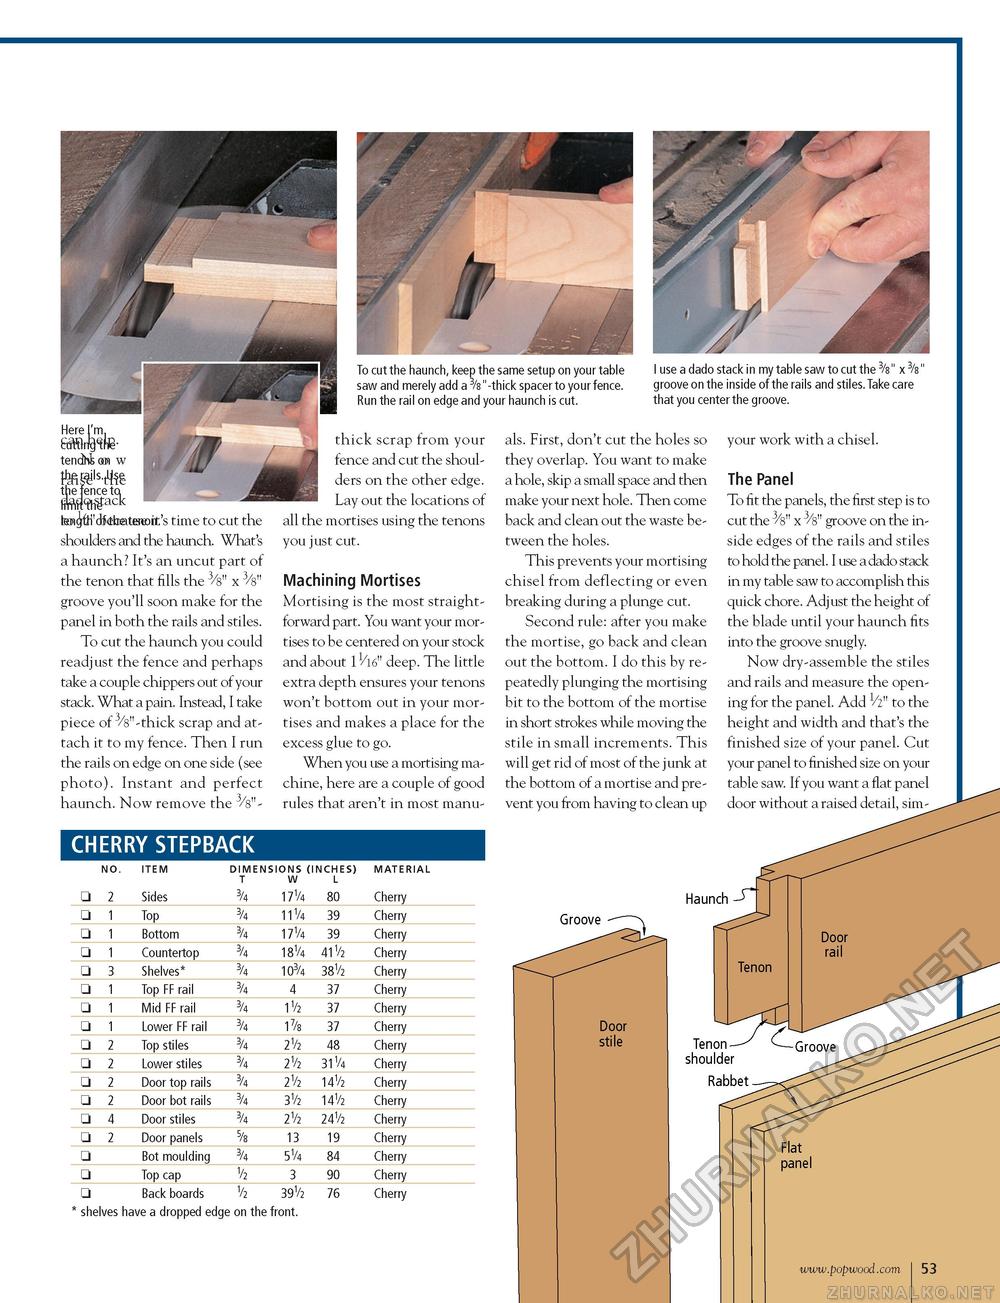
To cut the haunch, keep the same setup on your table saw and merely add a 3/s "-thick spacer to your fence. Run the rail on edge and your haunch is cut. I use a dado stack in my table saw to cut the 3/s" x 3/s" groove on the inside of the rails and stiles. Take care that you center the groove. t.'s time to cut the shoulders and the haunch. What's a haunch? It's an uncut part of the tenon that fills the 3/s" x 3/s" groove you'll soon make for the panel in both the rails and stiles. To cut the haunch you could readjust the fence and perhaps take a couple chippers out of your stack. What a pain. Instead, I take piece of 3/s"-thick scrap and attach it to my fence. Then I run the rails on edge on one side (see photo). Instant and perfect haunch. Now remove the 3/s"- CHERRY STEPBACK thick scrap from your fence and cut the shoulders on the other edge. Lay out the locations of all the mortises using the tenons you just cut. Machining Mortises Mortising is the most straightforward part. You want your mortises to be centered on your stock and about 11/l6" deep. The little extra depth ensures your tenons won't bottom out in your mortises and makes a place for the excess glue to go. When you use a mortising machine, here are a couple of good rules that aren't in most manu-
* shelves have a dropped edge on the front. als. First, don't cut the holes so they overlap. You want to make a hole, skip a small space and then make your next hole. Then come back and clean out the waste between the holes. This prevents your mortising chisel from deflecting or even breaking during a plunge cut. Second rule: after you make the mortise, go back and clean out the bottom. I do this by repeatedly plunging the mortising bit to the bottom of the mortise in short strokes while moving the stile in small increments. This will get rid of most of the junk at the bottom of a mortise and prevent you from having to clean up your work with a chisel. The Panel To fit the panels, the first step is to cut the 3/8" x 3/8" groove on the inside edges of the rails and stiles to hold the panel. I use a dado stack in my table saw to accomplish this quick chore. Adjust the height of the blade until your haunch fits into the groove snugly. Now dry-assemble the stiles and rails and measure the opening for the panel. Add 1/2" to the height and width and that's the finished size of your panel. Cut your panel to finished size on your table saw. If you want a flat panel door without a raised detail, sim- Haunch Groove * shelves have a dropped edge on the front. Door stile Tenon shoulder Rabbet www.popwood.com I 53 |
||||||||||||||||||||||||||||||||||||||||||||||||||||||||||||||||||||||||||||||||||||||||||||||||||||||||||||||||||||||||||||||


