Popular Woodworking 2002-02 № 126, страница 60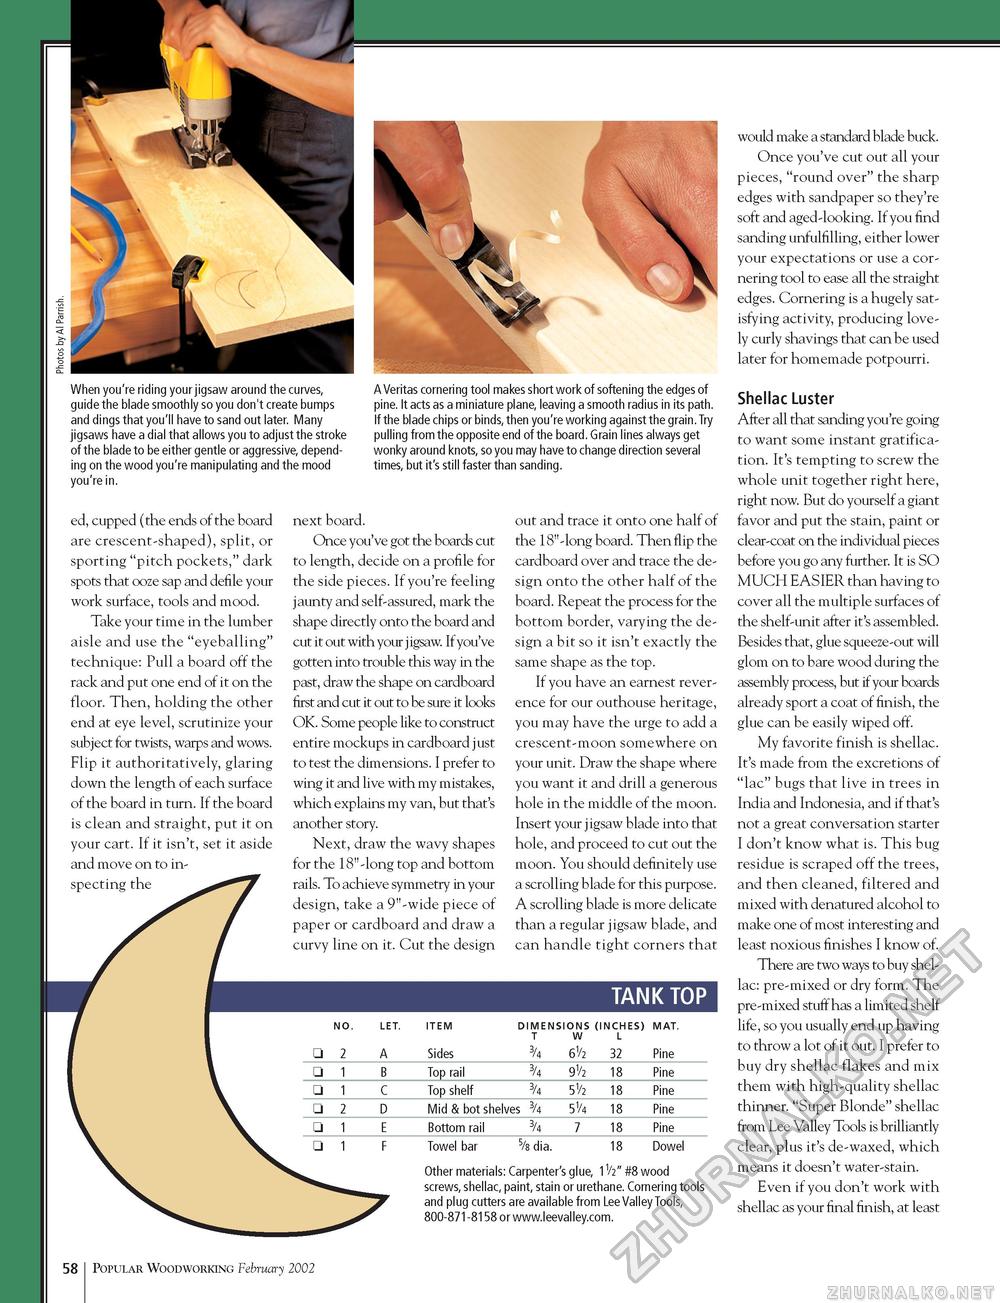
<4 When you're riding your jigsaw around the curves, guide the blade smoothly so you don't create bumps and dings that you'll have to sand out later. Many jigsaws have a dial that allows you to adjust the stroke of the blade to be either gentle or aggressive, depending on the wood you're manipulating and the mood you're in. A Veritas cornering tool makes short work of softening the edges of pine. It acts as a miniature plane, leaving a smooth radius in its path. If the blade chips or binds, then you're working against the grain.Try pulling from the opposite end of the board. Grain lines always get wonky around knots, so you may have to change direction several times, but it's still faster than sanding. ed, cupped (the ends of the board are crescent-shaped), split, or sporting "pitch pockets," dark spots that ooze sap and defile your work surface, tools and mood. Take your time in the lumber aisle and use the "eyeballing" technique: Pull a board off the rack and put one end of it on the floor. Then, holding the other end at eye level, scrutinize your subject for twists, warps and wows. Flip it authoritatively, glaring down the length of each surface of the board in turn. If the board is clean and straight, put it on your cart. If it isn't, set it aside and move on to inspecting the next board. Once you've got the boards cut to length, decide on a profile for the side pieces. If you're feeling jaunty and self-assured, mark the shape directly onto the board and cut it out with your jigsaw. If you've gotten into trouble this way in the past, draw the shape on cardboard first and cut it out to be sure it looks OK. Some people like to construct entire mockups in cardboard just to test the dimensions. I prefer to wing it and live with my mistakes, which explains my van, but that's another story. Next, draw the wavy shapes for the 18"-long top and bottom rails. To achieve symmetry in your design, take a 9"-wide piece of paper or cardboard and draw a curvy line on it. Cut the design out and trace it onto one half of the 18"-long board. Then flip the cardboard over and trace the design onto the other half of the board. Repeat the process for the bottom border, varying the design a bit so it isn't exactly the same shape as the top. If you have an earnest reverence for our outhouse heritage, you may have the urge to add a crescent-moon somewhere on your unit. Draw the shape where you want it and drill a generous hole in the middle of the moon. Insert your jigsaw blade into that hole, and proceed to cut out the moon. You should definitely use a scrolling blade for this purpose. A scrolling blade is more delicate than a regular jigsaw blade, and can handle tight corners that TANK TOP DIMENSIONS (INCHES) MAT. DIMENSIONS (INCHES) MAT. LET ITEM
Other materials: Carpenter's glue, 1V2" #8 wood screws, shellac, paint, stain or urethane. Cornering tools and plug cutters are available from Lee Valley Tools, 800-871-8158 or www.leevalley.com. 58 Popular Woodworking February 2002 LET ITEM would make a standard blade buck. Once you've cut out all your pieces, "round over" the sharp edges with sandpaper so they're soft and aged-looking. If you find sanding unfulfilling, either lower your expectations or use a cornering tool to ease all the straight edges. Cornering is a hugely satisfying activity, producing lovely curly shavings that can be used later for homemade potpourri. Shellac Luster After all that sanding you're going to want some instant gratification. It's tempting to screw the whole unit together right here, right now. But do yourself a giant favor and put the stain, paint or clear-coat on the individual pieces before you go any further. It is SO MUCH EASIER than having to cover all the multiple surfaces of the shelf-unit after it's assembled. Besides that, glue squeeze-out will glom on to bare wood during the assembly process, but if your boards already sport a coat of finish, the glue can be easily wiped off. My favorite finish is shellac. It's made from the excretions of "lac" bugs that live in trees in India and Indonesia, and if that's not a great conversation starter I don't know what is. This bug residue is scraped off the trees, and then cleaned, filtered and mixed with denatured alcohol to make one of most interesting and least noxious finishes I know of. There are two ways to buy shellac: pre-mixed or dry form. The pre-mixed stuff has a limited shelf life, so you usually end up having to throw a lot of it out. I prefer to buy dry shellac flakes and mix them with high-quality shellac thinner. "Super Blonde" shellac from Lee Valley Tools is brilliantly clear, plus it's de-waxed, which means it doesn't water-stain. Even if you don't work with shellac as your final finish, at least |


