Popular Woodworking 2002-02 № 126, страница 71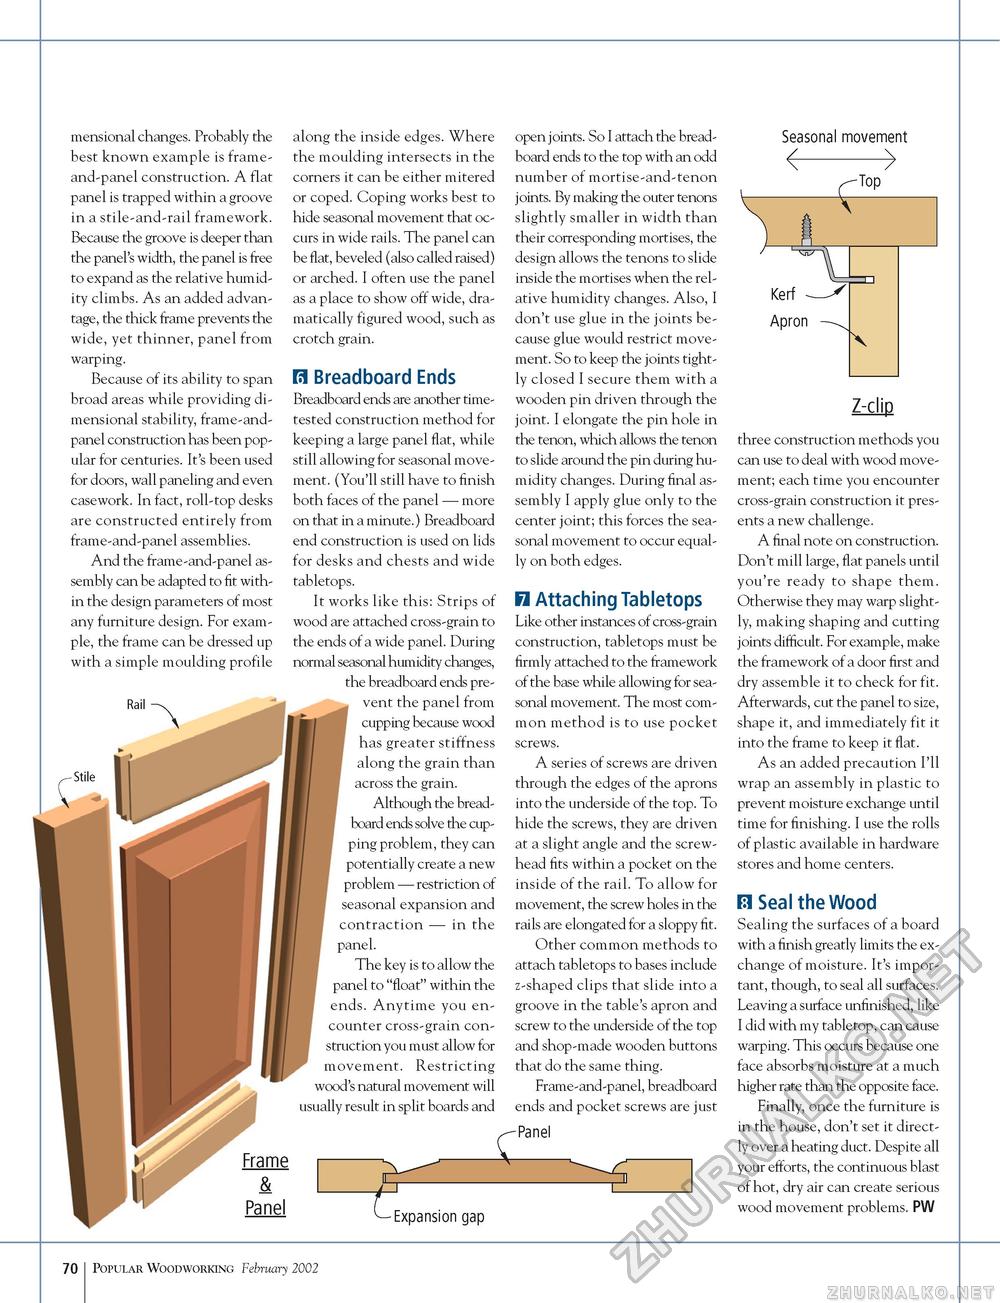
mensional changes. Probably the best known example is frame-and-panel construction. A flat panel is trapped within a groove in a stile-and-rail framework. Because the groove is deeper than the panel's width, the panel is free to expand as the relative humidity climbs. As an added advantage, the thick frame prevents the wide, yet thinner, panel from warping. Because of its ability to span broad areas while providing dimensional stability, frame-and-panel construction has been popular for centuries. It's been used for doors, wall paneling and even casework. In fact, roll-top desks are constructed entirely from frame-and-panel assemblies. And the frame-and-panel assembly can be adapted to fit within the design parameters of most any furniture design. For example, the frame can be dressed up with a simple moulding profile Rail along the inside edges. Where the moulding intersects in the corners it can be either mitered or coped. Coping works best to hide seasonal movement that occurs in wide rails. The panel can be flat, beveled (also called raised) or arched. I often use the panel as a place to show off wide, dramatically figured wood, such as crotch grain. fl Breadboard Ends Breadboard ends are another time-tested construction method for keeping a large panel flat, while still allowing for seasonal movement. (You'll still have to finish both faces of the panel — more on that in a minute.) Breadboard end construction is used on lids for desks and chests and wide tabletops. It works like this: Strips of wood are attached cross-grain to the ends of a wide panel. During normal seasonal humidity changes, the breadboard ends prevent the panel from cupping because wood has greater stiffness along the grain than across the grain. Although the breadboard ends solve the cupping problem, they can potentially create a new problem — restriction of seasonal expansion and contraction — in the I panel. The key is to allow the panel to "float" within the ends. Anytime you encounter cross-grain construction you must allow for movement. Restricting wood's natural movement will usually result in split boards and t 1 open joints. So I attach the breadboard ends to the top with an odd number of mortise-and-tenon joints. By making the outer tenons slightly smaller in width than their corresponding mortises, the design allows the tenons to slide inside the mortises when the relative humidity changes. Also, I don't use glue in the joints because glue would restrict movement. So to keep the joints tightly closed I secure them with a wooden pin driven through the joint. I elongate the pin hole in the tenon, which allows the tenon to slide around the pin during humidity changes. During final assembly I apply glue only to the center joint; this forces the seasonal movement to occur equally on both edges. fl Attaching Tabletops Like other instances of cross-grain construction, tabletops must be firmly attached to the framework of the base while allowing for seasonal movement. The most common method is to use pocket screws. A series of screws are driven through the edges of the aprons into the underside of the top. To hide the screws, they are driven at a slight angle and the screw-head fits within a pocket on the inside of the rail. To allow for movement, the screw holes in the rails are elongated for a sloppy fit. Other common methods to attach tabletops to bases include z-shaped clips that slide into a groove in the table's apron and screw to the underside of the top and shop-made wooden buttons that do the same thing. Frame-and-panel, breadboard ends and pocket screws are just Panel Seasonal movement <-> Top Kerf Apron X Expansion gap Z-clip three construction methods you can use to deal with wood movement; each time you encounter cross-grain construction it presents a new challenge. A final note on construction. Don't mill large, flat panels until you're ready to shape them. Otherwise they may warp slightly, making shaping and cutting joints difficult. For example, make the framework of a door first and dry assemble it to check for fit. Afterwards, cut the panel to size, shape it, and immediately fit it into the frame to keep it flat. As an added precaution I'll wrap an assembly in plastic to prevent moisture exchange until time for finishing. I use the rolls of plastic available in hardware stores and home centers. Seal the Wood Sealing the surfaces of a board with a finish greatly limits the exchange of moisture. It's important, though, to seal all surfaces. Leaving a surface unfinished, like I did with my tabletop, can cause warping. This occurs because one face absorbs moisture at a much higher rate than the opposite face. Finally, once the furniture is in the house, don't set it directly over a heating duct. Despite all your efforts, the continuous blast of hot, dry air can create serious wood movement problems. PW 71 Popular Woodworking February 2002 |


