Popular Woodworking 2002-04 № 127, страница 78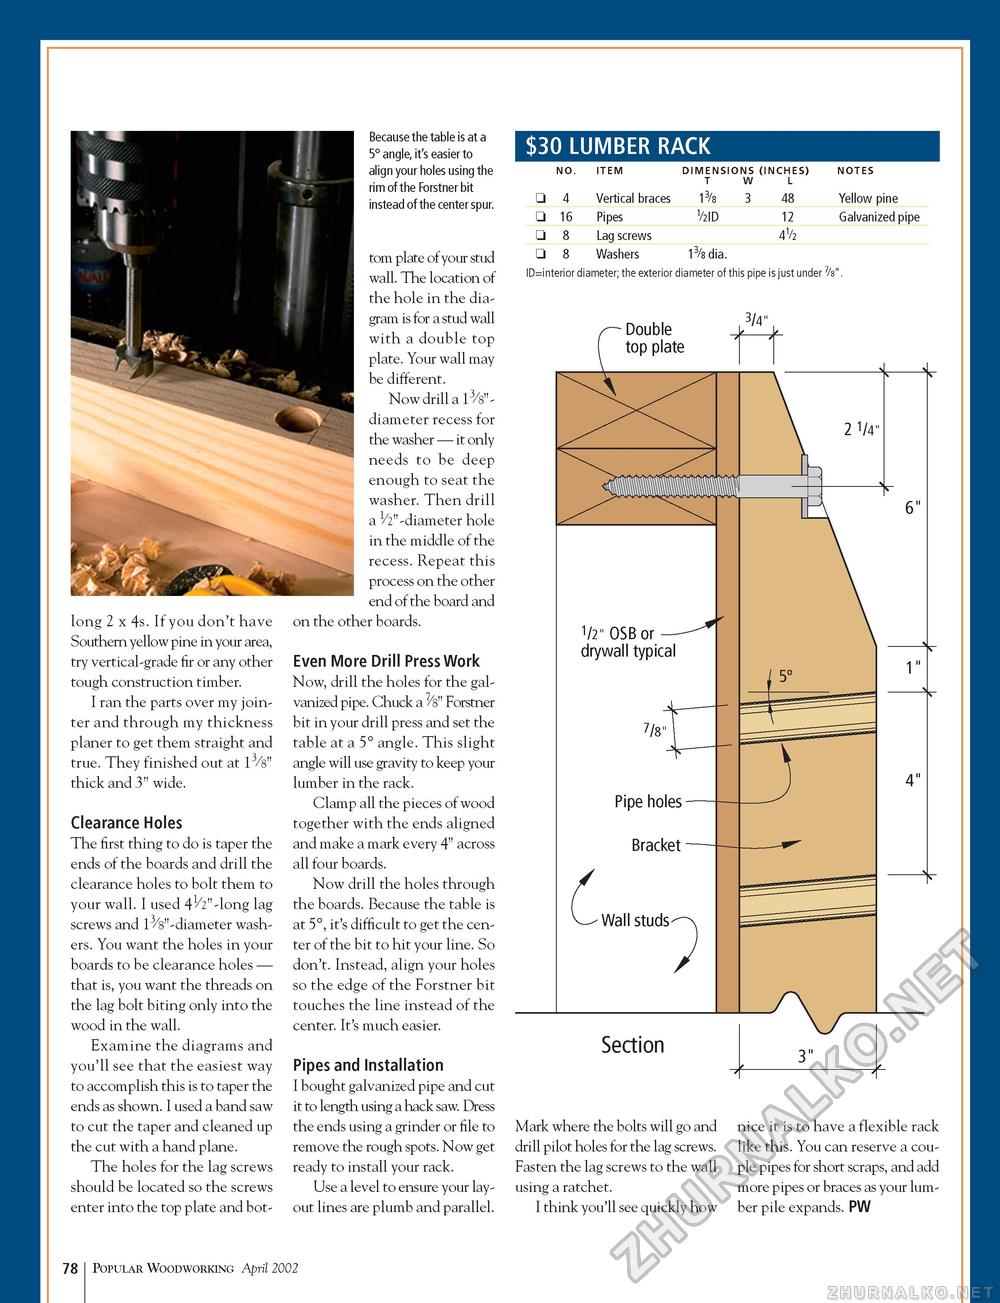
long 2 x 4s. If you don't have Southern yellow pine in your area, try vertical-grade fir or any other tough construction timber. I ran the parts over my jointer and through my thickness planer to get them straight and true. They finished out at 13/s" thick and 3" wide. Clearance Holes The first thing to do is taper the ends of the boards and drill the clearance holes to bolt them to your wall. I used 41/2"-long lag screws and 13/s" -diameter washers. You want the holes in your boards to be clearance holes — that is, you want the threads on the lag bolt biting only into the wood in the wall. Examine the diagrams and you'll see that the easiest way to accomplish this is to taper the ends as shown. I used a band saw to cut the taper and cleaned up the cut with a hand plane. The holes for the lag screws should be located so the screws enter into the top plate and bot Because the table is at a 5° angle, it's easier to align your holes using the rim of the Forstner bit instead of the center spur. tom plate of your stud wall. The location of the hole in the diagram is for a stud wall with a double top plate. Your wall may be different. Now drill a 13/s"-diameter recess for the washer — it only needs to be deep enough to seat the washer. Then drill a ^"-diameter hole in the middle of the recess. Repeat this process on the other end of the board and on the other boards. Even More Drill Press Work Now, drill the holes for the galvanized pipe. Chuck a ^s" Forstner bit in your drill press and set the table at a 5° angle. This slight angle will use gravity to keep your lumber in the rack. Clamp all the pieces of wood together with the ends aligned and make a mark every 4" across all four boards. Now drill the holes through the boards. Because the table is at 5°, it's difficult to get the center of the bit to hit your line. So don't. Instead, align your holes so the edge of the Forstner bit touches the line instead of the center. It's much easier. Pipes and Installation I bought galvanized pipe and cut it to length using a hack saw. Dress the ends using a grinder or file to remove the rough spots. Now get ready to install your rack. Use a level to ensure your layout lines are plumb and parallel. $30 LUMBER RACK
ID=interior diameter; the exterior diameter of this pipe is just under 7/sn. Yellow pine Galvanized pipe ID=interior diameter; the exterior diameter of this pipe is just under 7/sn. Section Mark where the bolts will go and drill pilot holes for the lag screws. Fasten the lag screws to the wall using a ratchet. I think you'll see quickly how nice it is to have a flexible rack like this. You can reserve a couple pipes for short scraps, and add more pipes or braces as your lumber pile expands. PW NOTES 78 Popular Woodworking April 2002 |
||||||||||||||||||||||||||||||


