Popular Woodworking 2002-06 № 128, страница 42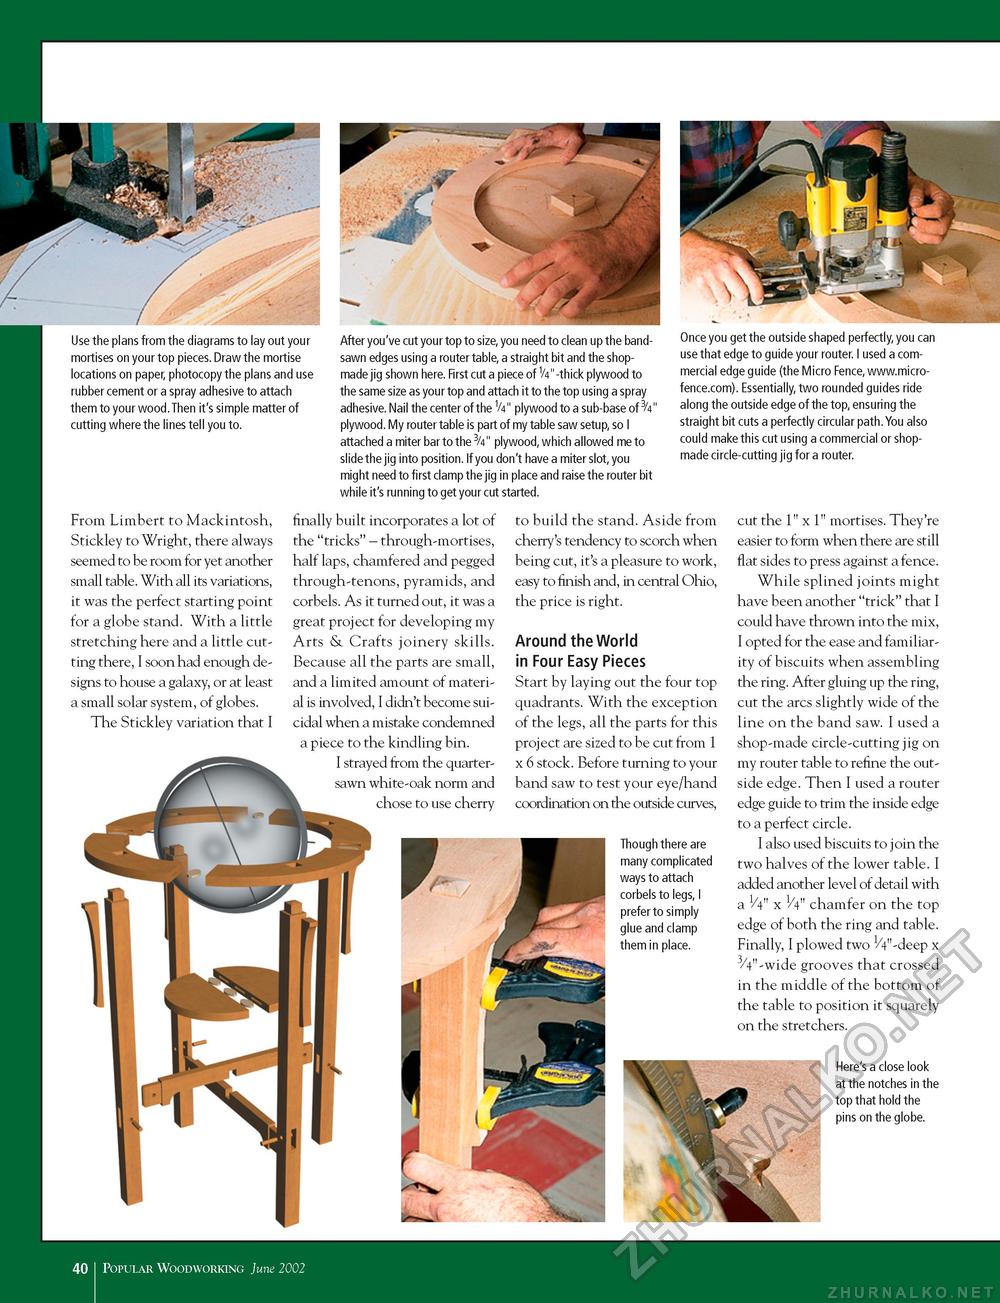
Use the plans from the diagrams to lay out your mortises on your top pieces. Draw the mortise locations on paper, photocopy the plans and use rubber cement or a spray adhesive to attach them to your wood.Then it's simple matter of cutting where the lines tell you to. After you've cut your top to size, you need to clean up the band-sawn edges using a router table, a straight bit and the shop-made jig shown here. First cut a piece of 1/4"-thick plywood to the same size as your top and attach it to the top using a spray adhesive. Nail the center of the V4" plywood to a sub-base of 3/4" plywood. My router table is part of my table saw setup, so I attached a miter bar to the 3/4" plywood, which allowed me to slide the jig into position. If you don't have a miter slot, you might need to first clamp the jig in place and raise the router bit while it's running to get your cut started. Once you get the outside shaped perfectly, you can use that edge to guide your router. I used a commercial edge guide (the Micro Fence, www.micro-fence.com). Essentially, two rounded guides ride along the outside edge of the top, ensuring the straight bit cuts a perfectly circular path.You also could make this cut using a commercial or shop-made circle-cutting jig for a router. From Limbert to Mackintosh, Stickley to Wright, there always seemed to be room for yet another small table. With all its variations, it was the perfect starting point for a globe stand. With a little stretching here and a little cutting there, I soon had enough designs to house a galaxy, or at least a small solar system, of globes. The Stickley variation that I finally built incorporates a lot of the "tricks" - through-mortises, half laps, chamfered and pegged through-tenons, pyramids, and corbels. As it turned out, it was a great project for developing my Arts & Crafts joinery skills. Because all the parts are small, and a limited amount of material is involved, I didn't become suicidal when a mistake condemned a piece to the kindling bin. I strayed from the quarter-sawn white-oak norm and chose to use cherry to build the stand. Aside from cherry's tendency to scorch when being cut, it's a pleasure to work, easy to finish and, in central Ohio, the price is right. Around the World in Four Easy Pieces Start by laying out the four top quadrants. With the exception of the legs, all the parts for this project are sized to be cut from 1 x 6 stock. Before turning to your band saw to test your eye/hand coordination on the outside curves, Though there are many complicated ways to attach corbels to legs, I prefer to simply glue and clamp them in place. cut the 1" x 1" mortises. They're easier to form when there are still flat sides to press against a fence. While splined joints might have been another "trick" that I could have thrown into the mix, I opted for the ease and familiarity of biscuits when assembling the ring. After gluing up the ring, cut the arcs slightly wide of the line on the band saw. I used a shop-made circle-cutting jig on my router table to refine the outside edge. Then I used a router edge guide to trim the inside edge to a perfect circle. I also used biscuits to join the two halves of the lower table. I added another level of detail with a V4" x 1/4" chamfer on the top edge of both the ring and table. Finally, I plowed two 1/4"-deep x 3/4"-wide grooves that crossed in the middle of the bottom of the table to position it squarely on the stretchers. Here's a close look at the notches in the top that hold the pins on the globe. 40 I Popular Woodworking June 2002 |


