Popular Woodworking 2002-12 № 131, страница 57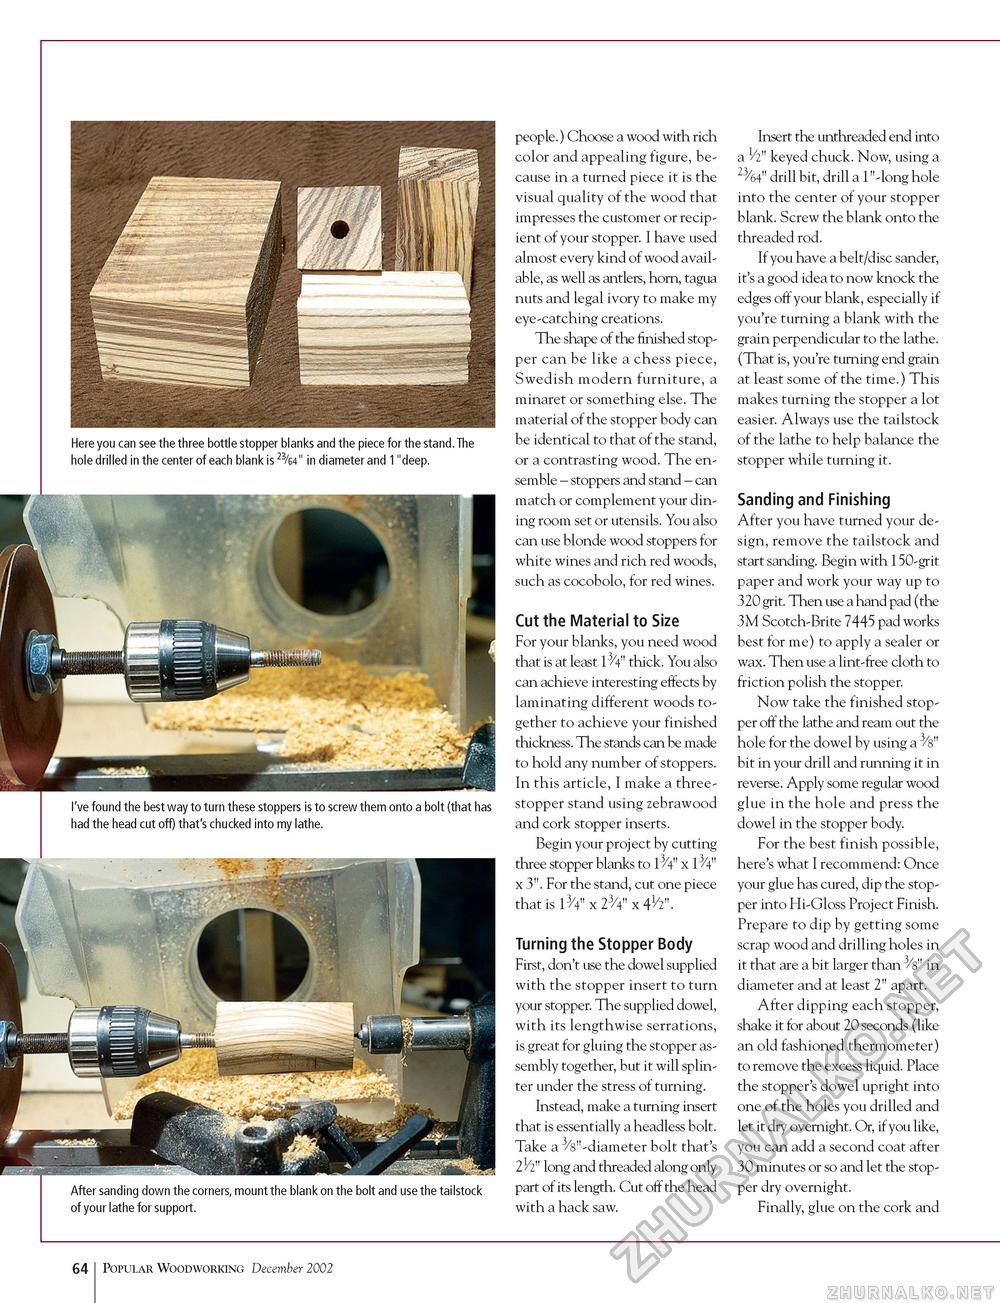
Here you can see the three bottle stopper blanks and the piece for the stand. The hole drilled in the center of each blank is 23/64" in diameter and 1"deep. I've found the best way to turn these stoppers is to screw them onto a bolt (that has had the head cut off) that's chucked into my lathe. After sanding down the corners, mount the blank on the bolt and use the tailstock of your lathe for support. people.) Choose a wood with rich color and appealing figure, because in a turned piece it is the visual quality of the wood that impresses the customer or recipient of your stopper. I have used almost every kind of wood available, as well as antlers, horn, tagua nuts and legal ivory to make my eye-catching creations. The shape of the finished stopper can be like a chess piece, Swedish modern furniture, a minaret or something else. The material of the stopper body can be identical to that of the stand, or a contrasting wood. The ensemble - stoppers and stand - can match or complement your dining room set or utensils. You also can use blonde wood stoppers for white wines and rich red woods, such as cocobolo, for red wines. Cut the Material to Size For your blanks, you need wood that is at least 13/4" thick. You also can achieve interesting effects by laminating different woods together to achieve your finished thickness. The stands can be made to hold any number of stoppers. In this article, I make a three-stopper stand using zebrawood and cork stopper inserts. Begin your project by cutting three stopper blanks to 13/4" x 13/4" x 3". For the stand, cut one piece that is 13/4" x 23/4" x 41/2". Turning the Stopper Body First, don't use the dowel supplied with the stopper insert to turn your stopper. The supplied dowel, with its lengthwise serrations, is great for gluing the stopper assembly together, but it will splinter under the stress of turning. Instead, make a turning insert that is essentially a headless bolt. Take a ^''-diameter bolt that's long and threaded along only part of its length. Cut off the head with a hack saw. Insert the unthreaded end into a V2" keyed chuck. Now, using a 23/64" drill bit, drill a 1"-long hole into the center of your stopper blank. Screw the blank onto the threaded rod. If you have a belt/disc sander, it's a good idea to now knock the edges off your blank, especially if you're turning a blank with the grain perpendicular to the lathe. (That is, you're turning end grain at least some of the time.) This makes turning the stopper a lot easier. Always use the tailstock of the lathe to help balance the stopper while turning it. Sanding and Finishing After you have turned your design, remove the tailstock and start sanding. Begin with 150-grit paper and work your way up to 320 grit. Then use a hand pad (the 3M Scotch-Brite 7445 pad works best for me) to apply a sealer or wax. Then use a lint-free cloth to friction polish the stopper. Now take the finished stopper off the lathe and ream out the hole for the dowel by using a 3/8" bit in your drill and running it in reverse. Apply some regular wood glue in the hole and press the dowel in the stopper body. For the best finish possible, here's what I recommend: Once your glue has cured, dip the stopper into Hi-Gloss Project Finish. Prepare to dip by getting some scrap wood and drilling holes in it that are a bit larger than 3/8" in diameter and at least 2" apart. After dipping each stopper, shake it for about 20 seconds (like an old fashioned thermometer) to remove the excess liquid. Place the stopper's dowel upright into one of the holes you drilled and let it dry overnight. Or, if you like, you can add a second coat after 30 minutes or so and let the stopper dry overnight. Finally, glue on the cork and 64 Popular Woodworking December 2002 |


