Popular Woodworking 2003-02 № 132, страница 69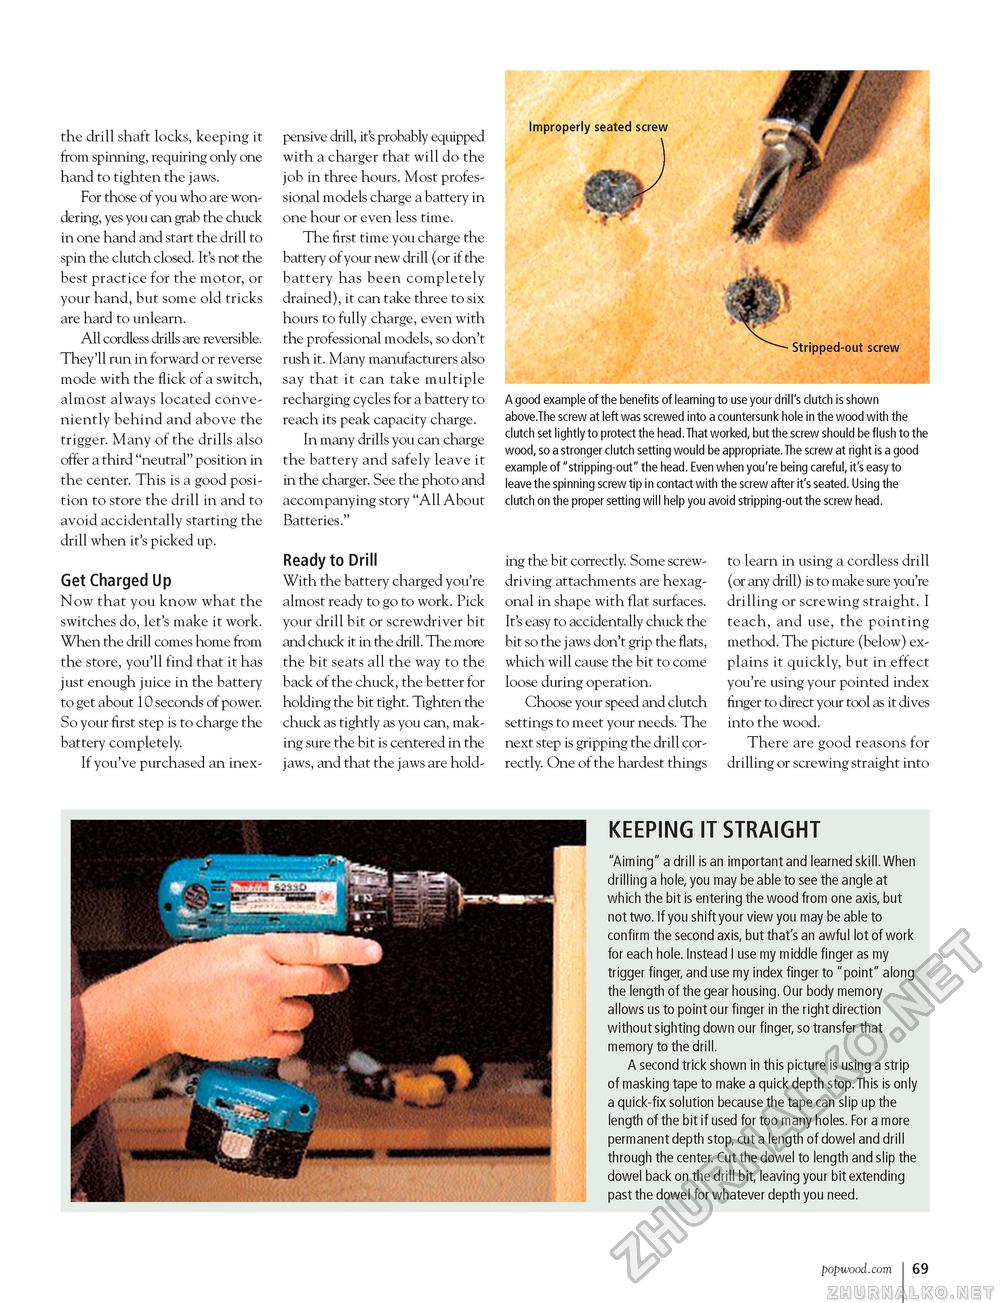
A good example of the benefits of learning to use your drill's clutch is shown above.The screw at left was screwed into a countersunk hole in the wood with the clutch set lightly to protect the head.That worked, but the screw should be flush to the wood, so a stronger clutch setting would be appropriate.The screw at right is a good example of "stripping-out" the head. Even when you're being careful, it's easy to leave the spinning screw tip in contact with the screw after it's seated. Using the clutch on the proper setting will help you avoid stripping-out the screw head. the drill shaft locks, keeping it from spinning, requiring only one hand to tighten the jaws. For those of you who are wondering, yes you can grab the chuck in one hand and start the drill to spin the clutch closed. It's not the best practice for the motor, or your hand, but some old tricks are hard to unlearn. All cordless drills are reversible. They'll run in forward or reverse mode with the flick of a switch, almost always located conveniently behind and above the trigger. Many of the drills also offer a third "neutral" position in the center. This is a good position to store the drill in and to avoid accidentally starting the drill when it's picked up. Get Charged Up Now that you know what the switches do, let's make it work. When the drill comes home from the store, you'll find that it has just enough juice in the battery to get about 10 seconds of power. So your first step is to charge the battery completely. If you've purchased an inex pensive drill, it's probably equipped with a charger that will do the job in three hours. Most professional models charge a battery in one hour or even less time. The first time you charge the battery of your new drill (or if the battery has been completely drained), it can take three to six hours to fully charge, even with the professional models, so don't rush it. Many manufacturers also say that it can take multiple recharging cycles for a battery to reach its peak capacity charge. In many drills you can charge the battery and safely leave it in the charger. See the photo and accompanying story "All About Batteries." Ready to Drill With the battery charged you're almost ready to go to work. Pick your drill bit or screwdriver bit and chuck it in the drill. The more the bit seats all the way to the back of the chuck, the better for holding the bit tight. Tighten the chuck as tightly as you can, making sure the bit is centered in the jaws, and that the jaws are hold- ing the bit correctly. Some screw-driving attachments are hexagonal in shape with flat surfaces. It's easy to accidentally chuck the bit so the jaws don't grip the flats, which will cause the bit to come loose during operation. Choose your speed and clutch settings to meet your needs. The next step is gripping the drill correctly. One of the hardest things to learn in using a cordless drill (or any drill) is to make sure you're drilling or screwing straight. I teach, and use, the pointing method. The picture (below) explains it quickly, but in effect you're using your pointed index finger to direct your tool as it dives into the wood. There are good reasons for drilling or screwing straight into KEEPING IT STRAIGHT "Aiming" a drill is an important and learned skill.When drilling a hole, you may be able to see the angle at which the bit is entering the wood from one axis, but not two. If you shift your view you may be able to confirm the second axis, but that's an awful lot of work for each hole. Instead I use my middle finger as my trigger finger, and use my index finger to "point" along the length of the gear housing. Our body memory allows us to point our finger in the right direction without sighting down our finger, so transfer that memory to the drill. A second trick shown in this picture is using a strip of masking tape to make a quick depth stop.This is only a quick-fix solution because the tape can slip up the length of the bit if used for too many holes. For a more permanent depth stop, cut a length of dowel and drill through the center. Cut the dowel to length and slip the dowel back on the drill bit, leaving your bit extending past the dowel for whatever depth you need. popwood.com 69 |


