Popular Woodworking 2003-04 № 133, страница 60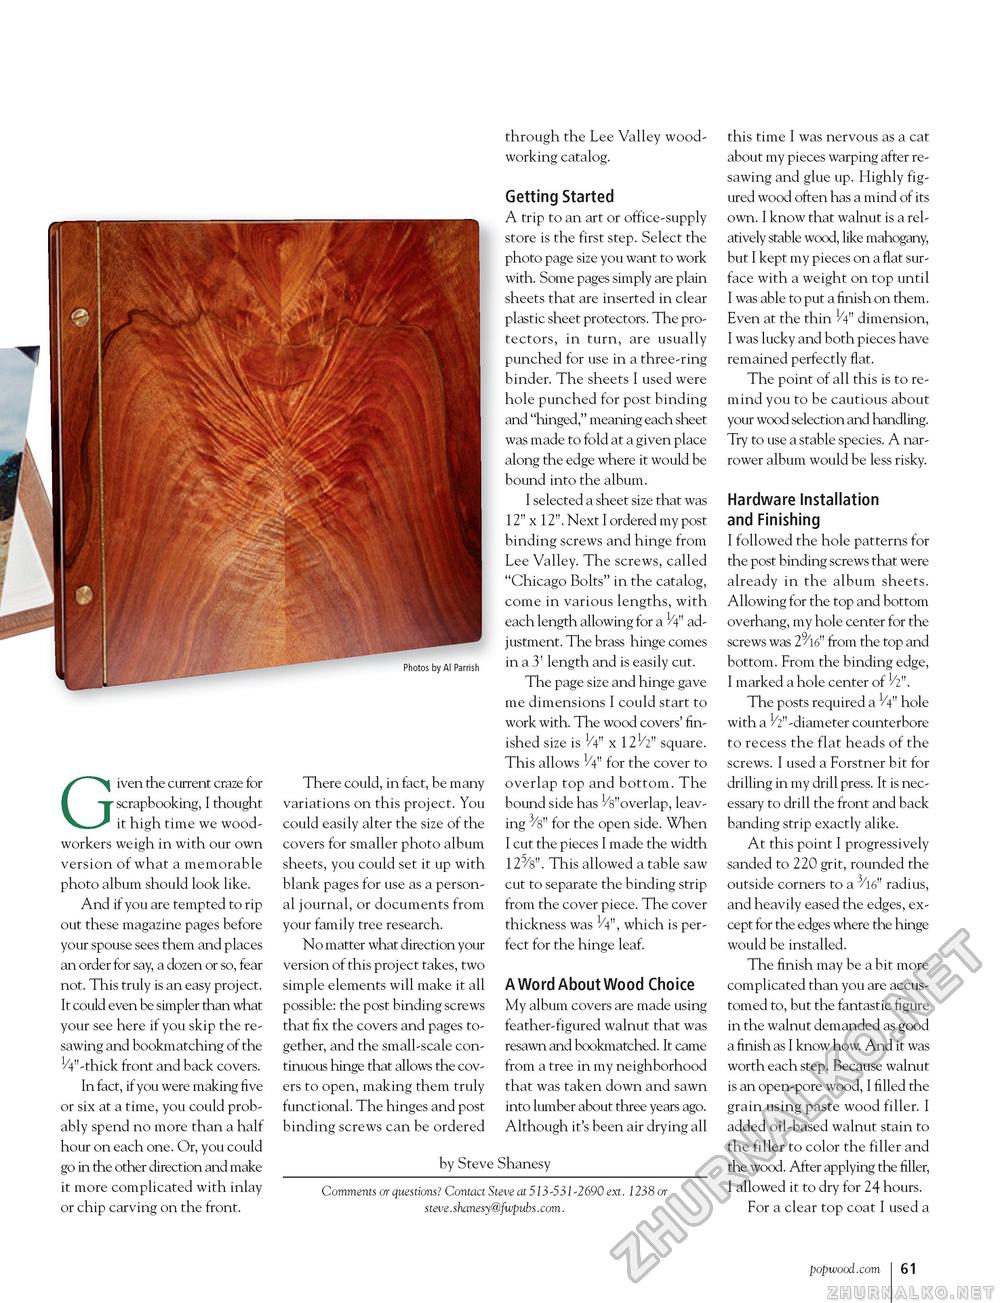
Photos by Al Parrish Given the current craze for scrapbooking, I thought it high time we woodworkers weigh in with our own version of what a memorable photo album should look like. And if you are tempted to rip out these magazine pages before your spouse sees them and places an order for say, a dozen or so, fear not. This truly is an easy project. It could even be simpler than what your see here if you skip the re-sawing and bookmatching of the 1/4"-thick front and back covers. In fact, if you were making five or six at a time, you could probably spend no more than a half hour on each one. Or, you could go in the other direction and make it more complicated with inlay or chip carving on the front. There could, in fact, be many variations on this project. You could easily alter the size of the covers for smaller photo album sheets, you could set it up with blank pages for use as a personal journal, or documents from your family tree research. No matter what direction your version of this project takes, two simple elements will make it all possible: the post binding screws that fix the covers and pages together, and the small-scale continuous hinge that allows the covers to open, making them truly functional. The hinges and post binding screws can be ordered through the Lee Valley woodworking catalog. Getting Started A trip to an art or office-supply store is the first step. Select the photo page size you want to work with. Some pages simply are plain sheets that are inserted in clear plastic sheet protectors. The protectors, in turn, are usually punched for use in a three-ring binder. The sheets I used were hole punched for post binding and "hinged," meaning each sheet was made to fold at a given place along the edge where it would be bound into the album. I selected a sheet size that was 12" x 12". Next I ordered my post binding screws and hinge from Lee Valley. The screws, called "Chicago Bolts" in the catalog, come in various lengths, with each length allowing for a 1/4" adjustment. The brass hinge comes in a 3' length and is easily cut. The page size and hinge gave me dimensions I could start to work with. The wood covers' finished size is /4" x 121/2" square. This allows 1/4" for the cover to overlap top and bottom. The bound side has ^"overlap, leaving 3/8" for the open side. When I cut the pieces I made the width 125/8". This allowed a table saw cut to separate the binding strip from the cover piece. The cover thickness was 1/4", which is perfect for the hinge leaf. A Word About Wood Choice My album covers are made using feather-figured walnut that was resawn and bookmatched. It came from a tree in my neighborhood that was taken down and sawn into lumber about three years ago. Although it's been air drying all by Steve Shanesy Comments or questions? Contact Steve at 513-531-2690 ext. 1238 or steve.shanesy@fwpubs.com. this time I was nervous as a cat about my pieces warping after re-sawing and glue up. Highly figured wood often has a mind of its own. I know that walnut is a relatively stable wood, like mahogany, but I kept my pieces on a flat surface with a weight on top until I was able to put a finish on them. Even at the thin 1/4" dimension, I was lucky and both pieces have remained perfectly flat. The point of all this is to remind you to be cautious about your wood selection and handling. Try to use a stable species. A narrower album would be less risky. Hardware Installation and Finishing I followed the hole patterns for the post binding screws that were already in the album sheets. Allowing for the top and bottom overhang, my hole center for the screws was 29/16" from the top and bottom. From the binding edge, I marked a hole center of 1/2". The posts required a 1/4" hole with a ^"-diameter counterbore to recess the flat heads of the screws. I used a Forstner bit for drilling in my drill press. It is necessary to drill the front and back banding strip exactly alike. At this point I progressively sanded to 220 grit, rounded the outside corners to a 3/16" radius, and heavily eased the edges, except for the edges where the hinge would be installed. The finish may be a bit more complicated than you are accustomed to, but the fantastic figure in the walnut demanded as good a finish as I know how. And it was worth each step. Because walnut is an open-pore wood, I filled the grain using paste wood filler. I added oil-based walnut stain to the filler to color the filler and the wood. After applying the filler, I allowed it to dry for 24 hours. For a clear top coat I used a popwood.com 61 |


