Popular Woodworking 2003-06 № 134, страница 24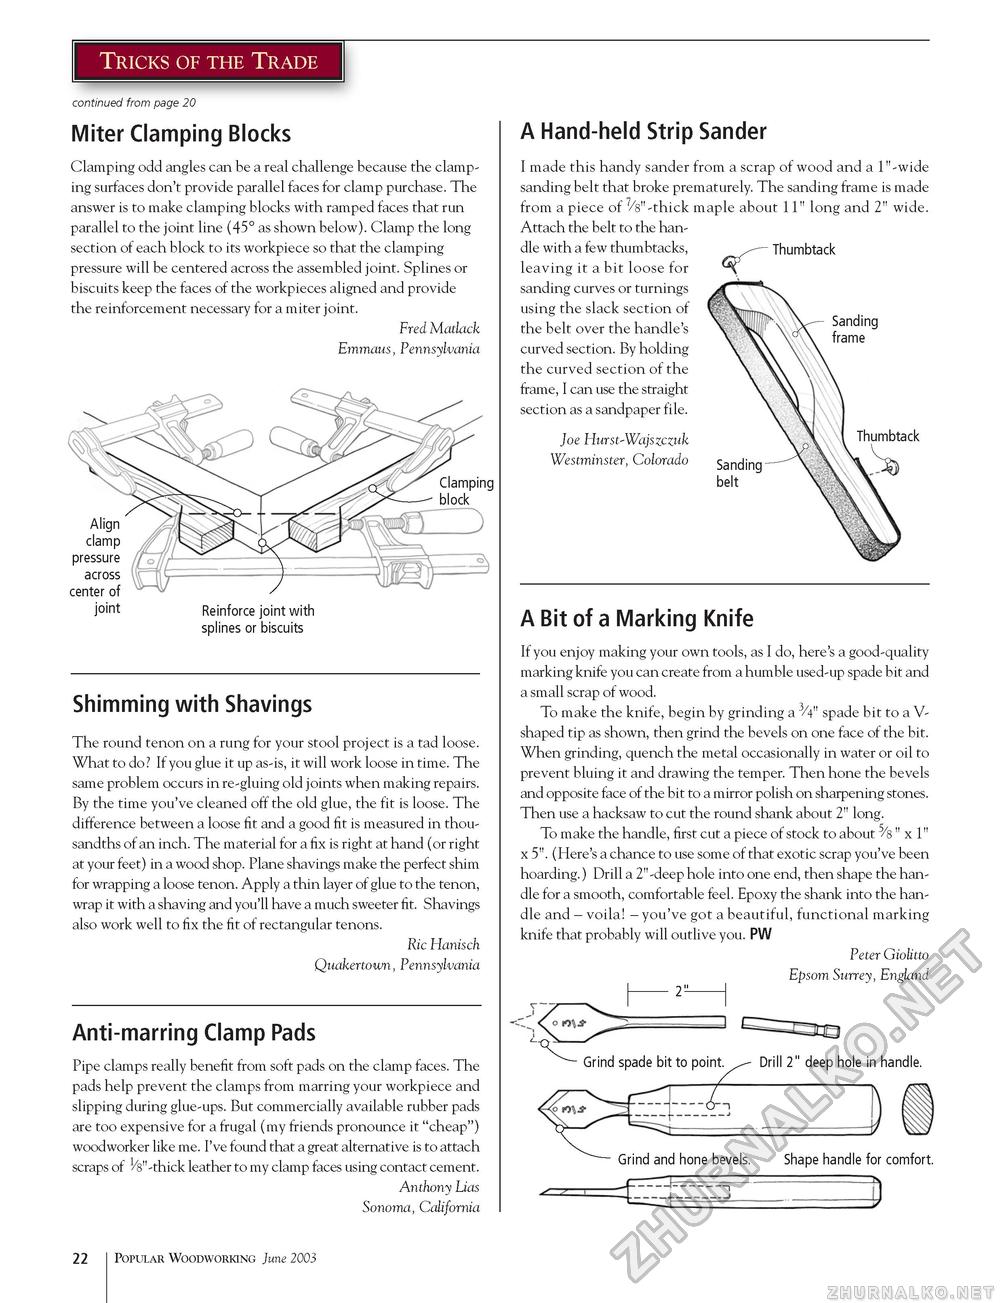
Miter Clamping Blocks Clamping odd angles can be a real challenge because the clamping surfaces don't provide parallel faces for clamp purchase. The answer is to make clamping blocks with ramped faces that run parallel to the joint line (45° as shown below). Clamp the long section of each block to its workpiece so that the clamping pressure will be centered across the assembled joint. Splines or biscuits keep the faces of the workpieces aligned and provide the reinforcement necessary for a miter joint. Fred Matlack Emmaus, Pennsylvania Reinforce joint with splines or biscuits Shimming with Shavings The round tenon on a rung for your stool project is a tad loose. What to do? If you glue it up as-is, it will work loose in time. The same problem occurs in re-gluing old joints when making repairs. By the time you've cleaned off the old glue, the fit is loose. The difference between a loose fit and a good fit is measured in thousandths of an inch. The material for a fix is right at hand (or right at your feet) in a wood shop. Plane shavings make the perfect shim for wrapping a loose tenon. Apply a thin layer of glue to the tenon, wrap it with a shaving and you'll have a much sweeter fit. Shavings also work well to fix the fit of rectangular tenons. Ric Hanisch Quakertown, Pennsylvania Anti-marring Clamp Pads Pipe clamps really benefit from soft pads on the clamp faces. The pads help prevent the clamps from marring your workpiece and slipping during glue-ups. But commercially available rubber pads are too expensive for a frugal (my friends pronounce it "cheap") woodworker like me. I've found that a great alternative is to attach scraps of 1/8" -thick leather to my clamp faces using contact cement. Anthony Lias Sonoma, California A Hand-held Strip Sander I made this handy sander from a scrap of wood and a 1"-wide sanding belt that broke prematurely. The sanding frame is made from a piece of 7/8" -thick maple about 11" long and 2" wide. Attach the belt to the handle with a few thumbtacks, — Thumbtack leaving it a bit loose for sanding curves or turnings using the slack section of the belt over the handle's curved section. By holding the curved section of the frame, I can use the straight section as a sandpaper file. Joe Hurst-Wajszczuk Westminster, Colorado A Bit of a Marking Knife If you enjoy making your own tools, as I do, here's a good-quality marking knife you can create from a humble used-up spade bit and a small scrap of wood. To make the knife, begin by grinding a 3/4" spade bit to a V-shaped tip as shown, then grind the bevels on one face of the bit. When grinding, quench the metal occasionally in water or oil to prevent bluing it and drawing the temper. Then hone the bevels and opposite face of the bit to a mirror polish on sharpening stones. Then use a hacksaw to cut the round shank about 2" long. To make the handle, first cut a piece of stock to about ^S" x 1" x 5". (Here's a chance to use some of that exotic scrap you've been hoarding.) Drill a 2"-deep hole into one end, then shape the handle for a smooth, comfortable feel. Epoxy the shank into the handle and - voila! - you've got a beautiful, functional marking knife that probably will outlive you. PW 22 Popular Woodworking June 2003 |


