Popular Woodworking 2003-06 № 134, страница 50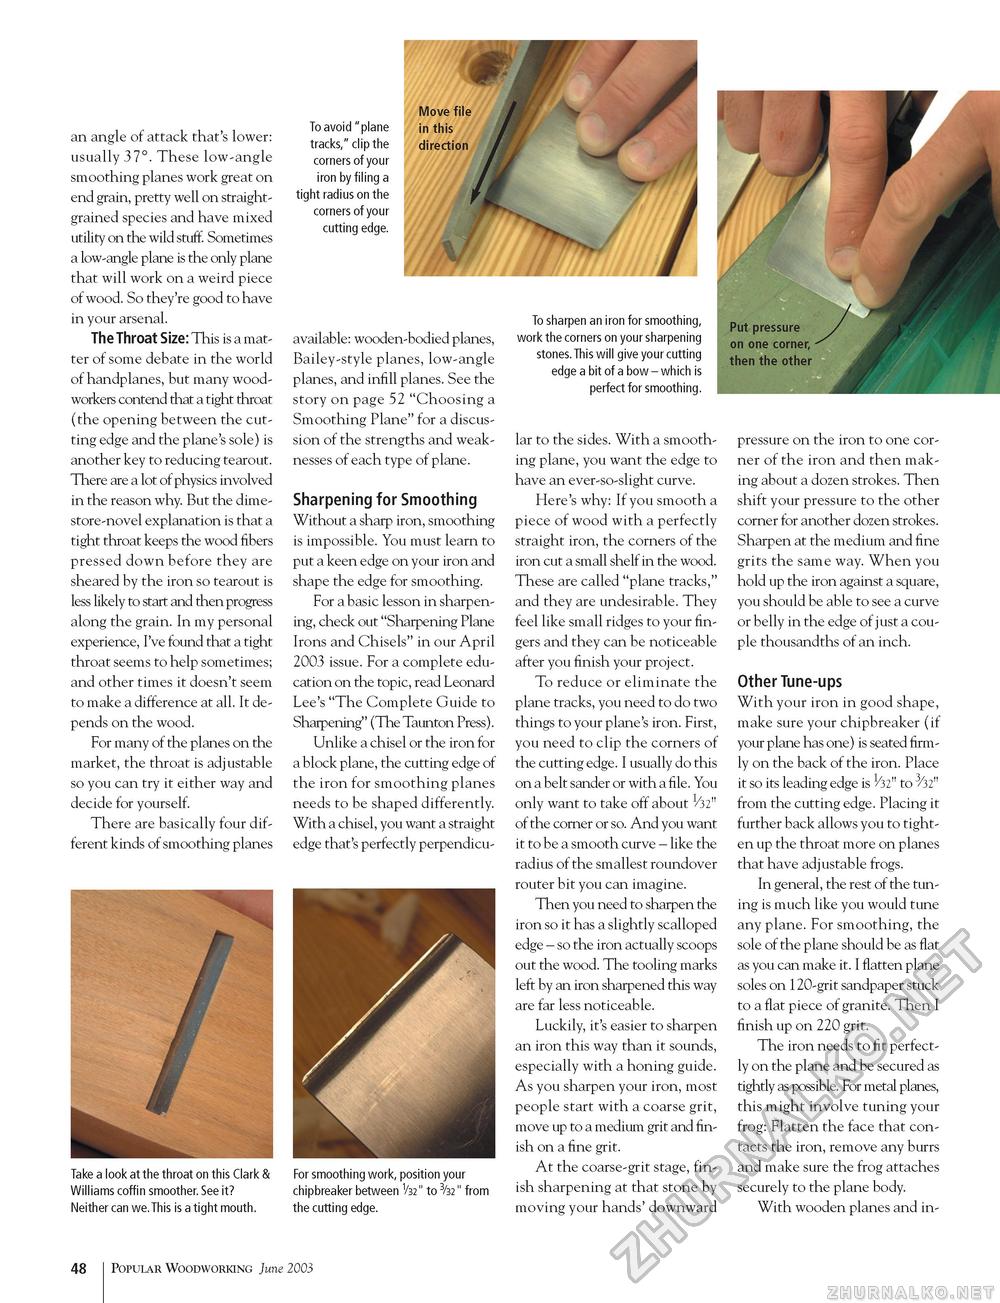
To avoid "plane tracks," clip the corners of your iron by filing a tight radius on the corners of your cutting edge. Move file in this direction an angle of attack that's lower: usually 37°. These low-angle smoothing planes work great on end grain, pretty well on straight-grained species and have mixed utility on the wild stuff. Sometimes a low-angle plane is the only plane that will work on a weird piece of wood. So they're good to have in your arsenal. The Throat Size: This is a matter of some debate in the world of handplanes, but many woodworkers contend that a tight throat (the opening between the cutting edge and the plane's sole) is another key to reducing tearout. There are a lot of physics involved in the reason why. But the dime-store-novel explanation is that a tight throat keeps the wood fibers pressed down before they are sheared by the iron so tearout is less likely to start and then progress along the grain. In my personal experience, I've found that a tight throat seems to help sometimes; and other times it doesn't seem to make a difference at all. It depends on the wood. For many of the planes on the market, the throat is adjustable so you can try it either way and decide for yourself. There are basically four different kinds of smoothing planes Take a look at the throat on this Clark & Williams coffin smoother. See it? Neither can we.This is a tight mouth. available: wooden-bodied planes, Bailey-style planes, low-angle planes, and infill planes. See the story on page 52 "Choosing a Smoothing Plane" for a discussion of the strengths and weaknesses of each type of plane. Sharpening for Smoothing Without a sharp iron, smoothing is impossible. You must learn to put a keen edge on your iron and shape the edge for smoothing. For a basic lesson in sharpening, check out "Sharpening Plane Irons and Chisels" in our April 2003 issue. For a complete education on the topic, read Leonard Lee's "The Complete Guide to Sharpening" (The Taunton Press). Unlike a chisel or the iron for a block plane, the cutting edge of the iron for smoothing planes needs to be shaped differently. With a chisel, you want a straight edge that's perfectly perpendicu- For smoothing work, position your chipbreaker between V32" to 3/b2 " from the cutting edge. To sharpen an iron for smoothing, work the corners on your sharpening stones. This will give your cutting edge a bit of a bow - which is perfect for smoothing. lar to the sides. With a smoothing plane, you want the edge to have an ever-so-slight curve. Here's why: If you smooth a piece of wood with a perfectly straight iron, the corners of the iron cut a small shelf in the wood. These are called "plane tracks," and they are undesirable. They feel like small ridges to your fingers and they can be noticeable after you finish your project. To reduce or eliminate the plane tracks, you need to do two things to your plane's iron. First, you need to clip the corners of the cutting edge. I usually do this on a belt sander or with a file. You only want to take off about 1/32n of the corner or so. And you want it to be a smooth curve - like the radius of the smallest roundover router bit you can imagine. Then you need to sharpen the iron so it has a slightly scalloped edge - so the iron actually scoops out the wood. The tooling marks left by an iron sharpened this way are far less noticeable. Luckily, it's easier to sharpen an iron this way than it sounds, especially with a honing guide. As you sharpen your iron, most people start with a coarse grit, move up to a medium grit and finish on a fine grit. At the coarse-grit stage, finish sharpening at that stone by moving your hands' downward pressure on the iron to one corner of the iron and then making about a dozen strokes. Then shift your pressure to the other corner for another dozen strokes. Sharpen at the medium and fine grits the same way. When you hold up the iron against a square, you should be able to see a curve or belly in the edge of just a couple thousandths of an inch. Other Tune-ups With your iron in good shape, make sure your chipbreaker (if your plane has one) is seated firmly on the back of the iron. Place it so its leading edge is 1/32" to 3/32" from the cutting edge. Placing it further back allows you to tighten up the throat more on planes that have adjustable frogs. In general, the rest of the tuning is much like you would tune any plane. For smoothing, the sole of the plane should be as flat as you can make it. I flatten plane soles on 120-grit sandpaper stuck to a flat piece of granite. Then I finish up on 220 grit. The iron needs to fit perfectly on the plane and be secured as tightly as possible. For metal planes, this might involve tuning your frog: Flatten the face that contacts the iron, remove any burrs and make sure the frog attaches securely to the plane body. With wooden planes and in- 48 Popular Woodworking June 2003 |


