Popular Woodworking 2003-11 № 137, страница 25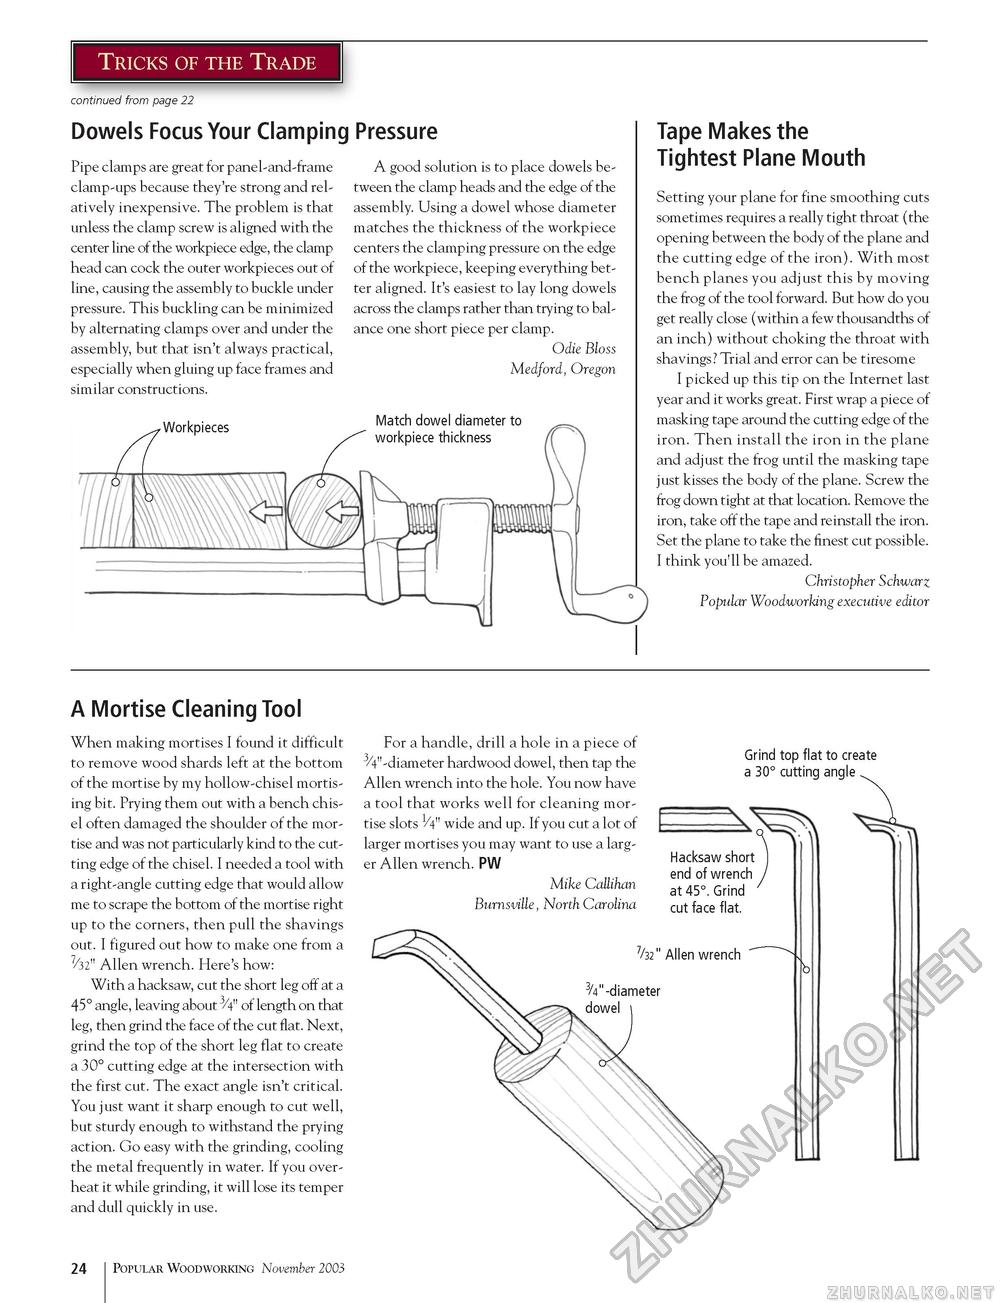
Tricks of the Trade continued from page 22 Dowels Focus Your Clamping Pressure Pipe clamps are great for panel-and-frame clamp-ups because they're strong and relatively inexpensive. The problem is that unless the clamp screw is aligned with the center line of the workpiece edge, the clamp head can cock the outer workpieces out of line, causing the assembly to buckle under pressure. This buckling can be minimized by alternating clamps over and under the assembly, but that isn't always practical, especially when gluing up face frames and similar constructions. A good solution is to place dowels between the clamp heads and the edge of the assembly. Using a dowel whose diameter matches the thickness of the workpiece centers the clamping pressure on the edge of the workpiece, keeping everything better aligned. It's easiest to lay long dowels across the clamps rather than trying to balance one short piece per clamp. Odie Bloss Medford, Oregon Tape Makes the Tightest Plane Mouth Setting your plane for fine smoothing cuts sometimes requires a really tight throat (the opening between the body of the plane and the cutting edge of the iron). With most bench planes you adjust this by moving the frog of the tool forward. But how do you get really close (within a few thousandths of an inch) without choking the throat with shavings? Trial and error can be tiresome I picked up this tip on the Internet last year and it works great. First wrap a piece of masking tape around the cutting edge of the iron. Then install the iron in the plane and adjust the frog until the masking tape just kisses the body of the plane. Screw the frog down tight at that location. Remove the iron, take off the tape and reinstall the iron. Set the plane to take the finest cut possible. I think you'll be amazed. Christopher Schwarz Popular Woodworking executive editor ,Workpieces Match dowel diameter to A Mortise Cleaning Tool When making mortises I found it difficult to remove wood shards left at the bottom of the mortise by my hollow-chisel mortising bit. Prying them out with a bench chisel often damaged the shoulder of the mortise and was not particularly kind to the cutting edge of the chisel. I needed a tool with a right-angle cutting edge that would allow me to scrape the bottom of the mortise right up to the corners, then pull the shavings out. I figured out how to make one from a 7/32" Allen wrench. Here's how: With a hacksaw, cut the short leg off at a 45° angle, leaving about 3/4" of length on that leg, then grind the face of the cut flat. Next, grind the top of the short leg flat to create a 30° cutting edge at the intersection with the first cut. The exact angle isn't critical. You just want it sharp enough to cut well, but sturdy enough to withstand the prying action. Go easy with the grinding, cooling the metal frequently in water. If you overheat it while grinding, it will lose its temper and dull quickly in use. For a handle, drill a hole in a piece of 3/4"-diameter hardwood dowel, then tap the Allen wrench into the hole. You now have a tool that works well for cleaning mortise slots V4" wide and up. If you cut a lot of larger mortises you may want to use a larger Allen wrench. PW Mike Callihan Burnsville, North Carolina Grind top flat to create 7/32" Allen wrench 3/4"-diameter dowel 24 Popular Woodworking November 2003 |


