Popular Woodworking 2003-12 № 138, страница 47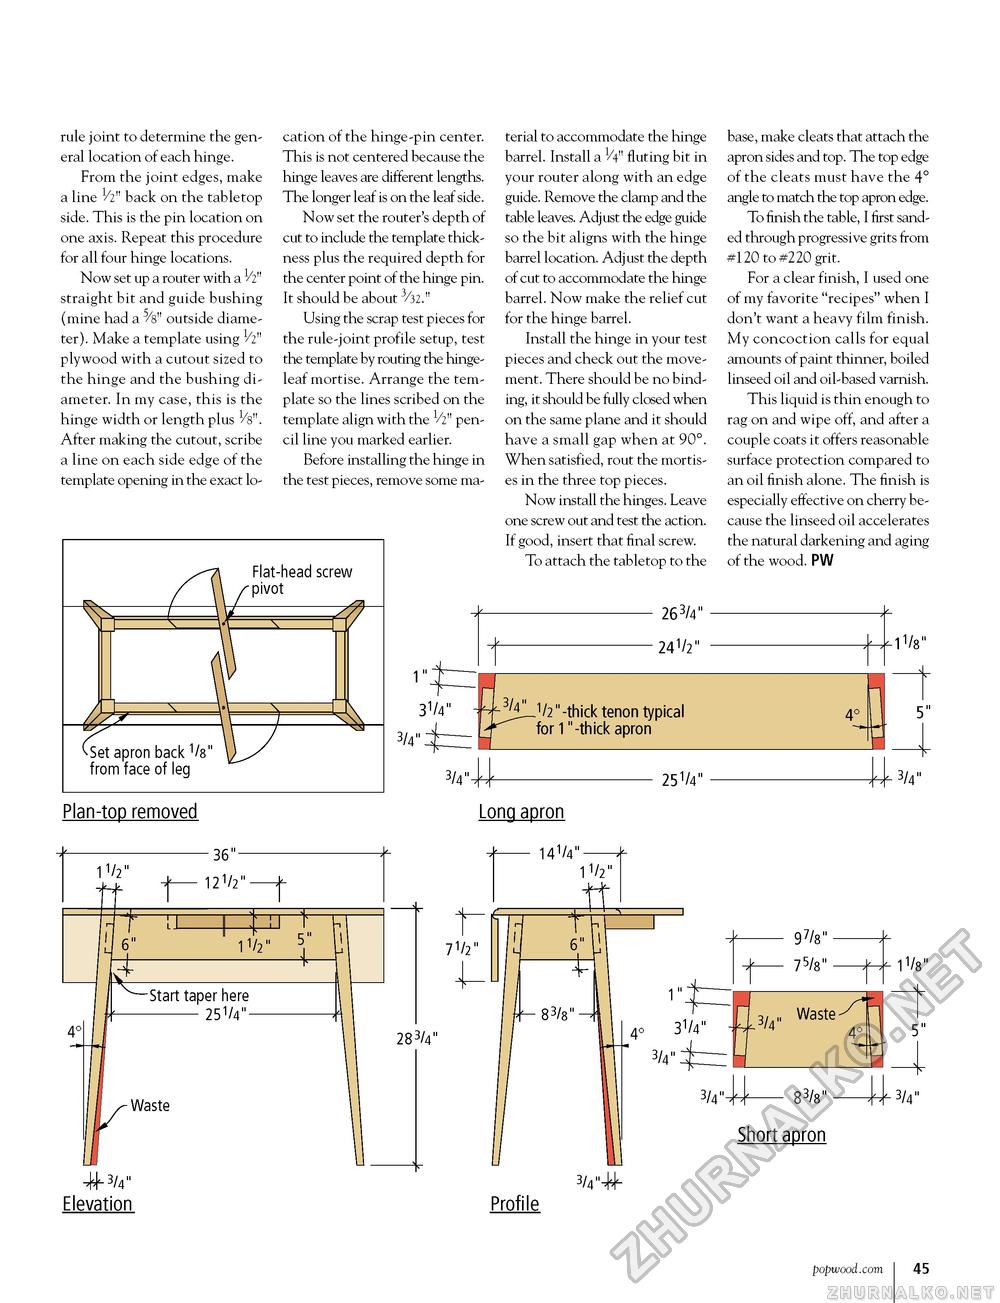
rule joint to determine the general location of each hinge. From the joint edges, make a line 1/2" back on the tabletop side. This is the pin location on one axis. Repeat this procedure for all four hinge locations. Now set up a router with a 1/2" straight bit and guide bushing (mine had a ^s" outside diameter). Make a template using 1/2" plywood with a cutout sized to the hinge and the bushing diameter. In my case, this is the hinge width or length plus 1/s". After making the cutout, scribe a line on each side edge of the template opening in the exact lo- cation of the hinge-pin center. This is not centered because the hinge leaves are different lengths. The longer leaf is on the leaf side. Now set the router's depth of cut to include the template thickness plus the required depth for the center point of the hinge pin. It should be about 3/32." Using the scrap test pieces for the rule-joint profile setup, test the template by routing the hinge-leaf mortise. Arrange the template so the lines scribed on the template align with the 1/2" pencil line you marked earlier. Before installing the hinge in the test pieces, remove some ma Flat-head screw ■pivot 2: •-Set apron back Vs" from face of leg 1" terial to accommodate the hinge barrel. Install a 1/4" fluting bit in your router along with an edge guide. Remove the clamp and the table leaves. Adjust the edge guide so the bit aligns with the hinge barrel location. Adjust the depth of cut to accommodate the hinge barrel. Now make the relief cut for the hinge barrel. Install the hinge in your test pieces and check out the movement. There should be no binding, it should be fully closed when on the same plane and it should have a small gap when at 90°. When satisfied, rout the mortises in the three top pieces. Now install the hinges. Leave one screw out and test the action. If good, insert that final screw. To attach the tabletop to the 263/4" 241/2" base, make cleats that attach the apron sides and top. The top edge of the cleats must have the 4° angle to match the top apron edge. To finish the table, I first sanded through progressive grits from #120 to #220 grit. For a clear finish, I used one of my favorite "recipes" when I don't want a heavy film finish. My concoction calls for equal amounts of paint thinner, boiled linseed oil and oil-based varnish. This liquid is thin enough to rag on and wipe off, and after a couple coats it offers reasonable surface protection compared to an oil finish alone. The finish is especially effective on cherry because the linseed oil accelerates the natural darkening and aging of the wood. PW ■11/8" 3V4" 3/4"4= 3V4" 3/4"4=
5" 25V4" 3/4" Plan-top removed 36"- +- 12V2"-* t " I 1V/2" Start taper here 25v/4" Waste #3/4" Elevation Long apron - 14V 7v/2" 1V/8" 28 3/4" Short apron Profile 3/4"# popwood.com 73 |


