Popular Woodworking 2004-04 № 140, страница 61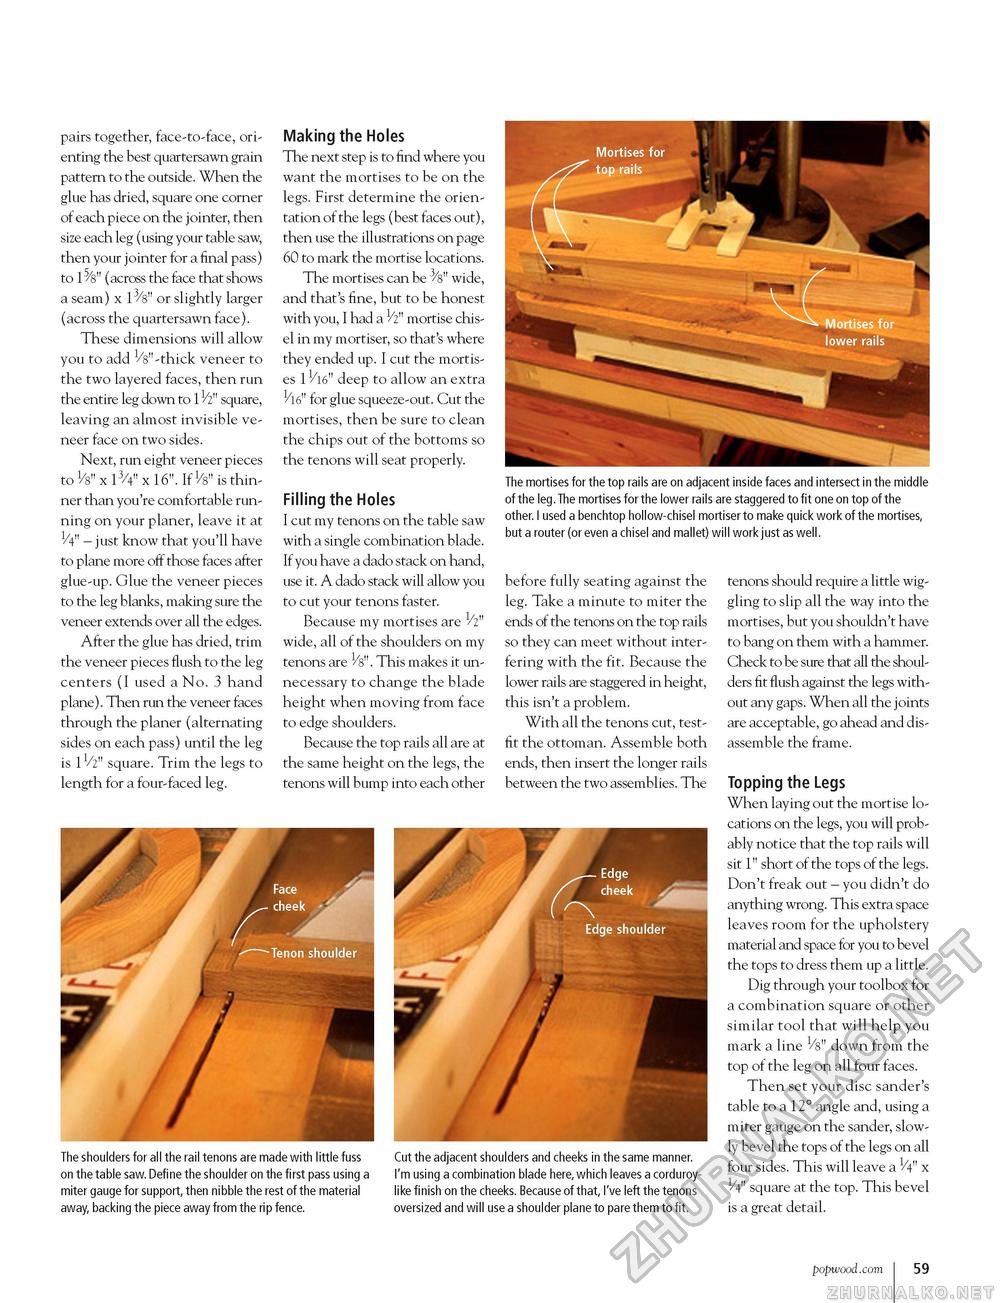
The mortises for the top rails are on adjacent inside faces and intersect in the middle of the leg.The mortises for the lower rails are staggered to fit one on top of the other. I used a benchtop hollow-chisel mortiser to make quick work of the mortises, but a router (or even a chisel and mallet) will work just as well. pairs together, face-to-face, orienting the best quartersawn grain pattern to the outside. When the glue has dried, square one corner of each piece on the jointer, then size each leg (using your table saw, then your jointer for a final pass) to 158" (across the face that shows a seam) x 13/8" or slightly larger (across the quartersawn face). These dimensions will allow you to add 1/8"-thick veneer to the two layered faces, then run the entire leg down to 1Vi" square, leaving an almost invisible veneer face on two sides. Next, run eight veneer pieces to V8" x 13/4" x 16". If V8" is thinner than you're comfortable running on your planer, leave it at 1/4" - just know that you'll have to plane more off those faces after glue-up. Glue the veneer pieces to the leg blanks, making sure the veneer extends over all the edges. After the glue has dried, trim the veneer pieces flush to the leg centers (I used a No. 3 hand plane). Then run the veneer faces through the planer (alternating sides on each pass) until the leg is 11/2" square. Trim the legs to length for a four-faced leg. Making the Holes The next step is to find where you want the mortises to be on the legs. First determine the orientation of the legs (best faces out), then use the illustrations on page 60 to mark the mortise locations. The mortises can be 3/8" wide, and that's fine, but to be honest with you, I had a 1/2" mortise chisel in my mortiser, so that's where they ended up. I cut the mortises 11/16" deep to allow an extra for glue squeeze-out. Cut the mortises, then be sure to clean the chips out of the bottoms so the tenons will seat properly. Filling the Holes I cut my tenons on the table saw with a single combination blade. If you have a dado stack on hand, use it. A dado stack will allow you to cut your tenons faster. Because my mortises are 1/2" wide, all of the shoulders on my tenons are V8". This makes it unnecessary to change the blade height when moving from face to edge shoulders. Because the top rails all are at the same height on the legs, the tenons will bump into each other before fully seating against the leg. Take a minute to miter the ends of the tenons on the top rails so they can meet without interfering with the fit. Because the lower rails are staggered in height, this isn't a problem. With all the tenons cut, test-fit the ottoman. Assemble both ends, then insert the longer rails between the two assemblies. The tenons should require a little wiggling to slip all the way into the mortises, but you shouldn't have to bang on them with a hammer. Check to be sure that all the shoulders fit flush against the legs without any gaps. When all the joints are acceptable, go ahead and disassemble the frame. Topping the Legs When laying out the mortise locations on the legs, you will probably notice that the top rails will sit 1" short of the tops of the legs. Don't freak out - you didn't do anything wrong. This extra space leaves room for the upholstery material and space for you to bevel the tops to dress them up a little. Dig through your toolbox for a combination square or other similar tool that will help you mark a line 1/8" down from the top of the leg on all four faces. Then set your disc sander's table to a 12° angle and, using a miter gauge on the sander, slowly bevel the tops of the legs on all four sides. This will leave a 1/4" x 1/4" square at the top. This bevel is a great detail. The shoulders for all the rail tenons are made with little fuss on the table saw. Define the shoulder on the first pass using a miter gauge for support, then nibble the rest of the material away, backing the piece away from the rip fence. Cut the adjacent shoulders and cheeks in the same manner. I'm using a combination blade here, which leaves a corduroylike finish on the cheeks. Because of that, I've left the tenons oversized and will use a shoulder plane to pare them to fit. popwood.com 59 |


