Popular Woodworking 2004-04 № 140, страница 63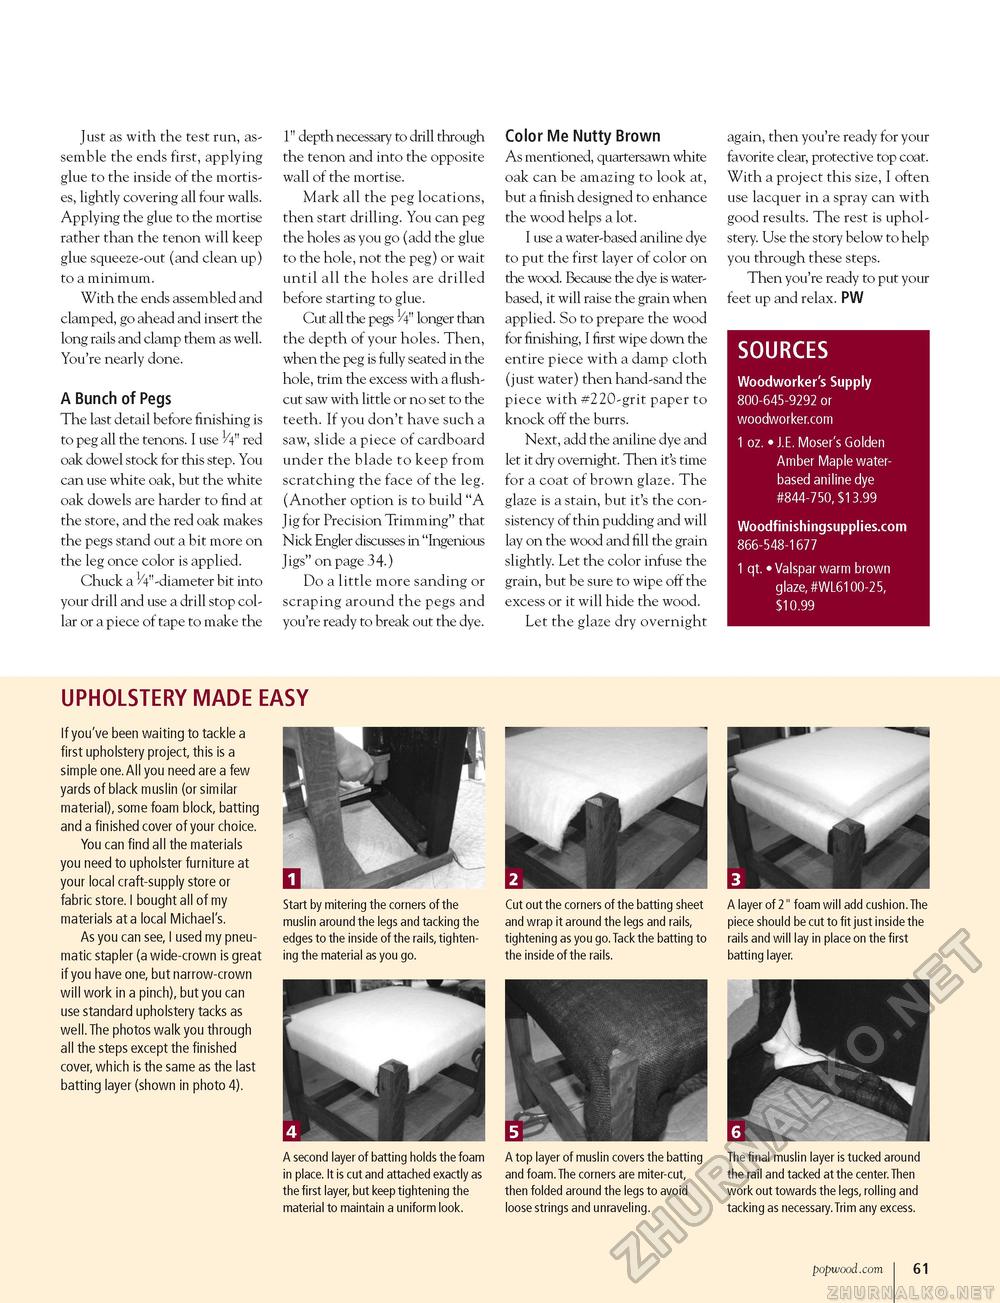
Just as with the test run, assemble the ends first, applying glue to the inside of the mortises, lightly covering all four walls. Applying the glue to the mortise rather than the tenon will keep glue squeeze-out (and clean up) to a minimum. With the ends assembled and clamped, go ahead and insert the long rails and clamp them as well. You're nearly done. A Bunch of Pegs The last detail before finishing is to peg all the tenons. I use H" red oak dowel stock for this step. You can use white oak, but the white oak dowels are harder to find at the store, and the red oak makes the pegs stand out a bit more on the leg once color is applied. Chuck a ^''-diameter bit into your drill and use a drill stop collar or a piece of tape to make the 1" depth necessary to drill through the tenon and into the opposite wall of the mortise. Mark all the peg locations, then start drilling. You can peg the holes as you go (add the glue to the hole, not the peg) or wait until all the holes are drilled before starting to glue. Cut all the pegs H" longer than the depth of your holes. Then, when the peg is fully seated in the hole, trim the excess with a flush-cut saw with little or no set to the teeth. If you don't have such a saw, slide a piece of cardboard under the blade to keep from scratching the face of the leg. (Another option is to build "A Jig for Precision Trimming" that Nick Engler discusses in "Ingenious Jigs" on page 34.) Do a little more sanding or scraping around the pegs and you're ready to break out the dye. Color Me Nutty Brown As mentioned, quartersawn white oak can be amazing to look at, but a finish designed to enhance the wood helps a lot. I use a water-based aniline dye to put the first layer of color on the wood. Because the dye is water-based, it will raise the grain when applied. So to prepare the wood for finishing, I first wipe down the entire piece with a damp cloth (just water) then hand-sand the piece with #220-grit paper to knock off the burrs. Next, add the aniline dye and let it dry overnight. Then it's time for a coat of brown glaze. The glaze is a stain, but it's the consistency of thin pudding and will lay on the wood and fill the grain slightly. Let the color infuse the grain, but be sure to wipe off the excess or it will hide the wood. Let the glaze dry overnight again, then you're ready for your favorite clear, protective top coat. With a project this size, I often use lacquer in a spray can with good results. The rest is upholstery. Use the story below to help you through these steps. Then you're ready to put your feet up and relax. PW SOURCES Woodworker's Supply 800-645-9292 or woodworker.com 1 oz. • J.E. Moser's Golden Amber Maple water-based aniline dye #844-750, $13.99 Woodfinishingsupplies.com 866-548-1677 1 qt. • Valspar warm brown glaze, #WL6100-25, $10.99 UPHOLSTERY MADE EASY If you've been waiting to tackle a first upholstery project, this is a simple one. All you need are a few yards of black muslin (or similar material), some foam block, batting and a finished cover of your choice. You can find all the materials you need to upholster furniture at your local craft-supply store or fabric store. I bought all of my materials at a local Michael's. As you can see, I used my pneumatic stapler (a wide-crown is great if you have one, but narrow-crown will work in a pinch), but you can use standard upholstery tacks as well. The photos walk you through all the steps except the finished cover, which is the same as the last batting layer (shown in photo 4). Start by mitering the corners of the muslin around the legs and tacking the edges to the inside of the rails, tightening the material as you go. Cut out the corners of the batting sheet and wrap it around the legs and rails, tightening as you go.Tack the batting to the inside of the rails. A layer of 2" foam will add cushion.The piece should be cut to fit just inside the rails and will lay in place on the first batting layer. A second layer of batting holds the foam in place. It is cut and attached exactly as the first layer, but keep tightening the material to maintain a uniform look. A top layer of muslin covers the batting and foam. The corners are miter-cut, then folded around the legs to avoid loose strings and unraveling. The final muslin layer is tucked around the rail and tacked at the center.Then work out towards the legs, rolling and tacking as necessary.Trim any excess. popwood.com 61 |


