Popular Woodworking 2004-10 № 143, страница 51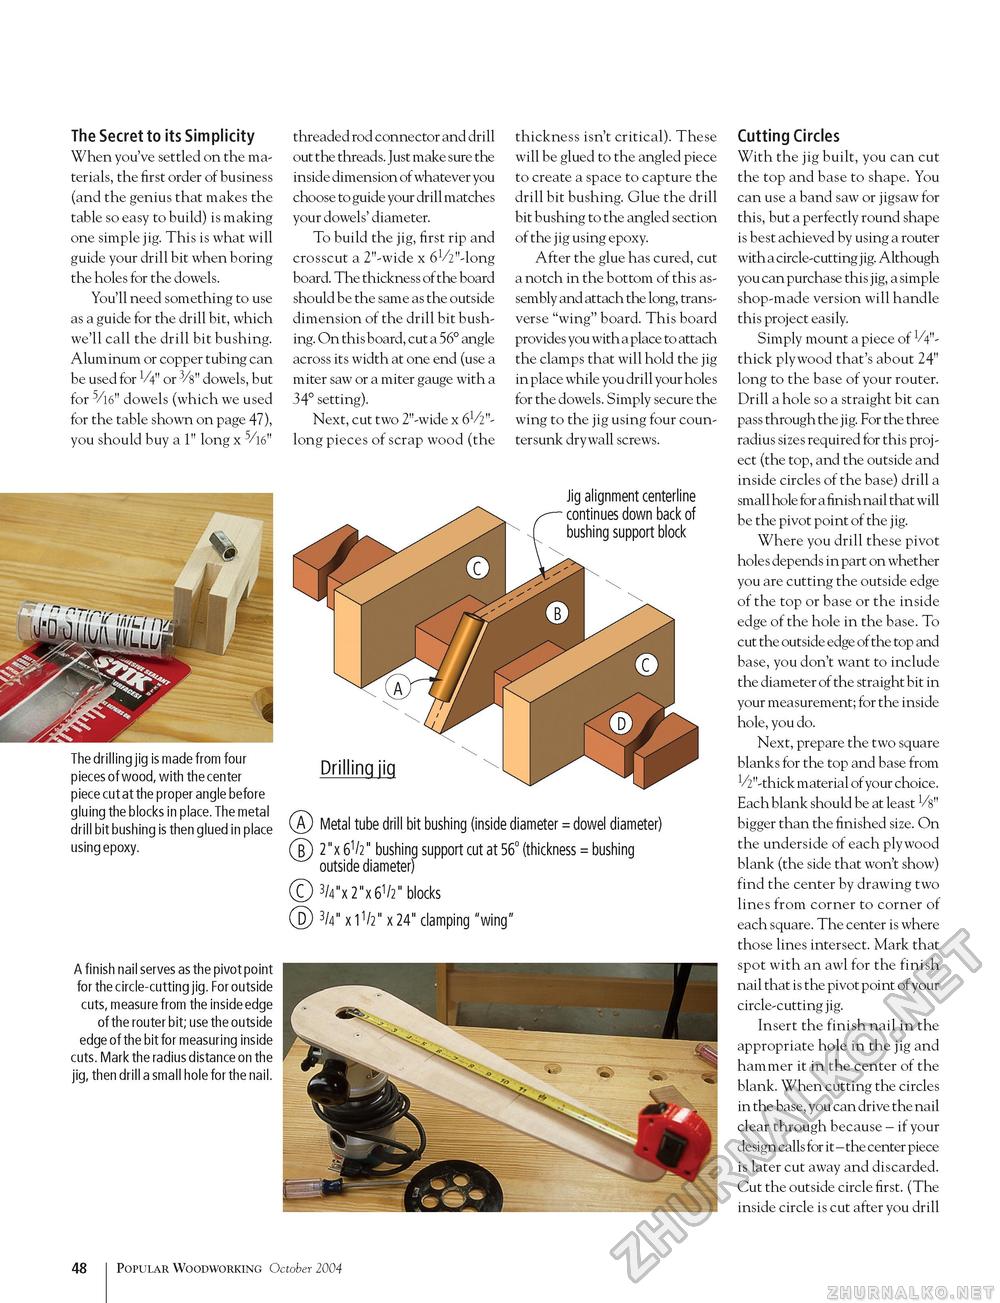
The Secret to its Simplicity When you've settled on the materials, the first order of business (and the genius that makes the table so easy to build) is making one simple jig. This is what will guide your drill bit when boring the holes for the dowels. You'll need something to use as a guide for the drill bit, which we'll call the drill bit bushing. Aluminum or copper tubing can be used for V4" or 3/s" dowels, but for 5/l6" dowels (which we used for the table shown on page 47), you should buy a 1" long x 5/l6" threaded rod connector and drill out the threads. Just make sure the inside dimension of whatever you choose to guide your drill matches your dowels' diameter. To build the jig, first rip and crosscut a 2"-wide x 6V?"-long board. The thickness of the board should be the same as the outside dimension of the drill bit bushing. On this board, cut a 56° angle across its width at one end (use a miter saw or a miter gauge with a 34° setting). Next, cut two 2"-wide x 61/2"-long pieces of scrap wood (the thickness isn't critical). These will be glued to the angled piece to create a space to capture the drill bit bushing. Glue the drill bit bushing to the angled section of the jig using epoxy. After the glue has cured, cut a notch in the bottom of this assembly and attach the long, transverse "wing" board. This board provides you with a place to attach the clamps that will hold the jig in place while you drill your hole s for the dowels. Simply secure the wing to the jig using four countersunk drywall screws. Jig alignment centerline continues down back of bushing support block The drilling jig is made from four pieces of wood, with the center piece cut at the proper angle before gluing the blocks in place. The metal s-rs ........ , , drill bit bushing is then glued in place Meta' tu^e drill bit bushing (inside diameter = dowel diameter) using epoxy. @ 2"x 61/2" bushing support cut at 56° (thickness = bushing outside diameter) © 3/4mx2"x61/2" blocks ® 3/4"x1 1/2"x24" clamping "wing" A finish nail serves as the pivot point for the circle-cutting jig. For outside cuts, measure from the inside edge of the router bit; use the outside edge of the bit for measuring inside cuts. Mark the radius distance on the jig, then drill a small hole for the nail. Cutting Circles With the jig built, you can cut the top and base to shape. You can use a band saw or jigsaw for this, but a perfectly round shape is best achieved by using a router with a circle-cutting j ig. Although you can purchase this jig, a simple shop-made version will handle this project easily. Simply mount a piece of V4"-thick plywood that's about 24" long to the base of your router. Drill a hole so a straight bit can pass through the jig. For the three radius sizes required for this project (the top, and the outside and inside circles of the base) drill a small hole for a finish nail that will be the pivot point of the jig. Where you drill these pivot holes depends in part on whether you are cutting the outside edge of the top or base or the inside edge of the hole in the base. To cut the outside edge of the top and base, you don't want to include the diameter of the straight bit in your measurement; for the inside hole, you do. Next, prepare the two square blanks for the top and base from V2"-thick material of your choice. Each blank should be at least Vs" bigger than the finished size. On the underside of each plywood blank (the side that won't show) find the center by drawing two lines from corner to corner of each square. The center is where those lines intersect. Mark that spot with an awl for the finish nail that is the pivot point of your circle-cutting jig. Insert the finish nail in the appropriate hole in the jig and hammer it in the center of the blank. When cutting the circles in the base, you can drive the nail clear through because - if your design calls for it - the center piece is later cut away and discarded. Cut the outside circle first. (The inside circle is cut after you drill 48 Popular Woodworking October 2004 |


