Popular Woodworking 2004-12 № 145, страница 32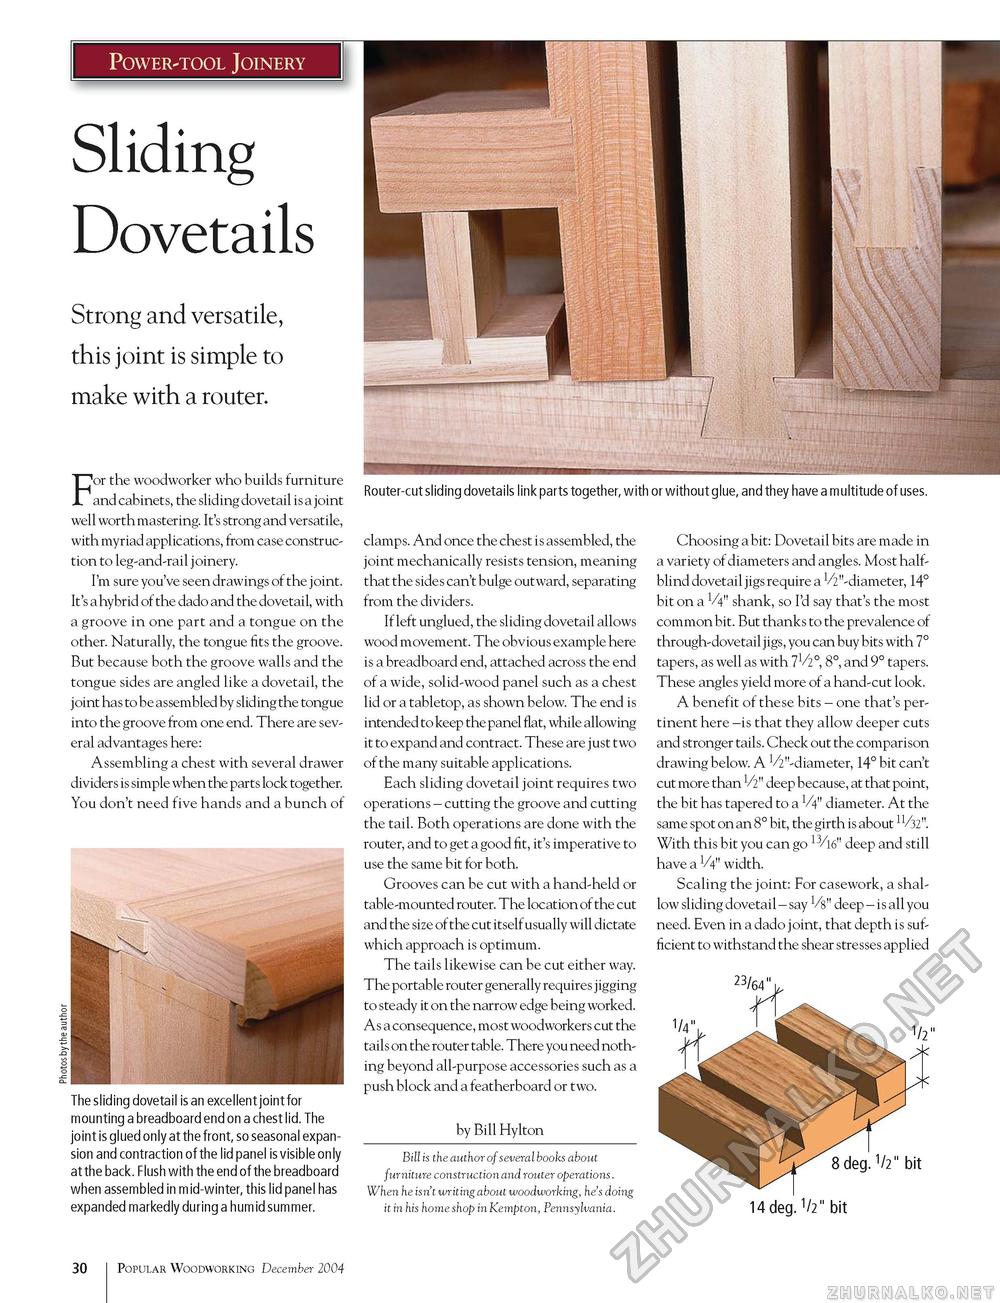
Power-tool Joinery Sliding Dovetails Strong and versatile, this joint is simple to make with a router. For the woodworker who builds furniture and cabinets, the sliding dovetail is a joint well worth mastering. It's strong and versatile, with myriad applications, from case construction to leg-and-rail joinery. I'm sure you've seen drawings of the joint. It's a hybrid of the dado and the dovetail, with a groove in one part and a tongue on the other. Naturally, the tongue fits the groove. But because both the groove walls and the tongue sides are angled like a dovetail, the joint has to be assembled by sliding the tongue into the groove from one end. There are several advantages here: Assembling a chest with several drawer dividers is simple when the parts lock together. You don't need five hands and a bunch of The sliding dovetail is an excellent joint for mounting a breadboard end on a chest lid. The joint is glued only at the front, so seasonal expansion and contraction of the lid panel is visible only at the back. Flush with the end of the breadboard when assembled in mid-winter, this lid panel has expanded markedly during a humid summer. Router-cut sliding dovetails link parts together, with or without glue, and they have a multitude of uses. clamps. And once the chest is assembled, the joint mechanically resists tension, meaning that the sides can't bulge outward, separating from the dividers. If left unglued, the sliding dovetail allows wood movement. The obvious example here is a breadboard end, attached across the end of a wide, solid-wood panel such as a chest lid or a tabletop, as shown below. The end is intended to keep the panel flat, while allowing it to expand and contract. These are just two of the many suitable applications. Each sliding dovetail joint requires two operations - cutting the groove and cutting the tail. Both operations are done with the router, and to get a good fit, it's imperative to use the same bit for both. Grooves can be cut with a hand-held or table-mounted router. The location of the cut and the size of the cut itself usually will dictate which approach is optimum. The tails likewise can be cut either way. The portable router generally requires jigging to steady it on the narrow edge being worked. As a consequence, most woodworkers cut the tails on the router table. There you need nothing beyond all-purpose accessories such as a push block and a featherboard or two. by Bill Hylton Bill is the author of several books about furniture construction and router operations. When he isn't writing about woodworking, he's doing it in his home shop in Kempton, Pennsylvania. Choosing a bit: Dovetail bits are made in a variety of diameters and angles. Most half-blind dovetail jigs require a ^"-diameter, 14° bit on a V4" shank, so I'd say that's the most common bit. But thanks to the prevalence of through-dovetail jigs, you can buy bits with 7° tapers, as well as with 71/2°, 8°, and 9° tapers. These angles yield more of a hand-cut look. A benefit of these bits - one that's pertinent here -is that they allow deeper cuts and stronger tails. Check out the comparison drawing below. A ^"-diameter, 14° bit can't cut more than V2" deep because, at that point, the bit has tapered to a V4" diameter. At the same spot on an 8° bit, the girth is about With this bit you can go 13/16" deep and still have a V4" width. Scaling the joint: For casework, a shallow sliding dovetail - say V8" deep - is all you need. Even in a dado joint, that depth is sufficient to withstand the shear stresses applied 23/64" 8deg.1/2" bit 14deg.1/2" bit 100 Popular Woodworking December 2004 |


