Popular Woodworking 2005-06 № 148, страница 20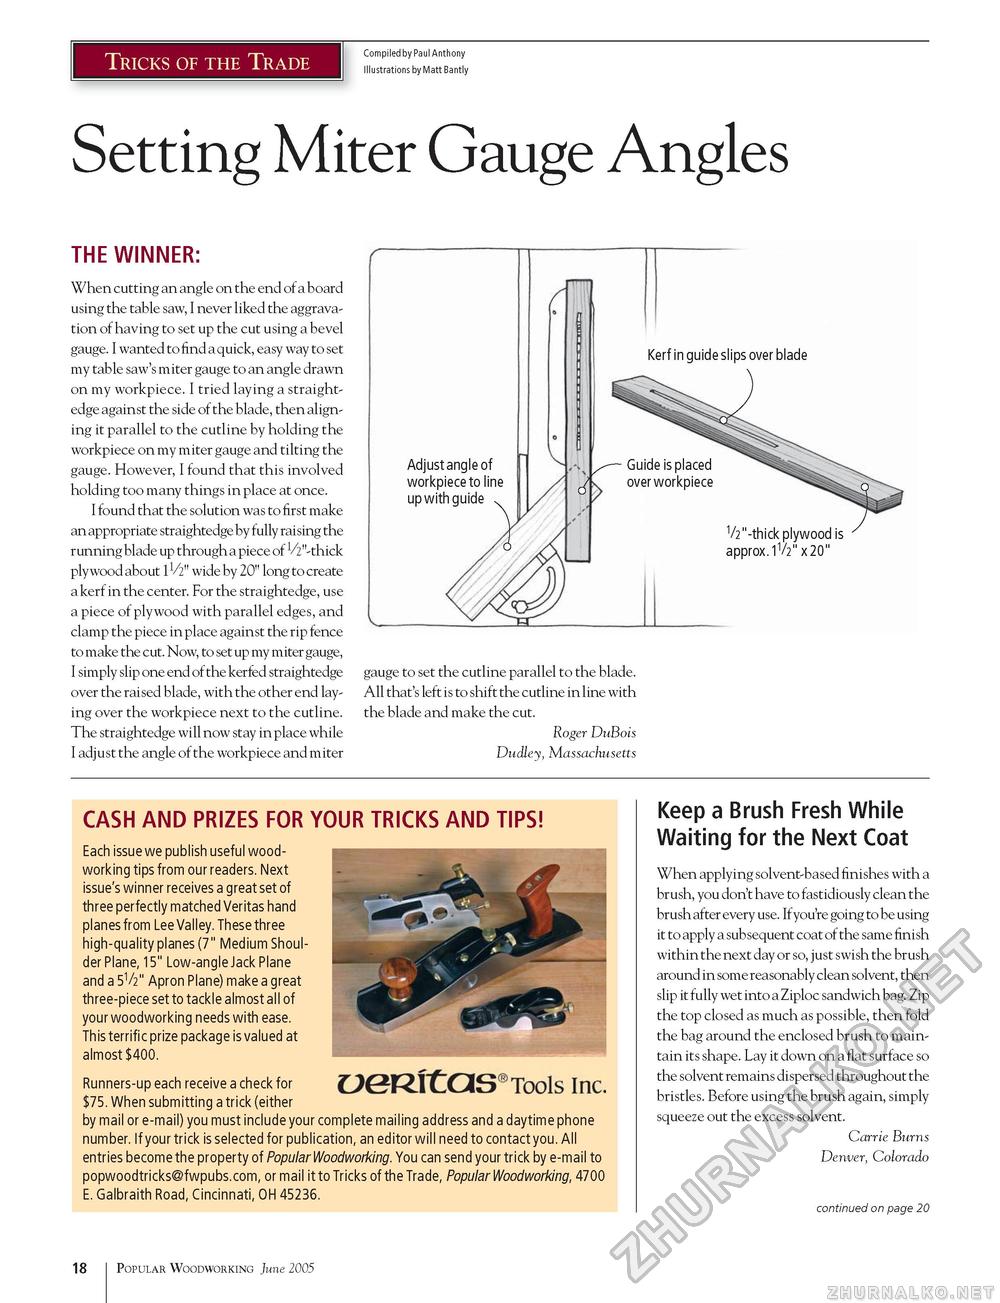
Tricks of the Trade Compiled by Paul Anthony Illustrations by Matt Bantly Setting Miter Gauge Angles THE WINNER: When cutting an angle on the end of a board using the table saw, I never liked the aggravation of having to set up the cut using a bevel gauge. I wanted to find a quick, easy way to set my table saw's miter gauge to an angle drawn on my workpiece. I tried laying a straightedge against the side of the blade, then aligning it parallel to the cutline by holding the workpiece on my miter gauge and tilting the gauge. However, I found that this involved holding too many things in place at once. I found that the solution was to first make an appropriate straightedge by fully raising the running blade up through a piece of V2"-thick plywood about lV2" wide by 20" long to create a kerf in the center. For the straightedge, use a piece of plywood with parallel edges, and clamp the piece in place against the rip fence to make the cut. Now, to set up my miter gauge, I simply slip one end of the kerfed straightedge over the raised blade, with the other end laying over the workpiece next to the cutline. The straightedge will now stay in place while I adjust the angle of the workpiece and miter Adjust angle of workpiece to line up with guide 1/2"-thick plywood is approx. IV2" x 20" gauge to set the cutline parallel to the blade. All that's left is to shift the cutline in line with the blade and make the cut. Roger DuBois Dudley, Massachusetts CASH AND PRIZES FOR YOUR TRICKS AND TIPS! Each issue we publish useful woodworking tips from our readers. Next issue's winner receives a great set of three perfectly matched Veritas hand planes from Lee Valley. These three high-quality planes (7" Medium Shoulder Plane, 15" Low-angle Jack Plane and a 5V2" Apron Plane) make a great three-piece set to tackle almost all of your woodworking needs with ease. This terrific prize package is valued at almost $400. Runners-up each receive a check for OGRTtGIS® Tools IllC. $75. When submitting a trick (either by mail or e-mail) you must include your complete mailing address and a daytime phone number. If your trick is selected for publication, an editor will need to contact you. All entries become the property of Popular Woodworking. You can send your trick by e-mail to popwoodtricks@fwpubs.com, or mail it to Tricks of the Trade, PopularWoodworking, 4700 E. Galbraith Road, Cincinnati, OH 45236. Keep a Brush Fresh While Waiting for the Next Coat When applying solvent-based finishes with a brush, you don't have to fastidiously clean the brush after every use. Ifyou're going to be using it to apply a subsequent coat of the same finish within the next day or so, just swish the brush around in some reasonably clean solvent, then slip it fully wet into a Ziploc sandwich bag. Zip the top closed as much as possible, then fold the bag around the enclosed brush to maintain its shape. Lay it down on a flat surface so the solvent remains dispersed throughout the bristles. Before using the brush again, simply squeeze out the excess solvent. Carrie Burns Denver, Colorado continued on page 20 18 Popular Woodworking June 2005 |


