Popular Woodworking 2005-10 № 150, страница 38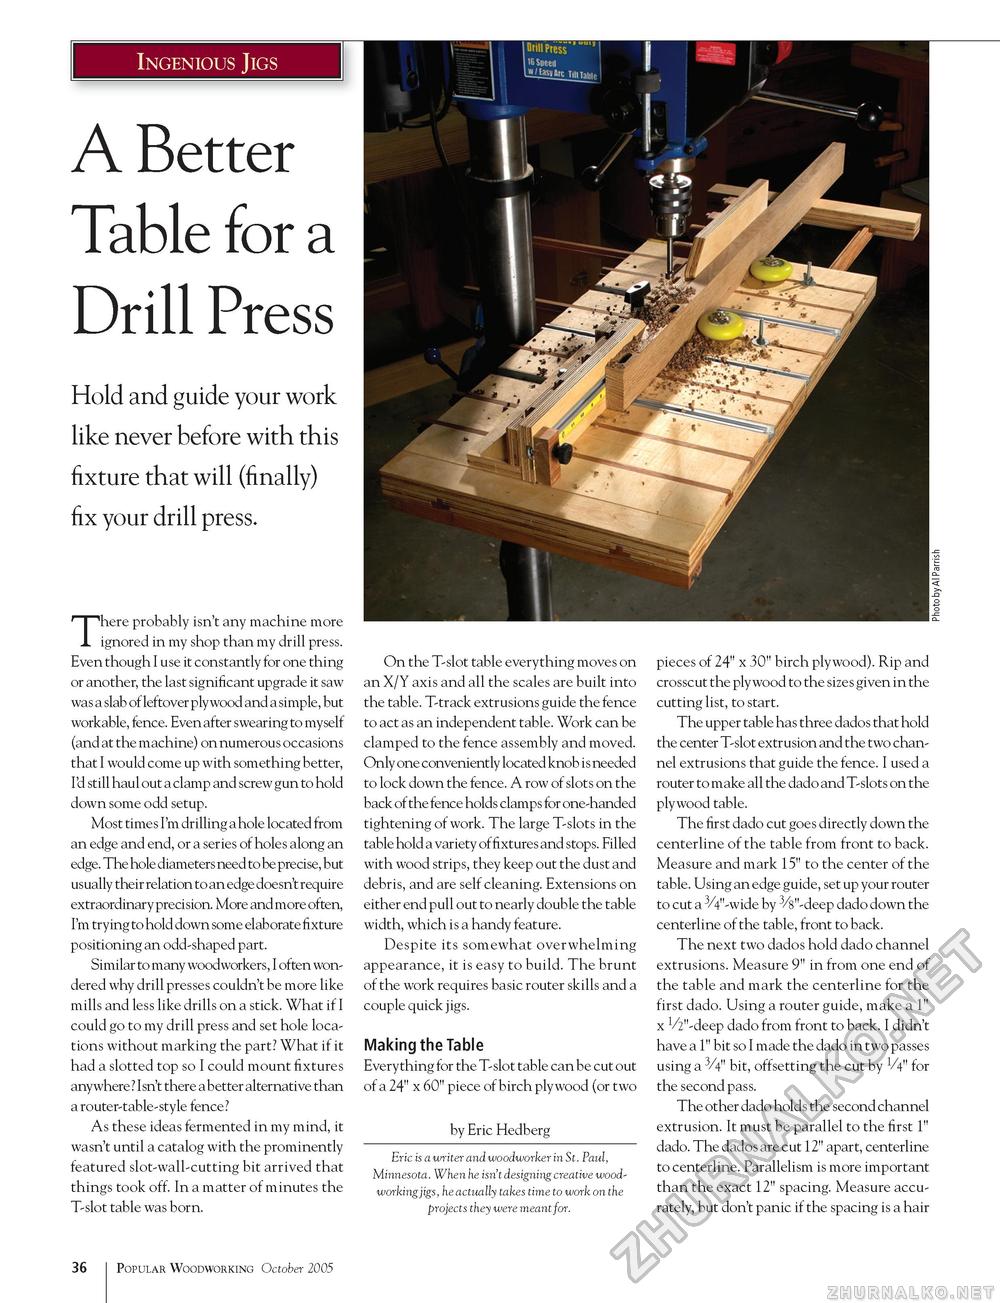
Ingenious Jigs A Better Table for a Drill Press Hold and guide your work like never before with this fixture that will (finally) fix your drill press. There probably isn't any machine more ignored in my shop than my drill press. Even though I use it constantly for one thing or another, the last significant upgrade it saw was a slab of leftover plywood and a simple, but workable, fence. Even after swearing to myself (and at the machine) on numerous occasions that I would come up with something better, I'd still haul out a clamp and screw gun to hold down some odd setup. Most times I'm drilling a hole located from an edge and end, or a series of holes along an edge. The hole diameters need to be precise, but usually their relation to an edge doesn't require extraordinary precision. More and more often, I'm trying to hold down some elaborate fixture positioning an odd-shaped part. Similar to many woodworkers, I often wondered why drill presses couldn't be more like mills and less like drills on a stick. What if I could go to my drill press and set hole locations without marking the part? What if it had a slotted top so I could mount fixtures anywhere ? Isn't there a better alternative than a router-table-style fence? As these ideas fermented in my mind, it wasn't until a catalog with the prominently featured slot-wall-cutting bit arrived that things took off. In a matter of minutes the T-slot table was born. On the T-slot table everything moves on an X/Y axis and all the scales are built into the table. T-track extrusions guide the fence to act as an independent table. Work can be clamped to the fence assembly and moved. Only one conveniently located knob is needed to lock down the fence. A row of slots on the back of the fence holds clamps for one-handed tightening of work. The large T-slots in the table hold a variety of fixtures and stops. Filled with wood strips, they keep out the dust and debris, and are self cleaning. Extensions on either end pull out to nearly double the table width, which is a handy feature. Despite its somewhat overwhelming appearance, it is easy to build. The brunt of the work requires basic router skills and a couple quick jigs. Making the Table Everything for the T-slot table can be cut out of a 24" x 60" piece of birch plywood (or two by Eric Hedberg Eric is a writer and woodworker in St. Paul, Minnesota. When he isn't designing creative woodworkingjigs, he actually takes time to work on the projects they were meant for. pieces of 24" x 30" birch plywood). Rip and crosscut the plywood to the sizes given in the cutting list, to start. The upper table has three dados that hold the center T-slot extrusion and the two channel extrusions that guide the fence. I used a router to make all the dado and T-slots on the plywood table. The first dado cut goes directly down the centerline of the table from front to back. Measure and mark 15" to the center of the table. Using an edge guide, set up your router to cut a 3/4"-wide by 3/8"-deep dado down the centerline of the table, front to back. The next two dados hold dado channel extrusions. Measure 9" in from one end of the table and mark the centerline for the first dado. Using a router guide, make a 1" x ^"-deep dado from front to back. I didn't have a 1" bit so I made the dado in two passes using a 3/4" bit, offsetting the cut by V4" for the second pass. The other dado holds the second channel extrusion. It must be parallel to the first 1" dado. The dados are cut 12" apart, centerline to centerline. Parallelism is more important than the exact 12" spacing. Measure accurately, but don't panic if the spacing is a hair 36 Popular Woodworking October 2005 |


