Popular Woodworking 2005-10 № 150, страница 89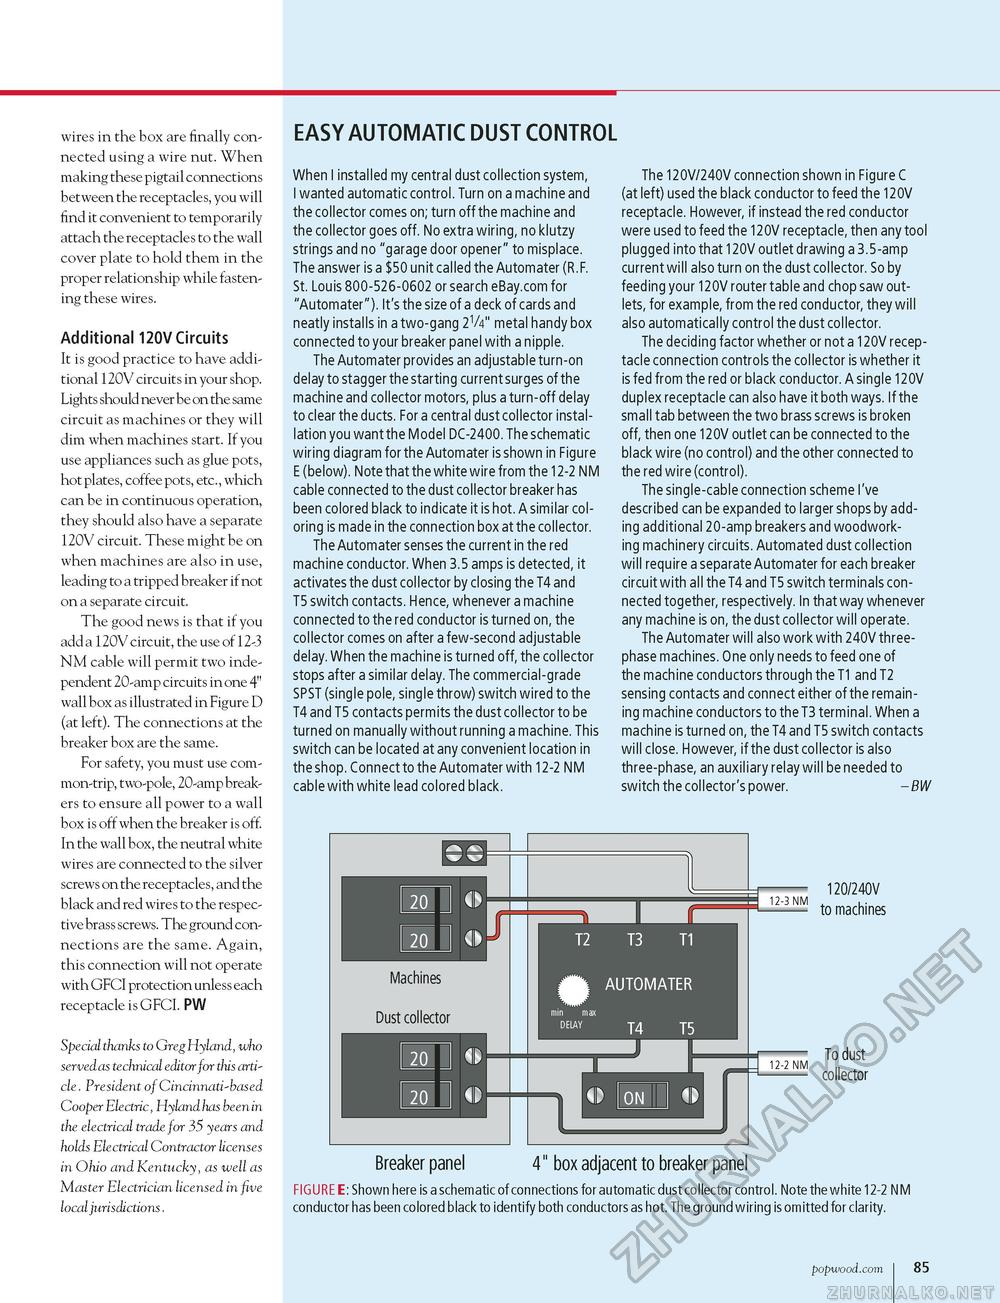
wires in the box are finally connected using a wire nut. When making these pigtail connections between the receptacles, you will find it convenient to temporarily attach the receptacles to the wall cover plate to hold them in the proper relationship while fastening these wires. Additional 120V Circuits It is good practice to have additional 120V circuits in your shop. Lights should never be on the same circuit as machines or they will dim when machines start. If you use appliances such as glue pots, hot plates, coffee pots, etc., which can be in continuous operation, they should also have a separate 120V circuit. These might be on when machines are also in use, leading to a tripped breaker if not on a separate circuit. The good news is that if you add a 120V circuit, the use of12-3 NM cable will permit two independent 20-amp circuits in one 4" wall box as illustrated in Figure D (at left). The connections at the breaker box are the same. For safety, you must use common-trip, two-pole, 20-amp breakers to ensure all power to a wall box is off when the breaker is off. In the wall box, the neutral white wires are connected to the silver screws on the receptacles, and the black and red wires to the respective brass screws. The ground connections are the same. Again, this connection will not operate with GFCI protection unless each receptacle is GFCI. PW Special thanks to GregHyland, who served as technical editor for this article. President of Cincinnati-based Cooper Electric, Hyland has been in the electrical trade for 35 years and holds Electrical Contractor licenses in Ohio and Kentucky, as well as Master Electrician licensed in five local jurisdictions. EASY AUTOMATIC DUST CONTROL When I installed my central dust collection system, I wanted automatic control. Turn on a machine and the collector comes on; turn off the machine and the collector goes off. No extra wiring, no klutzy strings and no "garage door opener" to misplace. The answer is a $50 unit called the Automater (R.F. St. Louis 800-526-0602 or search eBay.com for "Automater"). It's the size of a deck of cards and neatly installs in a two-gang 2V4" metal handy box connected to your breaker panel with a nipple. The Automater provides an adjustable turn-on delay to stagger the starting current surges of the machine and collector motors, plus a turn-off delay to clear the ducts. For a central dust collector installation you want the Model DC-2400. The schematic wiring diagram for the Automater is shown in Figure E (below). Note that the white wire from the 12-2 NM cable connected to the dust collector breaker has been colored black to indicate it is hot. A similar coloring is made in the connection box at the collector. The Automater senses the current in the red machine conductor. When 3.5 amps is detected, it activates the dust collector by closing the T4 and T5 switch contacts. Hence, whenever a machine connected to the red conductor is turned on, the collector comes on after a few-second adjustable delay. When the machine is turned off, the collector stops after a similar delay. The commercial-grade SPST (single pole, single throw) switch wired to the T4 and T5 contacts permits the dust collector to be turned on manually without running a machine. This switch can be located at any convenient location in the shop. Connect to the Automater with 12-2 NM cable with white lead colored black. The 120V/240V connection shown in Figure C (at left) used the black conductor to feed the 120V receptacle. However, if instead the red conductor were used to feed the 120V receptacle, then any tool plugged into that 120V outlet drawing a 3.5-amp current will also turn on the dust collector. So by feeding your 120V router table and chop saw outlets, for example, from the red conductor, they will also automatically control the dust collector. The deciding factor whether or not a 120V receptacle connection controls the collector is whether it is fed from the red or black conductor. A single 120V duplex receptacle can also have it both ways. If the small tab between the two brass screws is broken off, then one 120V outlet can be connected to the black wire (no control) and the other connected to the red wire (control). The single-cable connection scheme I've described can be expanded to larger shops by adding additional 20-amp breakers and woodworking machinery circuits. Automated dust collection will require a separate Automater for each breaker circuit with all the T4 and T5 switch terminals connected together, respectively. In that way whenever any machine is on, the dust collector will operate. The Automater will also work with 240V three-phase machines. One only needs to feed one of the machine conductors through the T1 and T2 sensing contacts and connect either of the remaining machine conductors to the T3 terminal. When a machine is turned on, the T4 and T5 switch contacts will close. However, if the dust collector is also three-phase, an auxiliary relay will be needed to switch the collector's power. - BW 120/240V to machines To dust collector Breaker panel 4" box adjacent to breaker panel FIGURE E: Shown here is a schematic of connections for automatic dust collector control. Note the white 12-2 NM conductor has been colored black to identify both conductors as hot. The ground wiring is omitted for clarity. popwood.com i 85 |


