Popular Woodworking 2005-11 № 151, страница 26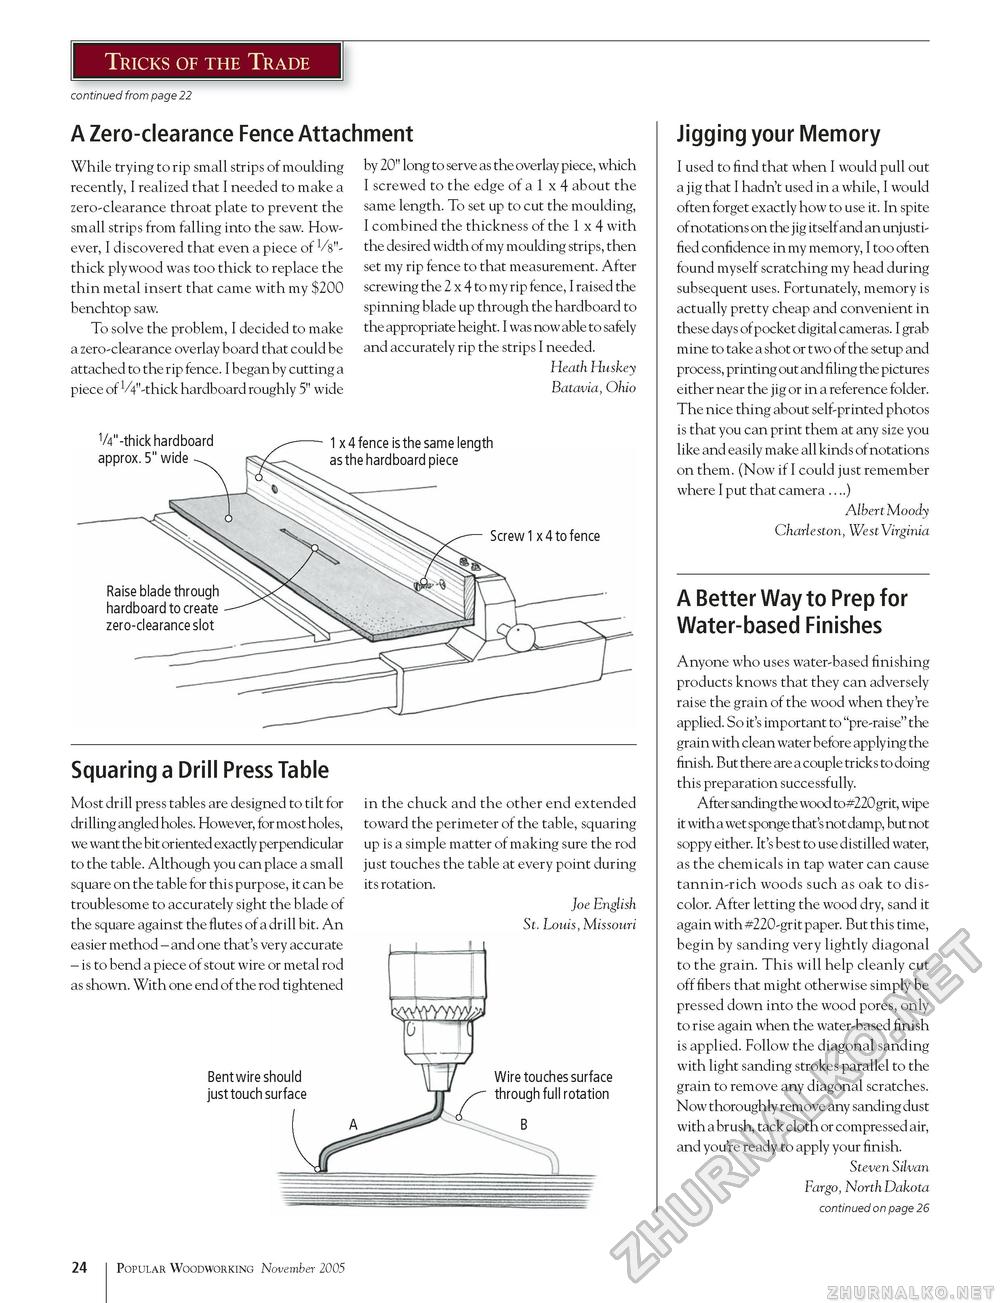
Tricks of the Trade continued from page 22 A Zero-clearance Fence Attachment While trying to rip small strips of moulding recently, I realized that I needed to make a zero-clearance throat plate to prevent the small strips from falling into the saw. However, I discovered that even a piece of 1/3"-thick plywood was too thick to replace the thin metal insert that came with my $200 benchtop saw. To solve the problem, I decided to make a zero-clearance overlay board that could be attached to the rip fence. I began by cutting a piece of 1/4"-thick hardboard roughly 5" wide by 20" long to serve as the overlay piece, which I screwed to the edge of a 1 x 4 about the same length. To set up to cut the moulding, I combined the thickness of the 1 x 4 with the desired width of my moulding strips, then set my rip fence to that measurement. After screwing the 2 x 4 to my rip fence, I raised the spinning blade up through the hardboard to the appropriate height. I was now able to safely and accurately rip the strips I needed. Heath Huskey Batavia, Ohio Squaring a Drill Press Table Most drill press tables are designed to tilt for drilling angled holes. However, for most holes, we want the bit oriented exactly perpendicular to the table. Although you can place a small square on the table for this purpose, it can be troublesome to accurately sight the blade of the square against the flutes of a drill bit. An easier method - and one that's very accurate - is to bend a piece of stout wire or metal rod as shown. With one end of the rod tightened Bent wire should just touch surface in the chuck and the other end extended toward the perimeter of the table, squaring up is a simple matter of making sure the rod just touches the table at every point during its rotation. Joe English St. Louis, Missouri
Wire touches surface through full rotation Jigging your Memory I used to find that when I would pull out a jig that I hadn't used in a while, I would often forget exactly how to use it. In spite of notations on the j ig itself and an unj usti-fied confidence in my memory, I too often found myself scratching my head during subsequent uses. Fortunately, memory is actually pretty cheap and convenient in these days of pocket digital cameras. I grab mine to take a shot or two of the setup and process, printing out and filing the pictures either near the jig or in a reference folder. The nice thing about self-printed photos is that you can print them at any size you like and easily make all kinds of notations on them. (Now if I could just remember where I put that camera ....) Albert Moody Charleston, West Virginia A Better Way to Prep for Water-based Finishes Anyone who uses water-based finishing products knows that they can adversely raise the grain of the wood when they're applied. So it's important to "pre-raise" the grain with clean water before applying the finish. But there are a couple tricks to doing this preparation successfully. After sanding the wood to #220grit, wipe it with a wet sponge that's not damp, but not soppy either. It's best to use distilled water, as the chemicals in tap water can cause tannin-rich woods such as oak to discolor. After letting the wood dry, sand it again with #220-grit paper. But this time, begin by sanding very lightly diagonal to the grain. This will help cleanly cut off fibers that might otherwise simply be pressed down into the wood pores, only to rise again when the water-based finish is applied. Follow the diagonal sanding with light sanding strokes parallel to the grain to remove any diagonal scratches. Now thoroughly remove any sanding dust with a brush, tack cloth or compressed air, and you're ready to apply your finish. Steven Silvan Fargo, North Dakota continued on page 26 24 Popular Woodworking November 2005 |
||||||||||||||||


