Popular Woodworking 2005-12 № 152, страница 53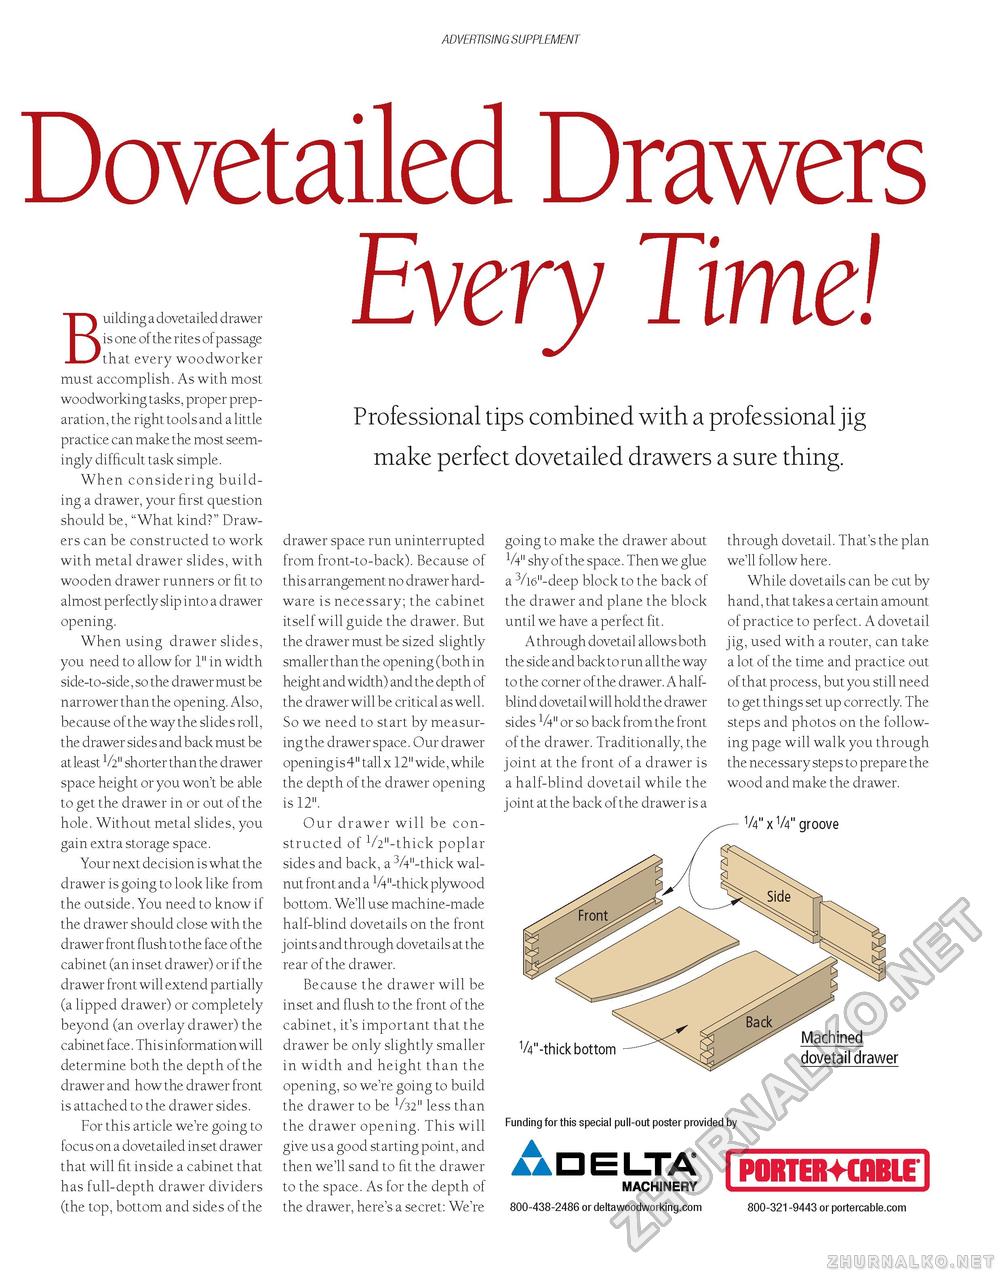
ADVERTISING SUPPLEMENT Dovetailed Drawers Every Time! Building a dovetailed drawer is one of the rites of passage that every woodworker must accomplish. As with most woodworking tasks, proper preparation, the right tools and a little practice can make the most seemingly difficult task simple. When considering building a drawer, your first question should be, "What kind?" Drawers can be constructed to work with metal drawer slides, with wooden drawer runners or fit to almost perfectly slip into a drawer opening. When using drawer slides, you need to allow for 1" in width side-to-side, so the drawer must be narrower than the opening. Also, because of the way the slides roll, the drawer sides and back must be at least V2" shorter than the drawer space height or you won't be able to get the drawer in or out of the hole. Without metal slides, you gain extra storage space. Your next decision is what the drawer is going to look like from the outside. You need to know if the drawer should close with the drawer front flush to the face of the cabinet (an inset drawer) or if the drawer front will extend partially (a lipped drawer) or completely beyond (an overlay drawer) the cabinet face. This information will determine both the depth of the drawer and how the drawer front is attached to the drawer sides. For this article we're going to focus on a dovetailed inset drawer that will fit inside a cabinet that has full-depth drawer dividers (the top, bottom and sides of the Professional tips combined with a professional jig make perfect dovetailed drawers a sure thing. drawer space run uninterrupted from front-to-back). Because of this arrangement no drawer hardware is necessary; the cabinet itself will guide the drawer. But the drawer must be sized slightly smaller than the opening (both in height and width) and the depth of the drawer will be critical as well. So we need to start by measuring the drawer space. Our drawer opening is 4" tall x12" wide, while the depth of the drawer opening is 12". Our drawer will be constructed of 1/2"-thick poplar sides and back, a 3/4"-thick walnut front and a 1/4"-thick plywood bottom. We'll use machine-made half-blind dovetails on the front j oints and through dovetails at the rear of the drawer. Because the drawer will be inset and flush to the front of the cabinet, it's important that the drawer be only slightly smaller in width and height than the opening, so we're going to build the drawer to be 1/32" less than the drawer opening. This will give us a good starting point, and then we'll sand to fit the drawer to the space. As for the depth of the drawer, here's a secret: We're going to make the drawer about V4" shy of the space. Then we glue a 3/l6"-deep block to the back of the drawer and plane the block until we have a perfect fit. A through dovetail allows both the side and back to run all the way to the corner of the drawer. A half-blind dovetail will hold the drawer sides 1/4" or so back from the front of the drawer. Traditionally, the joint at the front of a drawer is a half-blind dovetail while the joint at the back of the drawer is a through dovetail. That's the plan we'll follow here. While dovetails can be cut by hand, that takes a certain amount of practice to perfect. A dovetail jig, used with a router, can take a lot of the time and practice out of that process, but you still need to get things set up correctly. The steps and photos on the following page will walk you through the necessary steps to prepare the wood and make the drawer. V4" x V4" groove 1/4"-thick bottom Funding for this special pull-out poster provided by MACHINERY 800-438-2486 or deltawoodworking.com 800-321-9443 or portercable.com |


