Popular Woodworking 2005-12 № 152, страница 67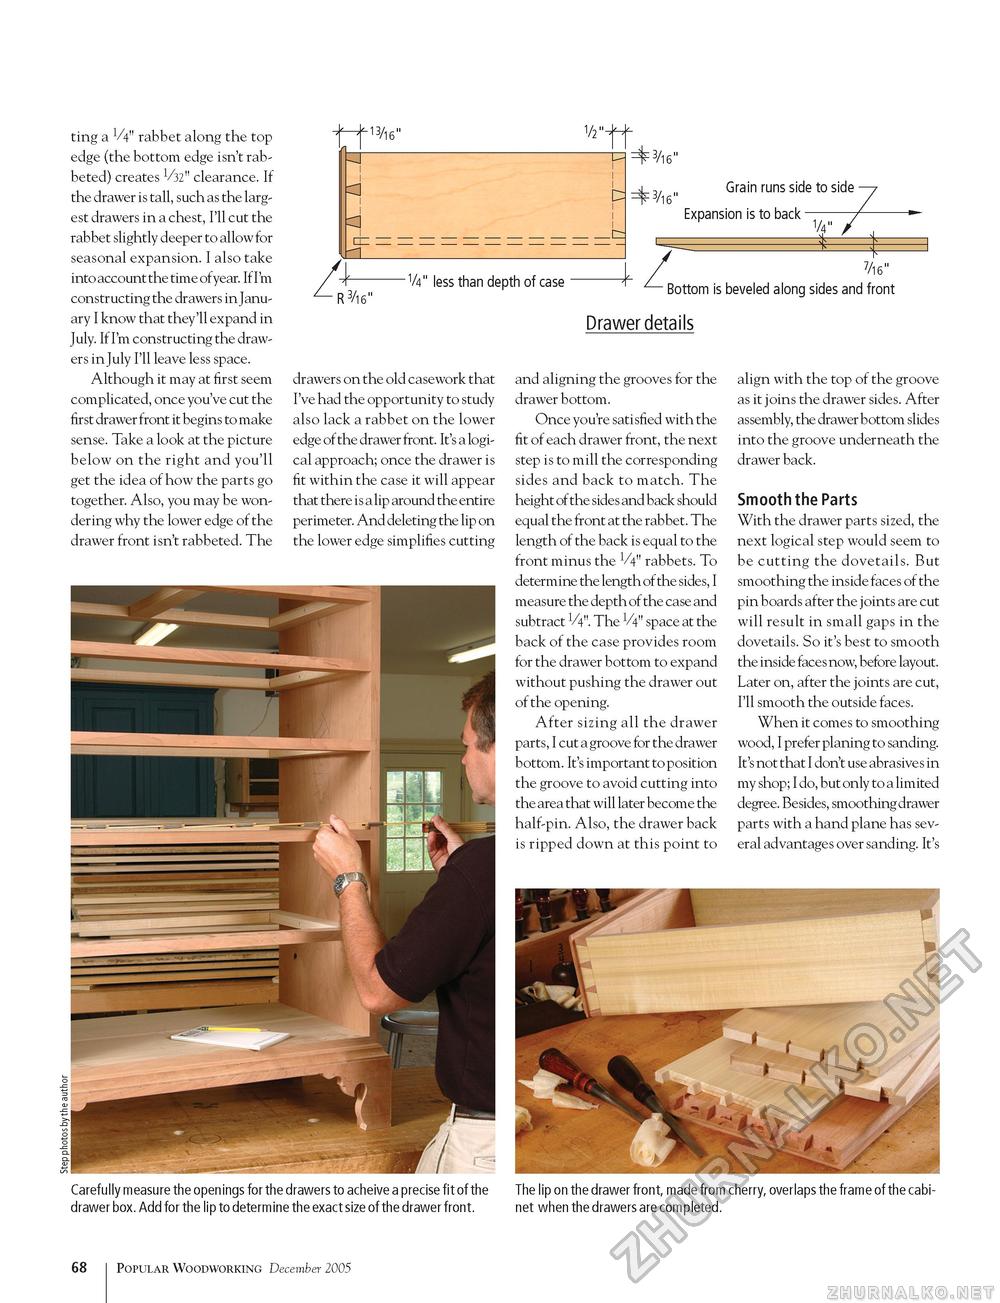
ting a V4" rabbet along the top edge (the bottom edge isn't rabbeted) creates V32" clearance. If the drawer is tall, such as the largest drawers in a chest, I'll cut the rabbet slightly deeper to allow for seasonal expansion. I also take into account the time ofyear. IfI'm constructing the drawers in January I know that they'll expand in July. If I'm constructing the drawers in July I'll leave less space. Although it may at first seem complicated, once you've cut the first drawer front it begins to make sense. Take a look at the picture below on the right and you'll get the idea of how the parts go together. Also, you may be wondering why the lower edge of the drawer front isn't rabbeted. The d R3/ie _1/4" less than depth of case #3/ie #3/ie Grain runs side to side Expansion is to back Bottom is beveled along sides and front Drawer details drawers on the old casework that I've had the opportunity to study also lack a rabbet on the lower edge of the drawer front. It's a logical approach; once the drawer is fit within the case it will appear that there is a lip around the entire perimeter. And deleting the lip on the lower edge simplifies cutting and aligning the grooves for the drawer bottom. Once you're satisfied with the fit of each drawer front, the next step is to mill the corresponding sides and back to match. The height of the sides and back should equal the front at the rabbet. The length of the back is equal to the front minus the V4" rabbets. To determine the length of the sides, I measure the depth of the case and subtract V4". The V4" space at the back of the case provides room for the drawer bottom to expand without pushing the drawer out of the opening. After sizing all the drawer parts, I cut a groove for the drawer bottom. It's important to position the groove to avoid cutting into the area that will later become the half-pin. Also, the drawer back is ripped down at this point to align with the top of the groove as it joins the drawer sides. After assembly, the drawer bottom slides into the groove underneath the drawer back. Smooth the Parts With the drawer parts sized, the next logical step would seem to be cutting the dovetails. But smoothing the inside faces of the pin boards after the joints are cut will result in small gaps in the dovetails. So it's best to smooth the inside faces now, before layout. Later on, after the joints are cut, I'll smooth the outside faces. When it comes to smoothing wood, I prefer planing to sanding. It's not that I don't use abrasive s in my shop; I do, but only to a limited degree. Besides, smoothing drawer parts with a hand plane has several advantages over sanding. It's Carefully measure the openings for the drawers to acheive a precise fit of the drawer box. Add for the lip to determine the exact size of the drawer front. The lip on the drawer front, made from cherry, overlaps the frame of the cabinet when the drawers are completed. 68 102 Popular Woodworking December 2005 |


