Popular Woodworking 2006-02 № 153, страница 22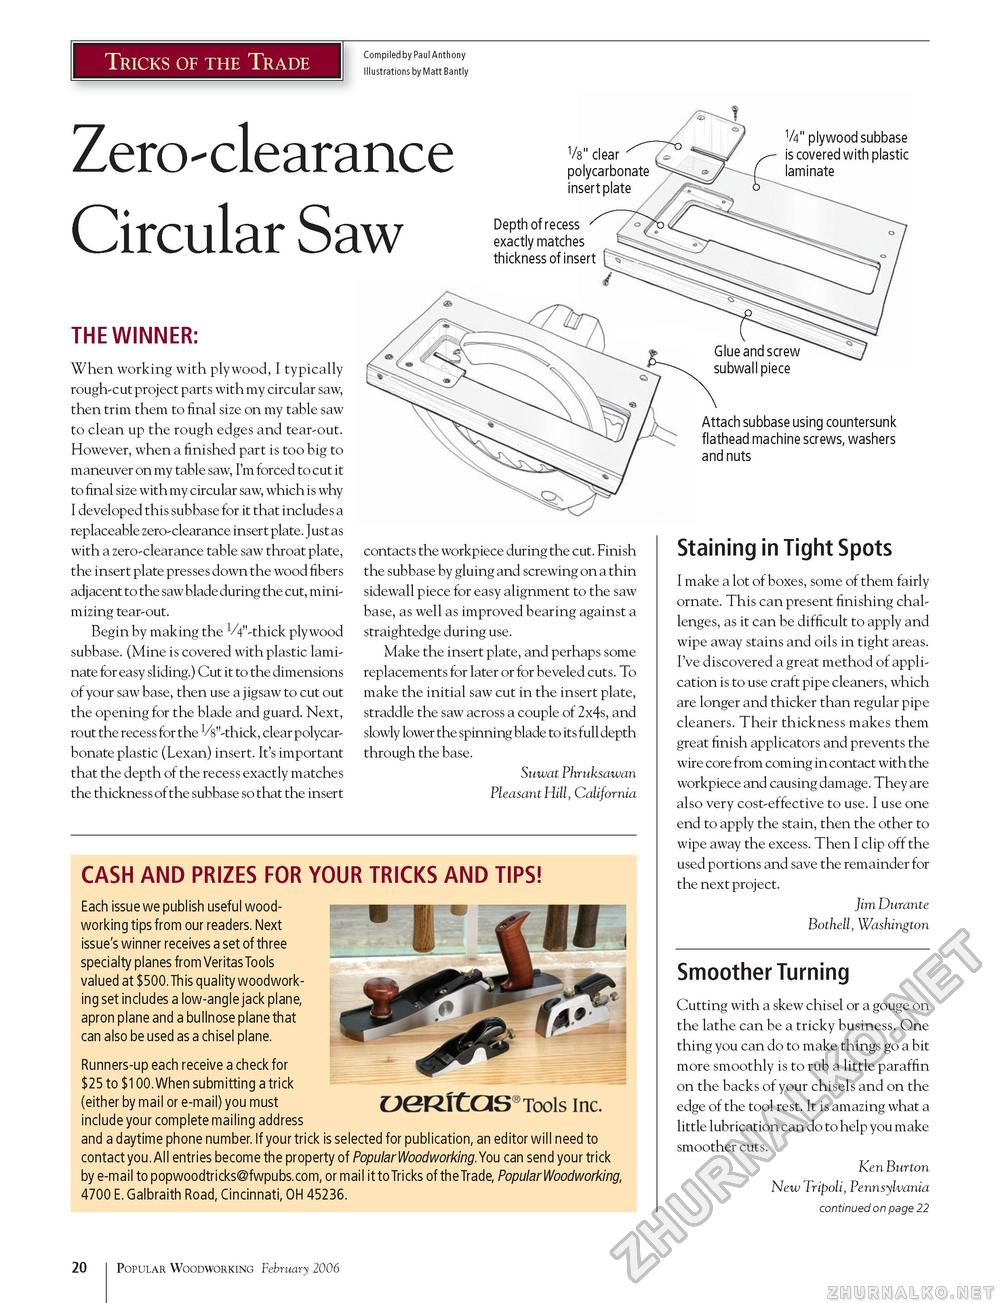
Tricks of the Trade Compiled by Paul Anthony Illustrations by Matt Bantly Zero-clearance Circular Saw THE WINNER: When working with plywood, I typically rough-cut project parts with my circular saw, then trim them to final size on my table saw to clean up the rough edges and tear-out. However, when a finished part is too big to maneuver on my table saw, I'm forced to cut it to final size with my circular saw, which is why I developed this subbase for it that includes a replaceable zero-clearance insert plate. Just as with a zero-clearance table saw throat plate, the insert plate presses down the wood fibers adjacent to the saw blade during the cut, minimizing tear-out. Begin by making the V4"-thick plywood subbase. (Mine is covered with plastic laminate for easy sliding.) Cut it to the dimensions of your saw base, then use a j igsaw to cut out the opening for the blade and guard. Next, rout the recess for the Vs'-thick, clear polycarbonate plastic (Lexan) insert. It's important that the depth of the recess exactly matches the thickness of the subbase so that the insert 1/8" clear polycarbonate insert plate V4" plywood subbase is covered with plastic laminate Depth of recess exactly matches thickness of insert contacts the workpiece during the cut. Finish the subbase by gluing and screwing on a thin sidewall piece for easy alignment to the saw base, as well as improved bearing against a straightedge during use. Make the insert plate, and perhaps some replacements for later or for beveled cuts. To make the initial saw cut in the insert plate, straddle the saw across a couple of 2x4s, and slowly lower the spinning blade to its full depth through the base. Suwat Phruksawan Pleasant Hill, California CASH AND PRIZES FOR YOUR TRICKS AND TIPS! Each issue we publish useful woodworking tips from our readers. Next issue's winner receives a set of three specialty planes from Veritas Tools valued at $500. This quality woodworking set includes a low-angle jack plane, apron plane and a bullnose plane that can also be used as a chisel plane. Runners-up each receive a check for $25 to $100. When submitting a trick (either by mail or e-mail) you must include your complete mailing address and a daytime phone number. If your trick is selected for publication, an editor will need to contact you. All entries become the property of PopularWoodworking. You can send your trick by e-mail to popwoodtricks@fwpubs.com, or mail it to Tricks of the Trade, PopularWoodworking, 4700 E. Galbraith Road, Cincinnati, OH 45236. OeRltaS®Tools Inc, Glue and screw subwall piece Attach subbase using countersunk flathead machine screws, washers and nuts Staining in Tight Spots I make a lot of boxes, some of them fairly ornate. This can present finishing challenges, as it can be difficult to apply and wipe away stains and oils in tight areas. I've discovered a great method of application is to use craft pipe cleaners, which are longer and thicker than regular pipe cleaners. Their thickness makes them great finish applicators and prevents the wire core from coming in contact with the workpiece and causing damage. They are also very cost-effective to use. I use one end to apply the stain, then the other to wipe away the excess. Then I clip off the used portions and save the remainder for the next project. Jim Durante Bothell, Washington Smoother Turning Cutting with a skew chisel or a gouge on the lathe can be a tricky business. One thing you can do to make things go a bit more smoothly is to rub a little paraffin on the backs of your chisels and on the edge of the tool rest. It is amazing what a little lubrication can do to help you make smoother cuts. Ken Burton New Tripoli, Pennsylvania continued on page 22 20 Popular Woodworking February 2006 |


