Popular Woodworking 2006-04 № 154, страница 62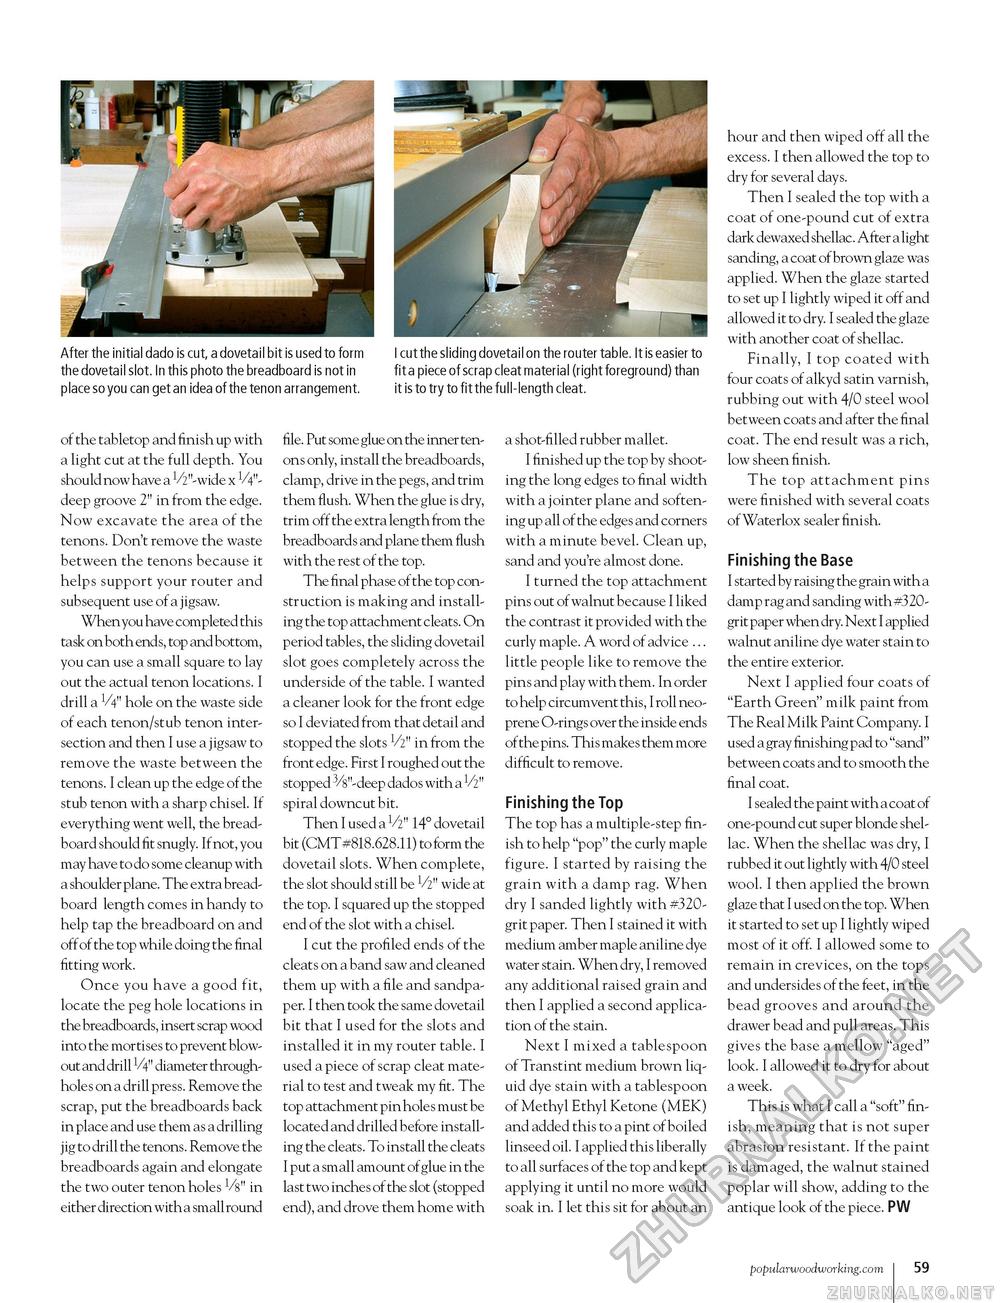
After the initial dado is cut, a dovetail bit is used to form I cut the sliding dovetail on the router table. It is easier to the dovetail slot. In this photo the breadboard is not in fit a piece of scrap cleat material (right foreground) than place so you can get an idea of the tenon arrangement. it is to try to fit the full-length cleat. of the tabletop and finish up with a light cut at the full depth. You should now have a V2"-wide x V4"-deep groove 2" in from the edge. Now excavate the area of the tenons. Don't remove the waste between the tenons because it helps support your router and subsequent use of a jigsaw. When you have completed this task on both ends, top and bottom, you can use a small square to lay out the actual tenon locations. I drill a V4" hole on the waste side of each tenon/stub tenon intersection and then I use a jigsaw to remove the waste between the tenons. I clean up the edge of the stub tenon with a sharp chisel. If everything went well, the breadboard should fit snugly. If not, you may have to do some cleanup with a shoulder plane. The extra breadboard length comes in handy to help tap the breadboard on and off of the top while doing the final fitting work. Once you have a good fit, locate the peg hole locations in the breadboards, insert scrap wood into the mortises to prevent blowout and drill V4" diameter through-holes on a drill press. Remove the scrap, put the breadboards back in place and use them as a drilling jig to drill the tenons. Remove the breadboards again and elongate the two outer tenon holes Vs" in either direction with a small round file. Put some glue on the inner tenons only, install the breadboards, clamp, drive in the pegs, and trim them flush. When the glue is dry, trim off the extra length from the breadboards and plane them flush with the rest of the top. The final phase of the top construction is making and installing the top attachment cleats. On period tables, the sliding dovetail slot goes completely across the underside of the table. I wanted a cleaner look for the front edge so I deviated from that detail and stopped the slots V2" in from the front edge. First I roughed out the stopped 3/s"-deep dados with a 1/2" spiral downcut bit. Then I used a V2" 14° dovetail bit (CMT #818.628.11) to form the dovetail slots. When complete, the slot should still be V2" wide at the top. I squared up the stopped end of the slot with a chisel. I cut the profiled ends of the cleats on a band saw and cleaned them up with a file and sandpaper. I then took the same dovetail bit that I used for the slots and installed it in my router table. I used a piece of scrap cleat material to test and tweak my fit. The top attachment pin holes must be located and drilled before installing the cleats. To install the cleats I put a small amount of glue in the last two inches of the slot (stopped end), and drove them home with a shot-filled rubber mallet. I finished up the top by shooting the long edges to final width with a jointer plane and softening up all of the edges and corners with a minute bevel. Clean up, sand and you're almost done. I turned the top attachment pins out of walnut because I liked the contrast it provided with the curly maple. A word of advice ... little people like to remove the pins and play with them. In order to help circumvent this, I roll neo-prene O-rings over the inside ends of the pins. This makes them more difficult to remove. Finishing the Top The top has a multiple-step finish to help "pop" the curly maple figure. I started by raising the grain with a damp rag. When dry I sanded lightly with #320-grit paper. Then I stained it with medium amber maple aniline dye water stain. When dry, I removed any additional raised grain and then I applied a second application of the stain. Next I mixed a tablespoon of Transtint medium brown liquid dye stain with a tablespoon of Methyl Ethyl Ketone (MEK) and added this to a pint of boiled linseed oil. I applied this liberally to all surfaces of the top and kept applying it until no more would soak in. I let this sit for about an hour and then wiped off all the excess. I then allowed the top to dry for several days. Then I sealed the top with a coat of one-pound cut of extra dark dewaxed shellac. After a light sanding, a coat of brown glaze was applied. When the glaze started to set up I lightly wiped it off and allowed it to dry. I sealed the glaze with another coat of shellac. Finally, I top coated with four coats of alkyd satin varnish, rubbing out with 4/0 steel wool between coats and after the final coat. The end result was a rich, low sheen finish. The top attachment pins were finished with several coats of Waterlox sealer finish. Finishing the Base I started by raising the grain with a damp rag and sanding with #320-grit paper when dry. Next I applied walnut aniline dye water stain to the entire exterior. Next I applied four coats of "Earth Green" milk paint from The Real Milk Paint Company. I used a gray finishing pad to "sand" between coats and to smooth the final coat. I sealed the paint with a coat of one-pound cut super blonde shellac. When the shellac was dry, I rubbed it out lightly with 4/0 steel wool. I then applied the brown glaze that I used on the top. When it started to set up I lightly wiped most of it off. I allowed some to remain in crevices, on the tops and undersides of the feet, in the bead grooves and around the drawer bead and pull areas. This gives the base a mellow "aged" look. I allowed it to dry for about a week. This is what I call a "soft" finish, meaning that is not super abrasion resistant. If the paint is damaged, the walnut stained poplar will show, adding to the antique look of the piece. PW popularwoodworking.com i 59 |


