Popular Woodworking 2006-06 № 155, страница 71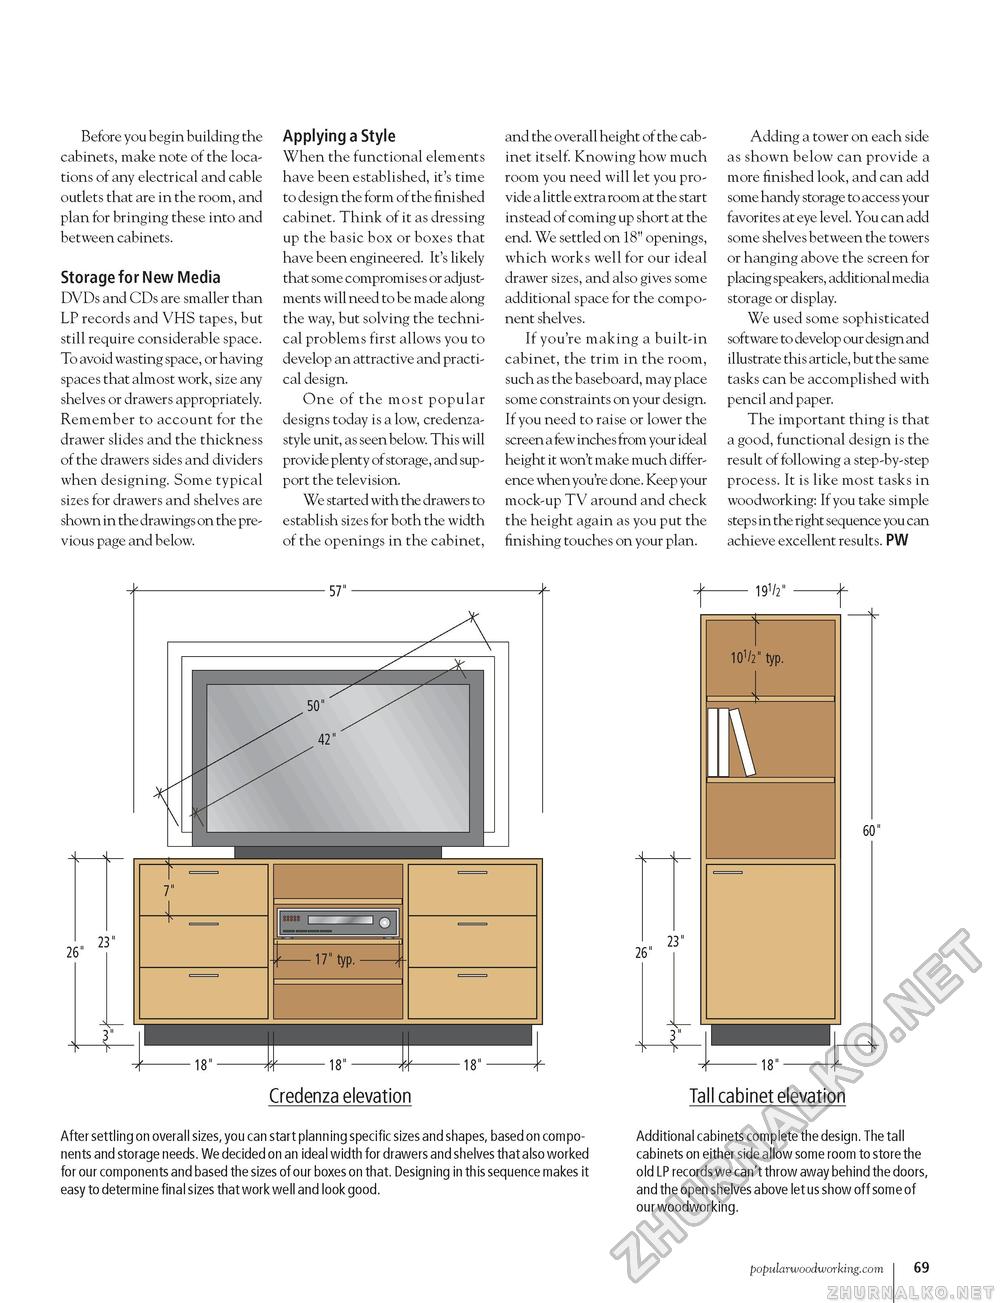
Before you begin building the cabinets, make note of the locations of any electrical and cable outlets that are in the room, and plan for bringing these into and between cabinets. Storage for New Media DVDs and CDs are smaller than LP records and VHS tapes, but still require considerable space. To avoid wasting space, or having spaces that almost work, size any shelves or drawers appropriately. Remember to account for the drawer slides and the thickness of the drawers sides and dividers when designing. Some typical sizes for drawers and shelves are shown in the drawings on the previous page and below. Applying a Style When the functional elements have been established, it's time to design the form of the finished cabinet. Think of it as dressing up the basic box or boxes that have been engineered. It's likely that some compromises or adjustments will need to be made along the way, but solving the technical problems first allows you to develop an attractive and practical design. One of the most popular designs today is a low, credenza-style unit, as seen below. This will provide plenty of storage, and support the television. We started with the drawers to establish sizes for both the width of the openings in the cabinet, and the overall height of the cabinet itself. Knowing how much room you need will let you provide a little extra room at the start instead of coming up short at the end. We settled on 18" openings, which works well for our ideal drawer sizes, and also gives some additional space for the component shelves. If you're making a built-in cabinet, the trim in the room, such as the baseboard, may place some constraints on your design. If you need to raise or lower the screen a few inches from your ideal height it won't make much difference when you're done. Keep your mock-up TV around and check the height again as you put the finishing touches on your plan. Adding a tower on each side as shown below can provide a more finished look, and can add some handy storage to access your favorites at eye level. You can add some shelves between the towers or hanging above the screen for placing speakers, additional media storage or display. We used some sophisticated software to develop our design and illustrate this article, but the same tasks can be accomplished with pencil and paper. The important thing is that a good, functional design is the result of following a step-by-step process. It is like most tasks in woodworking: If you take simple step s in the right sequence you can achieve excellent results. PW 26" 23" 19l/2" lOV typ. 60" Credenza elevation Tall cabinet elevation After settling on overall sizes, you can start planning specific sizes and shapes, based on components and storage needs. We decided on an ideal width for drawers and shelves that also worked for our components and based the sizes of our boxes on that. Designing in this sequence makes it easy to determine final sizes that work well and look good. Additional cabinets complete the design. The tall cabinets on either side allow some room to store the old LP records we can't throw away behind the doors, and the open shelves above let us show off some of our woodworking. popularwoodworking.com I 69 |


