Popular Woodworking 2006-08 № 156, страница 75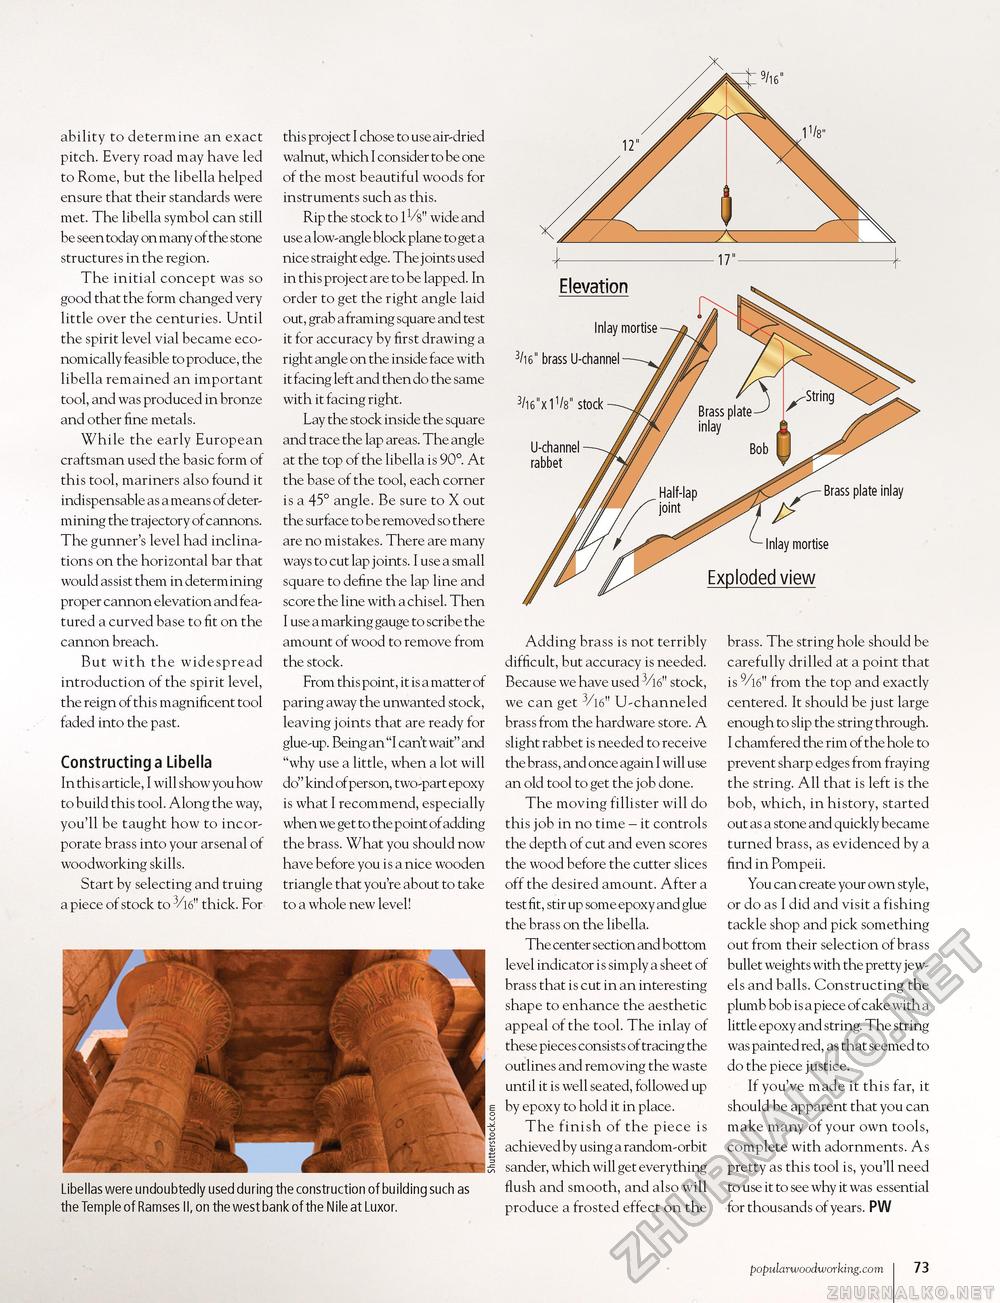
ability to determine an exact pitch. Every road may have led to Rome, but the libella helped ensure that their standards were met. The libella symbol can still be seen today on many of the stone structures in the region. The initial concept was so good that the form changed very little over the centuries. Until the spirit level vial became economically feasible to produce, the libella remained an important tool, and was produced in bronze and other fine metals. While the early European craftsman used the basic form of this tool, mariners also found it indispensable as a means of determining the trajectory of cannons. The gunner's level had inclinations on the horizontal bar that would assist them in determining proper cannon elevation and featured a curved base to fit on the cannon breach. But with the widespread introduction of the spirit level, the reign of this magnificent tool faded into the past. Constructing a Libella In this article, I will show you how to build this tool. Along the way, you'll be taught how to incorporate brass into your arsenal of woodworking skills. Start by selecting and truing a piece of stock to 3/l6" thick. For this project I chose to use air-dried walnut, which I consider to be one of the most beautiful woods for instruments such as this. Rip the stock to 1 Vs" wide and use a low-angle block plane to get a nice straight edge. The joints used in this project are to be lapped. In order to get the right angle laid out, grab a framing square and test it for accuracy by first drawing a right angle on the inside face with it facing left and then do the same with it facing right. Lay the stock inside the square and trace the lap areas. The angle at the top of the libella is 90°. At the base of the tool, each corner is a 45° angle. Be sure to X out the surface to be removed so there are no mistakes. There are many ways to cut lap joints. I use a small square to define the lap line and score the line with a chisel. Then I use a marking gauge to scribe the amount of wood to remove from the stock. From this point, it is a matter of paring away the unwanted stock, leaving joints that are ready for glue-up. Being an "I can't wait" and "why use a little, when a lot will do" kind of person, two-part epoxy is what I recommend, especially when we get to the point of adding the brass. What you should now have before you is a nice wooden triangle that you're about to take to a whole new level! Adding brass is not terribly difficult, but accuracy is needed. Because we have used 3/l6" stock, we can get 3/l6" U-channeled brass from the hardware store. A slight rabbet is needed to receive the brass, and once again I will use an old tool to get the job done. The moving fillister will do this job in no time - it controls the depth of cut and even scores the wood before the cutter slices off the desired amount. After a test fit, stir up some epoxy and glue the brass on the libella. The center section and bottom level indicator is simply a sheet of brass that is cut in an interesting shape to enhance the aesthetic appeal of the tool. The inlay of these pieces consists of tracing the outlines and removing the waste until it is well seated, followed up by epoxy to hold it in place. The finish of the piece is achieved by using a random-orbit sander, which will get everything flush and smooth, and also will produce a frosted effect on the brass. The string hole should be carefully drilled at a point that is 9/l6" from the top and exactly centered. It should be just large enough to slip the string through. I chamfered the rim of the hole to prevent sharp edges from fraying the string. All that is left is the bob, which, in history, started out as a stone and quickly became turned brass, as evidenced by a find in Pompeii. You can create your own style, or do as I did and visit a fishing tackle shop and pick something out from their selection of brass bullet weights with the pretty jewels and balls. Constructing the plumb bob is a piece of cake with a little epoxy and string. The string was painted red, as that seemed to do the piece justice. If you've made it this far, it should be apparent that you can make many of your own tools, complete with adornments. As pretty as this tool is, you'll need to use it to see why it was essential for thousands of years. PW Libellas were undoubtedly used during the construction of building such as the Temple of Ramses II, on the west bank of the Nile at Luxor. popularwoodworking.com I 73 |


