Popular Woodworking 2006-08 № 156, страница 78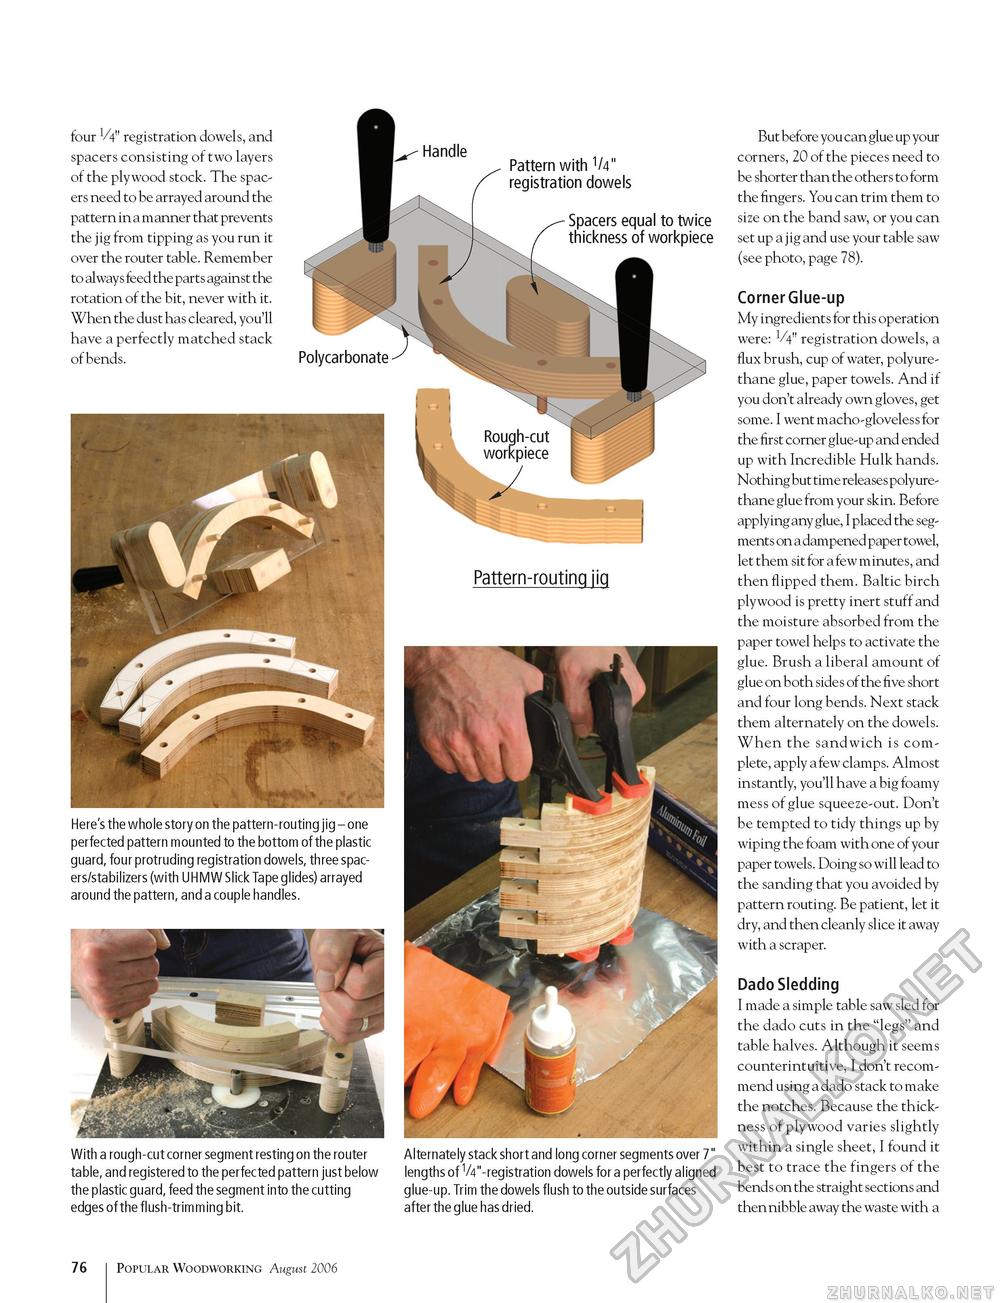
four V4" registration dowels, and spacers consisting of two layers of the plywood stock. The spacers need to be arrayed around the pattern in a manner that prevents the jig from tipping as you run it over the router table. Remember to always feed the parts against the rotation of the bit, never with it. When the dust has cleared, you'll have a perfectly matched stack of bends. Pattern with V4" registration dowels Spacers equal to twice thickness of workpiece Here's the whole story on the pattern-routing jig - one perfected pattern mounted to the bottom of the plastic guard, four protruding registration dowels, three spacers/stabilizers (with UHMW Slick Tape glides) arrayed around the pattern, and a couple handles. With a rough-cut corner segment resting on the router table, and registered to the perfected pattern just below the plastic guard, feed the segment into the cutting edges of the flush-trimming bit. Alternately stack short and long corner segments over 7" lengths of ^./^"-registration dowels for a perfectly aligned glue-up. Trim the dowels flush to the outside surfaces after the glue has dried. But before you can glue up your corners, 20 of the pieces need to be shorter than the others to form the fingers. You can trim them to size on the band saw, or you can set up a jig and use your table saw (see photo, page 78). Corner Glue-up My ingredients for this operation were: V4" registration dowels, a flux brush, cup of water, polyure-thane glue, paper towels. And if you don't already own gloves, get some. I went macho-gloveless for the first corner glue-up and ended up with Incredible Hulk hands. Nothing but time releases polyure-thane glue from your skin. Before applying any glue, I placed the segments on a dampened paper towel, let them sit for a few minutes, and then flipped them. Baltic birch plywood is pretty inert stuff and the moisture absorbed from the paper towel helps to activate the glue. Brush a liberal amount of glue on both sides of the five short and four long bends. Next stack them alternately on the dowels. When the sandwich is complete, apply a few clamps. Almost instantly, you'll have a big foamy mess of glue squeeze-out. Don't be tempted to tidy things up by wiping the foam with one of your paper towels. Doing so will lead to the sanding that you avoided by pattern routing. Be patient, let it dry, and then cleanly slice it away with a scraper. Dado Sledding I made a simple table saw sled for the dado cuts in the "legs" and table halves. Although it seems counterintuitive, I don't recommend using a dado stack to make the notches. Because the thickness of plywood varies slightly within a single sheet, I found it best to trace the fingers of the bends on the straight sections and then nibble away the waste with a 76 Popular Woodworking August 2006 |


