Popular Woodworking 2006-11 № 158, страница 10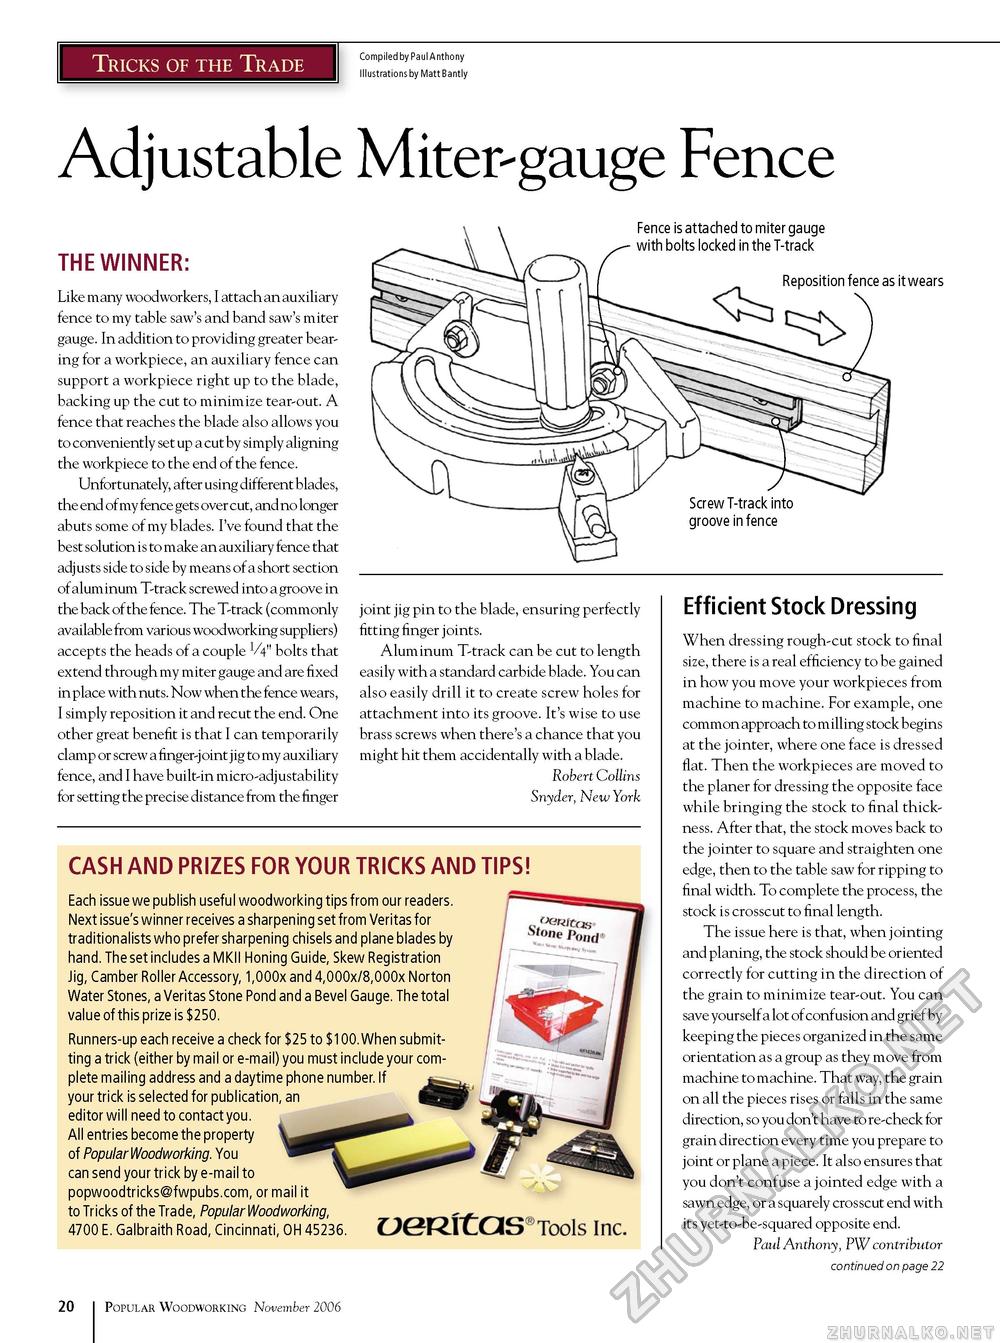
Tricks of the Trade Compiled by Paul Anthony Illustrations by Matt Bantly Adjustable Miter-gauge Fence THE WINNER: Like many woodworkers, I attach an auxiliary fence to my table saw's and band saw's miter gauge. In addition to providing greater bearing for a workpiece, an auxiliary fence can support a workpiece right up to the blade, backing up the cut to minimize tear-out. A fence that reaches the blade also allows you to conveniently set up a cut by simply aligning the workpiece to the end of the fence. Unfortunately, after using different blades, the end of my fence gets over cut, and no longer abuts some of my blades. I've found that the best solution is to make an auxiliary fence that adjusts side to side by means of a short section of alum inum T-track screwed into a groove in the back of the fence. The T-track (commonly available from various woodworking suppliers) accepts the heads of a couple V4" bolts that extend through my miter gauge and are fixed in place with nuts. Now when the fence wears, I simply reposition it and recut the end. One other great benefit is that I can temporarily clamp or screw a finger-j oint j ig to my auxiliary fence, and I have built-in micro-adjustability for setting the precise distance from the finger Fence is attached to miter gauge with bolts locked in the T-track Reposition fence as it wears joint jig pin to the blade, ensuring perfectly fitting finger joints. Aluminum T-track can be cut to length easily with a standard carbide blade. You can also easily drill it to create screw holes for attachment into its groove. It's wise to use brass screws when there's a chance that you might hit them accidentally with a blade. Robert Collins Snyder, New York CASH AND PRIZES FOR YOUR TRICKS AND TIPS! Each issue we publish useful woodworking tips from our readers. Next issue's winner receives a sharpening set from Veritas for traditionalists who prefer sharpening chisels and plane blades by hand. The set includes a MKII Honing Guide, Skew Registration Jig, Camber Roller Accessory, 1,000x and 4,000x/8,000x Norton Water Stones, a Veritas Stone Pond and a Bevel Gauge. The total value of this prize is $250. Runners-up each receive a check for $25 to $100. When submitting a trick (either by mail or e-mail) you must include your complete mailing address and a daytime phone number. If f-your trick is selected for publication, an ^ editor will need to contactyou. All entries become the property of PopularWoodworking. You can send your trick by e-mail to popwoodtricks@fwpubs.com, or mail it to Tricks of the Trade, Popular Woodworking, 4700 E. Galbraith Road, Cincinnati, OH 45236. DGTZlCOS £ C 'Tools Inc. Efficient Stock Dressing When dressing rough-cut stock to final size, there is a real efficiency to be gained in how you move your workpieces from machine to machine. For example, one common approach to milling stock begins at the jointer, where one face is dressed flat. Then the workpieces are moved to the planer for dressing the opposite face while bringing the stock to final thickness. After that, the stock moves back to the jointer to square and straighten one edge, then to the table saw for ripping to final width. To complete the process, the stock is crosscut to final length. The issue here is that, when jointing and planing, the stock should be oriented correctly for cutting in the direction of the grain to minimize tear-out. You can save yourself a lot of confusion and grief by keeping the pieces organized in the same orientation as a group as they move from machine to machine. That way, the grain on all the pieces rises or falls in the same direction, so you don't have to re-check for grain direction every time you prepare to joint or plane a piece. It also ensures that you don't confuse a jointed edge with a sawn edge, or a squarely crosscut end with its yet-to-be-squared opposite end. Paul Anthony, PW contributor continued on page 22 20 Popular Woodworking November 2006 |


