Popular Woodworking 2007-12 № 166, страница 56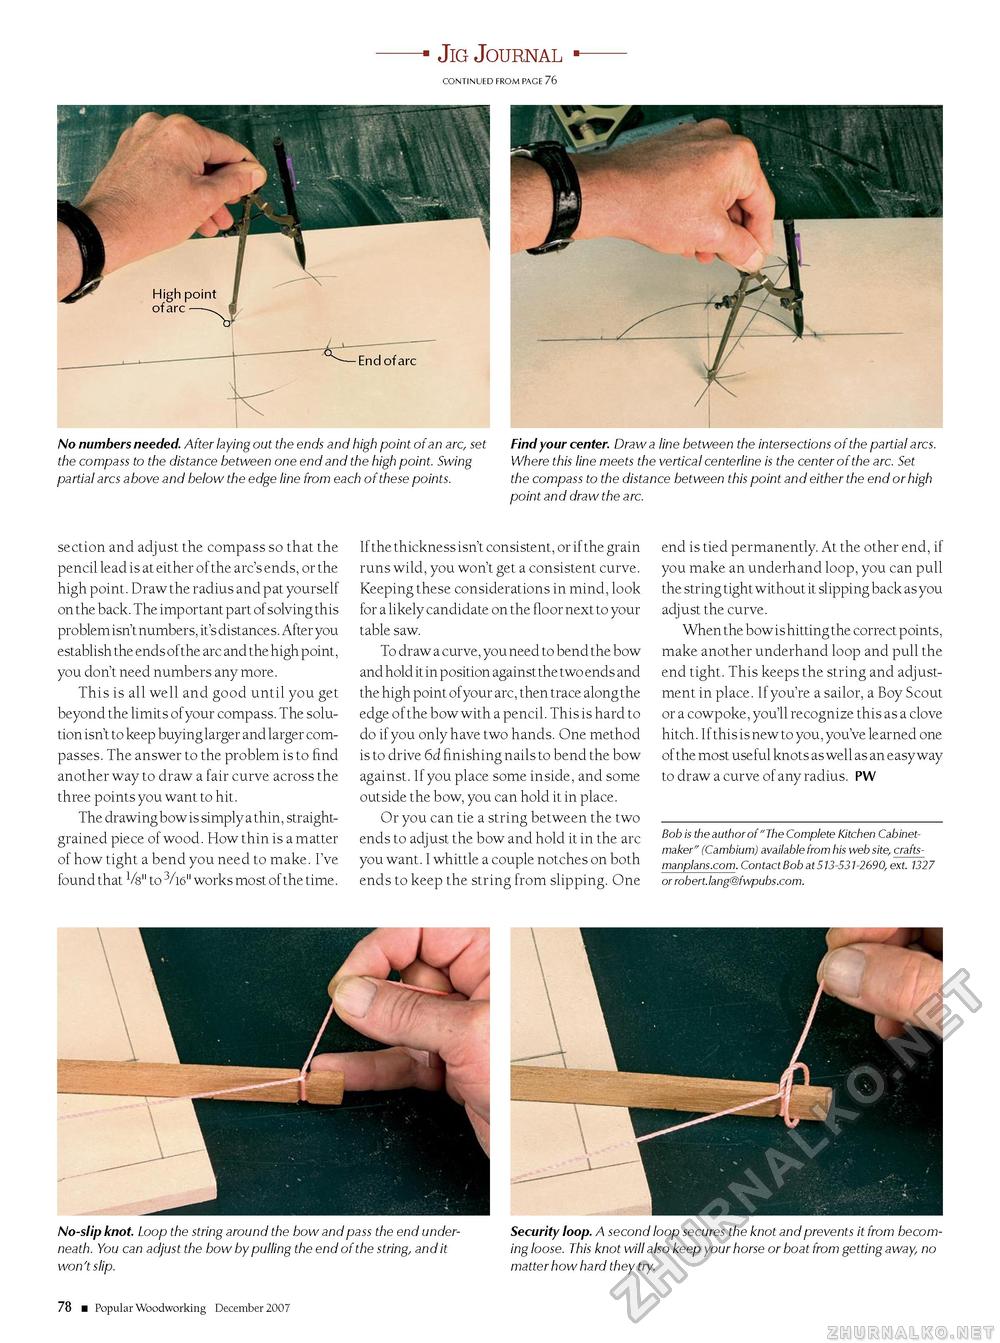
Jig Journal CONTINUED FROM PAGE 76 No numbers needed. After laying out the ends and high point of an arc, set the compass to the distance between one end and the high point. Swing partial arcs above and below the edge line from each of these points. Find your center. Draw a line between the intersections of the partial arcs. Where this line meets the vertical centerline is the center of the arc. Set the compass to the distance between this point and either the end or high point and draw the arc. section and adjust the compass so that the pencil lead is at either of the arc's ends, or the high point. Draw the radius and pat yourself on the back. The important part of solving this problem isn't numbers, it's distances. After you establish the ends ofthe arc and the high point, you don't need numbers any more. This is all well and good until you get beyond the limits of your compass. The solution isn't to keep buying larger and larger compasses. The answer to the problem is to find another way to draw a fair curve across the three points you want to hit. The drawing bow is simply a thin, straight-grained piece of wood. How thin is a matter of how tight a bend you need to make. I've found that Vs" to 3/16" works most of the time. If the thickness isn't consistent, or if the grain runs wild, you won't get a consistent curve. Keeping these considerations in mind, look for a likely candidate on the floor next to your table saw. To draw a curve, you need to bend the bow and hold it in p osition against the two ends and the high point ofyour arc, then trace along the edge of the bow with a pencil. This is hard to do if you only have two hands. One method is to drive 6d finishing nails to bend the bow against. If you place some inside, and some outside the bow, you can hold it in place. Or you can tie a string between the two ends to adjust the bow and hold it in the arc you want. I whittle a couple notches on both ends to keep the string from slipping. One end is tied permanently. At the other end, if you make an underhand loop, you can pull the string tight without it slipping back as you adjust the curve. When the bow is hitting the correct points, make another underhand loop and pull the end tight. This keeps the string and adjustment in place. If you're a sailor, a Boy Scout or a cowpoke, you'll recognize this as a clove hitch. If this is new to you, you've learned one of the most useful knots as well as an easy way to draw a curve of any radius. PW Bob is the author of "The Complete Kitchen Cabinetmaker" (Cambium) available from his web site, crafts-manplans.com. Contact Bob at 513-531-2690, ext. 1327 or robert.lang@fwpubs.com. No-slip knot. Loop the string around the bow and pass the end underneath. You can adjust the bow by pulling the end of the string, and it won't slip. Security loop. A second loop secures the knot and prevents it from becoming loose. This knot will also keep your horse or boat from getting away, no matter how hard they try. 78 Popular Woodworking December 2007 ■ |


