Popular Woodworking 2008-06 № 169, страница 59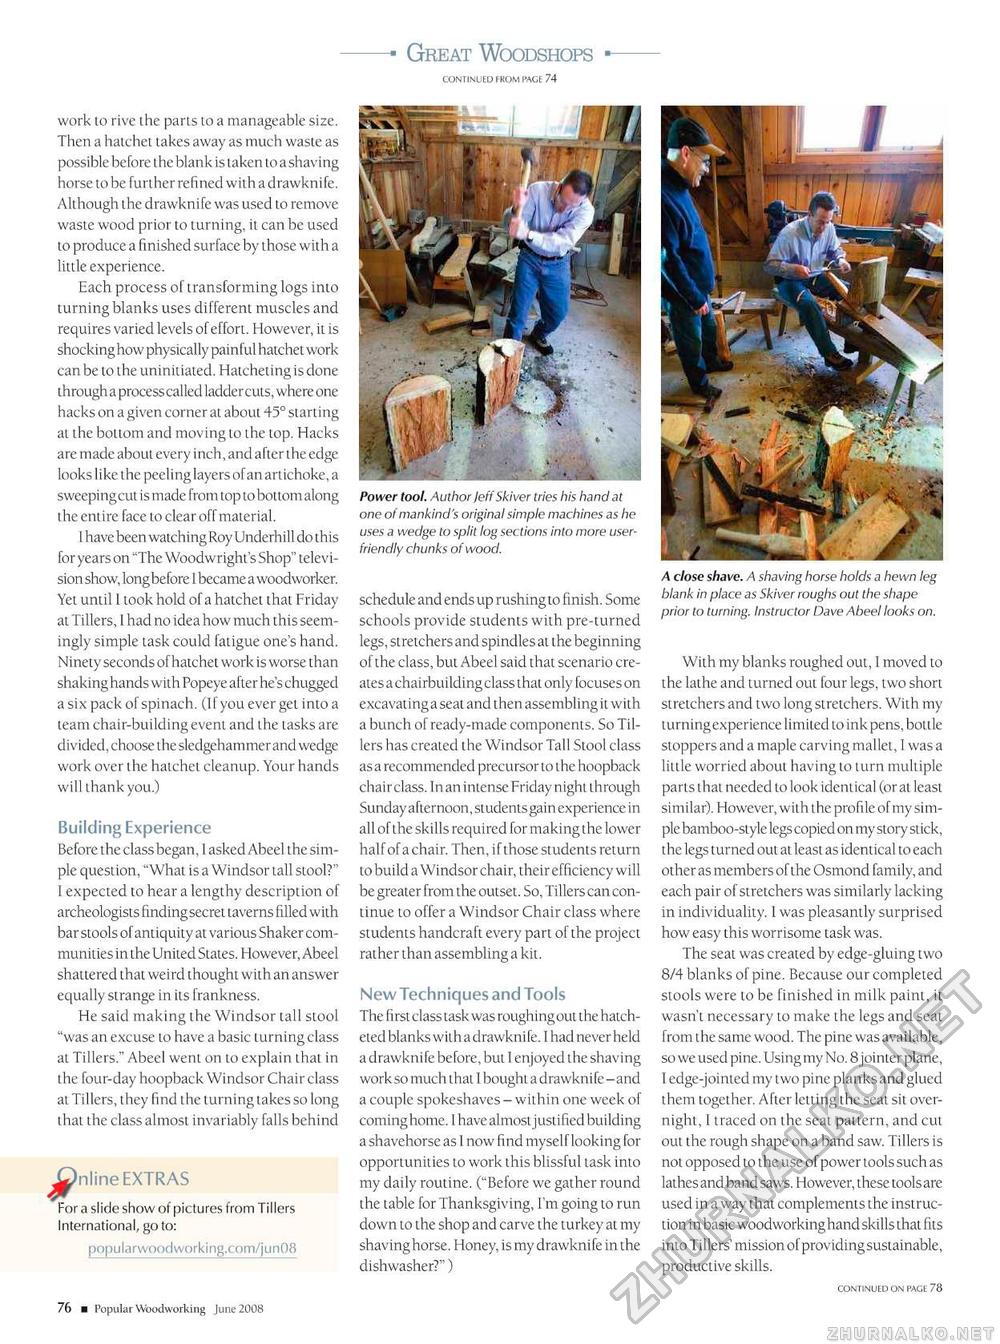
1 Great Woodshops 1 work to rive the parts to a manageable size. Then a hatchet takes away as much waste as possible before the blank is taken to a shaving horse to be further refined with a drawkni fe. Although the drawkni fe was used to remove waste wood prior to turning, it can be used to produce a finished surface by those with a little experience. Each process of transforming logs into turning blanks uses different muscles and requires varied levels of effort. However, it is shocking how physically painful hatchet work can be to the uninitiated. Hatcheting is done through a processcalled laddercuts, where one hacks on a given corner at about 45° starting at the bottom and moving to the top. Hacks are made about every inch, and after the edge looks like the peeling layers of an artichoke, a sweeping cut is made from top to bottom along the entire face to clear off material. I have been watching Roy Underhill do this foryears on "The Woodwright's Shop" television show, longbefore 1 became a woodworker. Yet until I took hold of a hatchet that Friday at Tillers, I had no idea how much this seemingly simple task could fatigue one's hand. Ninety seconds of hatchet work is worse than shaking hands with Popeye after he's chugged a six pack of spinach. (Ifyou ever get into a team chair-building event and the tasks are divided, choose the sledgehammerand wedge work over the hatchet cleanup. Your hands will thank you.) Building Experience Before the class began, 1 asked Abeel the simple question, "What is a Windsor tall stool?" 1 expected to hear a lengthy description of archeologists finding secret taverns filled with bar stools of antiquity at various Shaker communities in the United States. However, Abeel shattered that weird thought with an answer equally strange in its frankness. He said making the Windsor tall stool "was an excuse to have a basic turning class at Tillers." Abeel went on to explain that in the four-day hoopback Windsor Chair class at Tillers, they find the turning takes so long that the class almost invariably falls behind For a slide show of pictures from Tillers International, go to: popularwoodworking.com/jun08 12 ■ Popular Woodworking June 2008 Power tool. Author Jeff Skiver tries his hand at one of mankind's original simple machines as he uses a wedge to split log sections into n friendly chunks of wood. schedule and ends up rushing to finish. Some schools provide students with pre-turned legs, stretchers and spindles at the beginning of the class, but Abeel said that scenario creates a chairbuilding class that only focuses on excavatinga seat and then assembling it with a bunch of ready-made components. So Tillers has created the Windsor Tall Stool class as a recommended precursor to the hoopback chairclass. Inan intense Friday night through Sunday afternoon, students gain experience in all of the skills required for making the lower half of a chair. Then, if those students return to build a Windsor chair, their efficiency will be greater from the outset. So, Tillers can continue to offer a Windsor Chair class where students handcraft every part of the project rather than assembling a kit. New Techniques and Tools The first class task was roughing out the hatch-eted blanks with adrawknife. I had never held a drawknife before, but I enjoyed the shaving work so much that I bought a drawknife - and a couple spokeshaves - within one week of coming home. I have almost justified building a shavehorse as 1 now find myself looking for opportunities to work this blissful task into my daily routine. ("Before we gather round the table for Thanksgiving, I'm going to run down to the shop and carve the turkey at my shaving horse. Honey, is my drawknife in the dishwasher?") A close shave. A shaving horse holds a hewn leg blank in place as Skiver roughs out the shape prior to turning. Instructor Dave Abeel looks on. With my blanks roughed out, 1 moved to the lathe and turned out four legs, two short stretchers and two long stretchers. With my turning experience limited to ink pens, bottle stoppers and a maple carving mallet, I was a little worried about having to turn multiple parts that needed to look identical (or at least similar). However, with the profile of my simple bamboo-style legs copied on my story stick, the legs turned out at least as identical to each other as members of the Osmond family, and each pair of stretchers was similarly lacking in individuality. I was pleasantly surprised how easy this worrisome task was. The seat was created by edge-gluing two 8/4 blanks of pine. Because our completed stools were to be finished in milk paint, it wasn't necessary to make the legs and seat from the same wood. The pine was available, so we used pine. Using my No. 8jointer plane, I edge-jointed my two pine planks and glued them together. After letting the seat sit overnight, I traced on the seat pattern, and cut out the rough shape on a band saw. Tillers is not opposed to the use of power tools such as lathes and band saws. However, these tools are used in a way that complements the instruction in basic woodworking hand skills that fits into Tillers' mission of providing sustainable, productive skills. |


