Popular Woodworking 2008-11 № 172, страница 55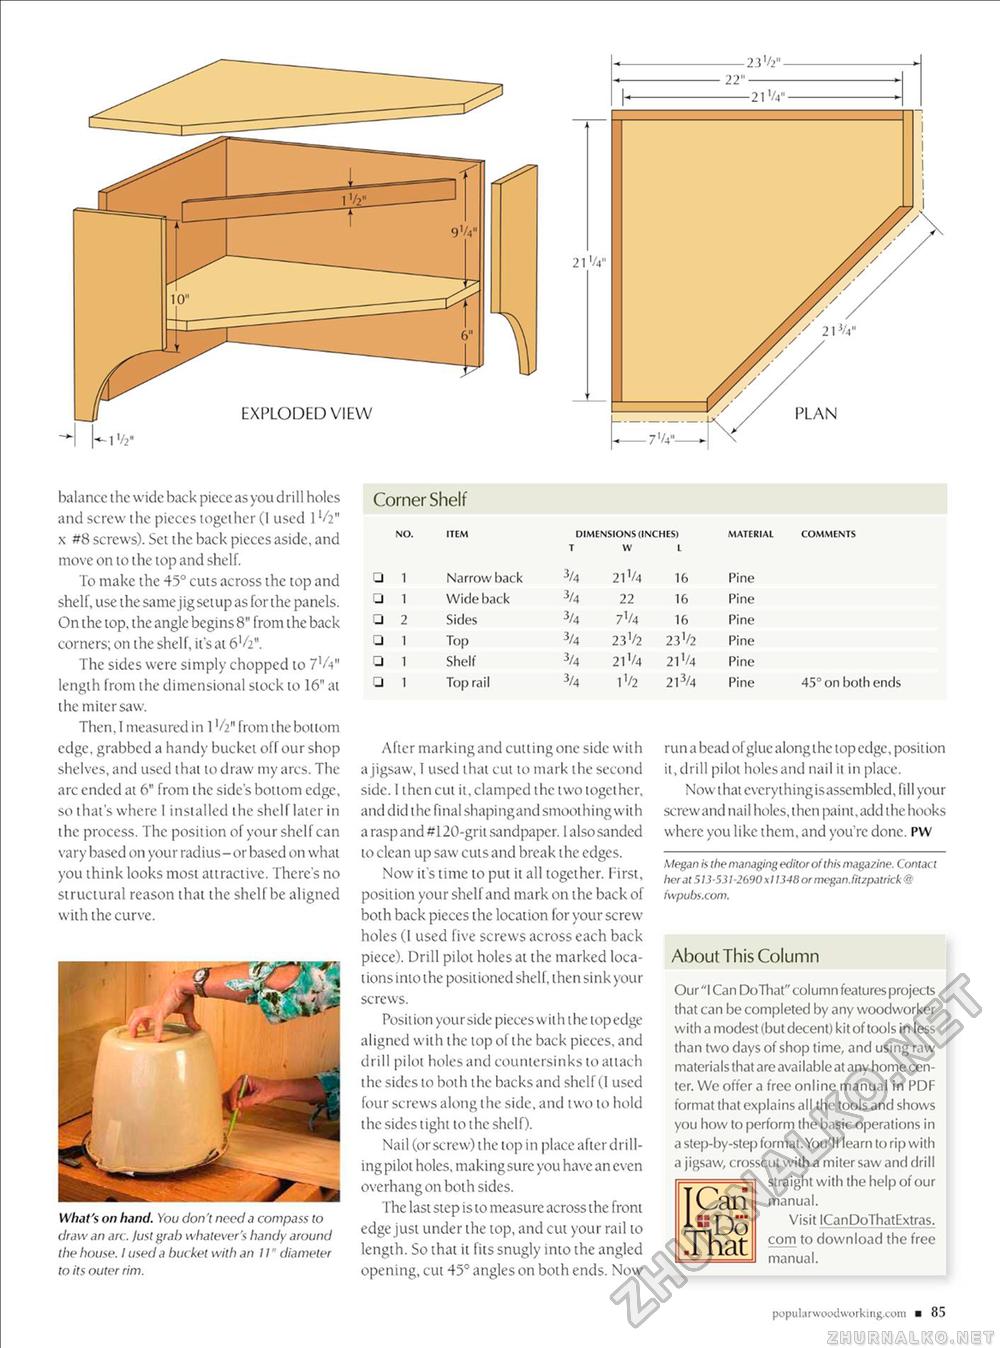
2 1 '4 i /a" balance ihe wide back piece as you drill holes and screw ihe pieces together (I used 11/2" x #8 screws). Set ihe back pieces aside, and move on to the lop and shelf. To make the 45° cuis across ihe lop and shelf, use ihe samejigsetup as for the panels. On ihe lop, ihe angle begins 8" from ihe back corners; on ihe shelf, it's at 6'/i". The sides were simply chopped to 7V4" length from the dimensional stock to 16" at the miter saw. Then. I measured in 1V2" from the bottom edge, grabbed a handy bucket off our shop shelves, and used that to draw my arcs. The arc ended at 6" from the side's bottom edge, so that's where I installed the shelf later in the process. The position of your shelf can vary based on your radius-or based on whai you think looks most attractive. There's no structural reason thai ihe shelf be aligned wiih ihe curve. Corner Shelf What's on hand. You don't need a compass to draw an arc. lust grab whalever's handy around the house. I used a bucket with an 1 /" diameter to its outer rim.
After markingand culling one side with a jigsaw, 1 used that cut to mark the second side. I then cut it. clamped the two together, and did the final shapingand smoothing with a rasp and #120-grit sandpaper. 1 also sanded to clean up saw cuts and break the edges. Now it's time to put it all together, first, position your shelf and mark on the back of boih back pieces ihe location for your screw-holes (I used five screws across each back piece). Drill pilot holes at the marked locations into the positioned shelf, then sink your screws. Position your side pieces with the top edge aligned wiih the top of the back pieces, and drill pilot holes and countersinks to attach the sides to both the backs and shelf (1 used four screws along the side, and two to hold the sides tight to the shelf). Nail (orscrew) the top in place after drilling piloi holes, making sure you have an even overhang on both sides. The last step is 10 measure across the front edge just under the top, and cut your rail to length. So that it fits snugly into the angled opening, cut 45° angles on both ends. Now run a bead of glue alonglhe topedge, position it,drill pilot holesand nail it in place. Now 1 hat every t hi ng isassembled, fill your screw and nail holes, then paint, add the hooks where you like them, and you're done. pw Megan is the managing editor of this magazine. Contact her at 513-531-2690xl 1348 or megan.fitzpatrick <® fwpubs.com. About This Column Our "I Can Do That" column features projects that can be completed by any woodworker with a modest (but decent) kit of tools in less than two days of shop time, and using raw materials that are available at any home center. We offer a free online manual in PDF format that explains all the tools and shows you how to perform the basic operations in a step-by-step format. You' 11 learn to rip with a jigsaw, crosscut with a miter saw and drill a straight with the help of our T Can manual. I SI JVisit ICanPolhatExtras. com to download the free an rfld0 .1 hat manual. PLAN popularwooclworking.com ■ 85 |
||||||||||||||||||||||||||||||||||||||||||||||||||||||||||||||||


