Popular Woodworking 2009-02 № 174, страница 20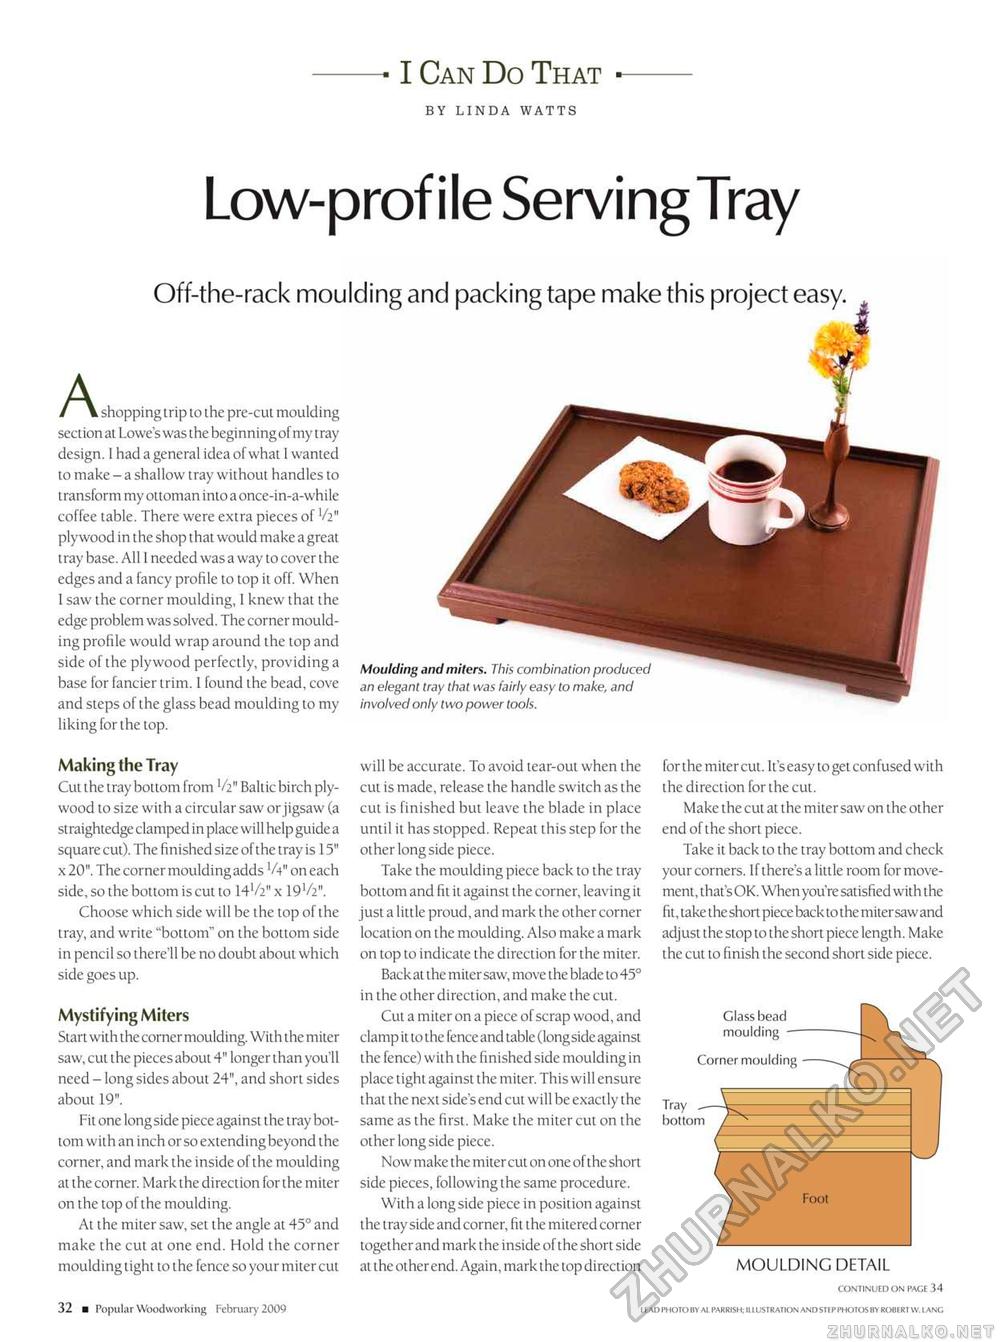
— I Can Do That — BY LINDA WATTS Low-profile Serving Tray Off-the-rack moulding and packing tape make this project easy. . A / \ shopping trip to the pre-cut moulding section at Lowe's was the beginning of my tray design. 1 had a general idea of what 1 wanted to make - a shallow tray without handles to transform my ottoman into a once-in-a-while coffee table. There were extra pieces of V2" plywood in the shop that would make a great tray base. All 1 needed was a way to cover the edges and a fancy profile to top it off. When I saw the corner moulding, I knew that the edge problem was solved. The corner moulding profile would wrap around the top and side of the plywood perfectly, providing a base for fancier trim. I found the bead, cove and steps of the glass bead moulding to my liking for the top. Moulding and miters. This combination produced an elegant tray that was fairly easy to make, and involved only two power tools. Making the Tray Cut the tray bottom from V2" Baltic birch plywood to size with a circular saw or jigsaw (a straightedge clamped in place will help guide a square cut). The finished size of the tray is 15" x 20". The corner moulding adds 'A" on each side, so the bottom is cut to 14'/2" x 19'/2n. Choose which side will be the top of the tray, and write "bottom" on the bottom side in pencil so there'll be no doubt about which side goes up. Mystifying Miters Start with the corner moulding. With the miter saw, cut the pieces about 4" longer than you'll need - long sides about 24", and short sides about 19". Fit one long side piece against the tray bottom with an inch or so extending beyond the corner, and mark the inside of the moulding at the corner. Mark the direction for the miter on the top of the moulding. At the miter saw, set the angle at 45° and make the cut at one end. Hold the corner moulding tight to the fence so your miter cut will be accurate. To avoid tear-out when the cut is made, release the handle switch as the cut is finished but leave the blade in place until it has stopped. Repeat this step for the other long side piece. Take the moulding piece back to the tray bottom and fit it against the corner, leaving it just a little proud, and mark the other corner location on the moulding. Also make a mark on top to indicate the direction for the miter. Backat the mitersaw, move the blade to45° in the other direction, and make the cut. Cut a miter on a piece of scrap wood, and clamp it to the fence and table (longside against the fence) with the finished side moulding in place tight against the miter. This will ensure that the next side's end cut will be exactly the same as the first. Make the miter cut on the other long side piece. Now make the miter cut on one of the short side pieces, following the same procedure. With a long side piece in position against the tray side and corner, fit the mitered corner together and mark the inside of the short side at the other end. Again, mark the top direction for the miter cut. It's easy to get confused with the direction for the cut. Make the cut at the miter saw on the other end of the short piece. Take it back to the tray bottom and check your corners. If there's a little room for movement, that's OK. When you're satisfied with the fit, take the short piece back to the mitersaw and adjust the stop to the short piece length. Make the cut to finish the second short side piece. MOULDING DETAIL Glass bead moulding I 32 ■ Popular Woodworking February 2009 |


