Popular Woodworking 2009-11 № 179, страница 21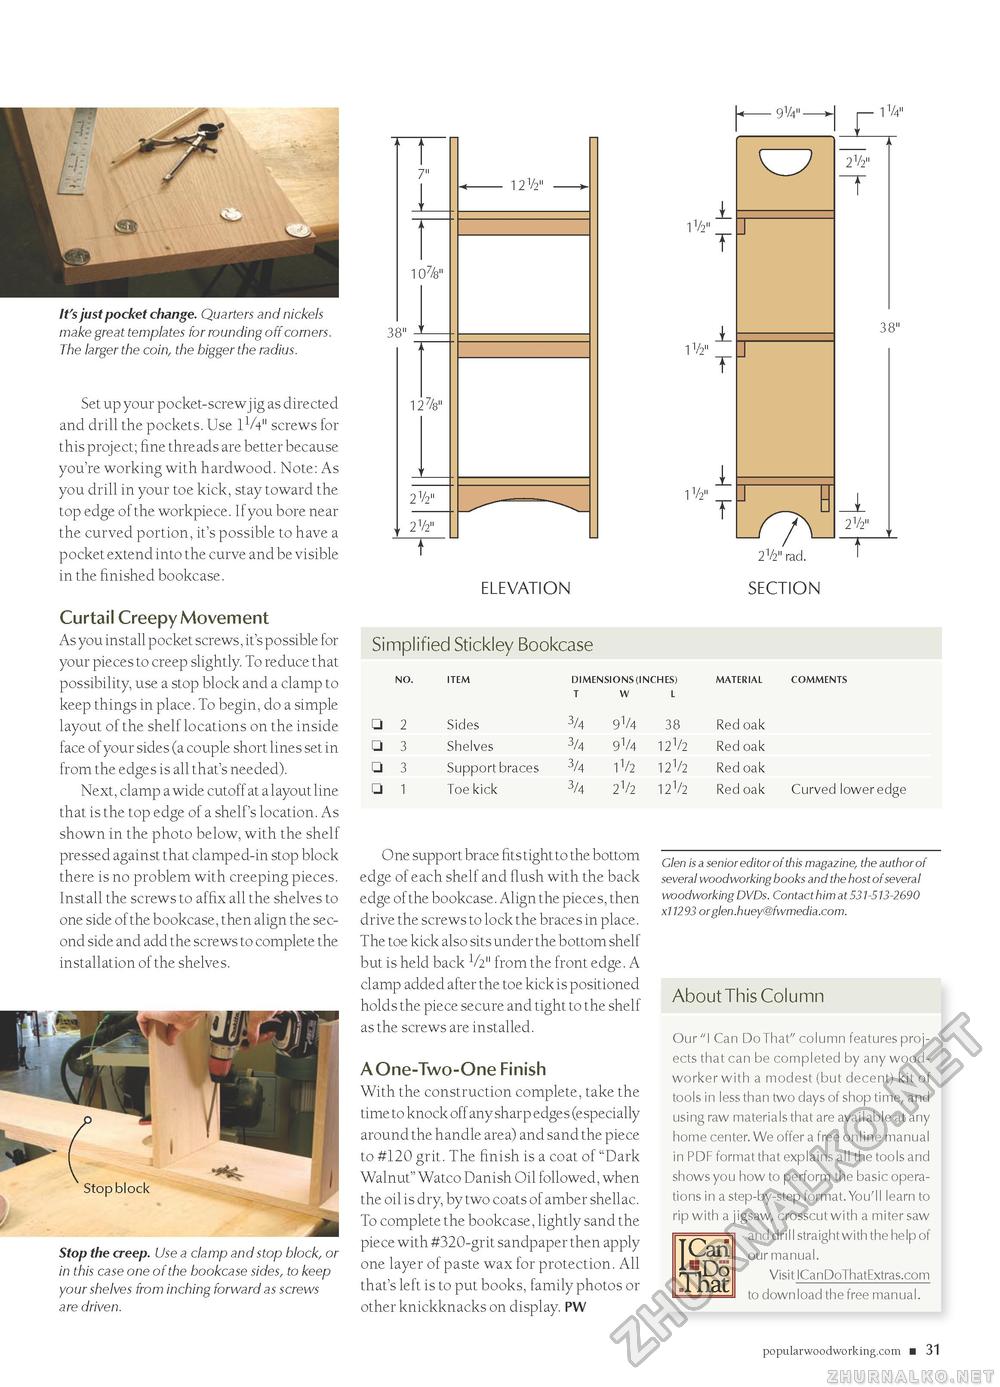
It's just pocket change. Quarters and nickels make great templates for rounding off corners. The larger the coin, the bigger the radius. Set up your pocket-screwjig as directed and drill the pockets. Use 11/4" screws for this project; fine threads are better because you're working with hardwood. Note: As you drill in your toe kick, stay toward the top edge of the workpiece. If you bore near the curved portion, it's possible to have a pocket extend into the curve and be visible in the finished bookcase. Curtail Creepy Movement As you install pocket screws, it's possible for your pieces to creep slightly. To reduce that possibility, use a stop block and a clamp to keep things in place. To begin, do a simple layout of the shelf locations on the inside face of your sides (a couple short lines set in from the edges is all that's needed). Next, clamp a wide cutoff at a layout line that is the top edge of a shelf's location. As shown in the photo below, with the shelf pressed against that clamped-in stop block there is no problem with creeping pieces. Install the screws to affix all the shelves to one side of the bookcase, then align the second side and add the screws to complete the installation of the shelves. Stop the creep. Use a clamp and stop block, or in this case one of the bookcase sides, to keep your shelves from inching forward as screws are driven. 7" 38" 12 7s" 2y2„ 212" 12V2" ELEVATION 1V4" 1V2" 1V2" 1V2" 2V2" rad. SECTION 2V2" T Simplified Stickley Bookcase
COMMENTS Red oak Red oak red oak red oak Curved lower edge One support brace fits tight to the bottom edge of each shelf and flush with the back edge of the bookcase. Align the pieces, then drive the screws to lock the braces in place. The toe kick also sits under the bottom shelf but is held back V211 from the front edge. A clamp added after the toe kick is positioned holds the piece secure and tight to the shelf as the screws are installed. A One-Two-One Finish With the construction complete, take the time to knock off any sharp edges (especially around the handle area) and sand the piece to #120 grit. The finish is a coat of "Dark Walnut" Watco Danish Oil followed, when the oil is dry, by two coats of amber shellac. To complete the bookcase, lightly sand the piece with #320-grit sandpaper then apply one layer of paste wax for protection. All that's left is to put books, family photos or other knickknacks on display. PW Glen is a senior editor of this magazine, the author of several woodworking books and the host of several woodworking DVDs. Contact him at 531-513-2690 x11293 orglen.huey@fwmedia.com. Our "I Can Do That" column features projects that can be completed by any woodworker with a modest (but decent) kit of tools in less than two days of shop time, and using raw materials that are available at any home center. We offer a free online manual in PDF format that explains all the tools and shows you how to perform the basic operations in a step-by-step format. You'll learn to rip with a jigsaw, crosscut with a miter saw and drill straight with the help of our manual. Visit ICanDoThatExtras.com to download the free manual. TCari ttPS That popularwoodworking.com ■ 31 |
||||||||||||||||||||||||||||||


